learning Angular
Notes from the course with Deborah Kurata in Pluralsight
https://github.com/deborahk/angular-gettingstarted
What is a Component?
Component =
- Template - View Layout - Created with HTML - Includes binding and directives
+ - Class with properties and methods - Code supporting the view - Created with typescript - Properties: data - Methods: logic
+ - Metadata aditional information
- Extra data for data
- Defined with a decorator

With Metadata we can create a Angular Component
app.component.ts
1 | {% raw %}import { Component } from '@angular/core'; |
Strong Typing
1 | {% raw %}pageTitle: string = 'Product List'; |
Interface: A Specification indentifying a related set of properties and methods.
A class commits to supporting the specification by implementing the interface.
Use the interface as a data type. Only for Typescript, so, only used in development
Ej
1 | {% raw %}export interface IProduct { |
So, you can use it like this
1 | {% raw %}import { IProduct } from './product'; |
Angular Module
AppModule- AppComponent
Templates, Interpolation and Directives
Binding
Coordinates comunication between the component’s class and its template and often involves passing data
1 | <img [src]="product.imageUrl" /> |
Two-way binding
1 | <input [(ngModel)]="listFilter" /> |
1 | {% raw %}export class ListComponent { |
Interpolation
1 | {% raw %} |
Directives
Structural Directives
1 | *ngIf="booleanSentence" |
Improving Components
- Strong typing and interfaces
- Encapsulating Styles
- Lifecycle hooks
- Custom pipes
- Nested Components
Strong Typing
The strong typing helps you to avoid errors with a checking tooling. The type is defined before the var name like the following.
1 | pageTitle: string = 'Product List'; |
The methods also have strong typing like this
1 | {% raw %} |
defining the input and output type format.
for more complex formats we can use any or create a interface. The Interface is a specification identifying a related set of properties and methods. A class commits to supporting the specification by implementing the interface.
Use the interface as a data type. So, is used only in development.
1 | {% raw %}export interface IProduct { |
Encapsulating Component Styles
You can add styles in the component or separate in a diferent file
1 | {% raw %} |
Component Lifecycle
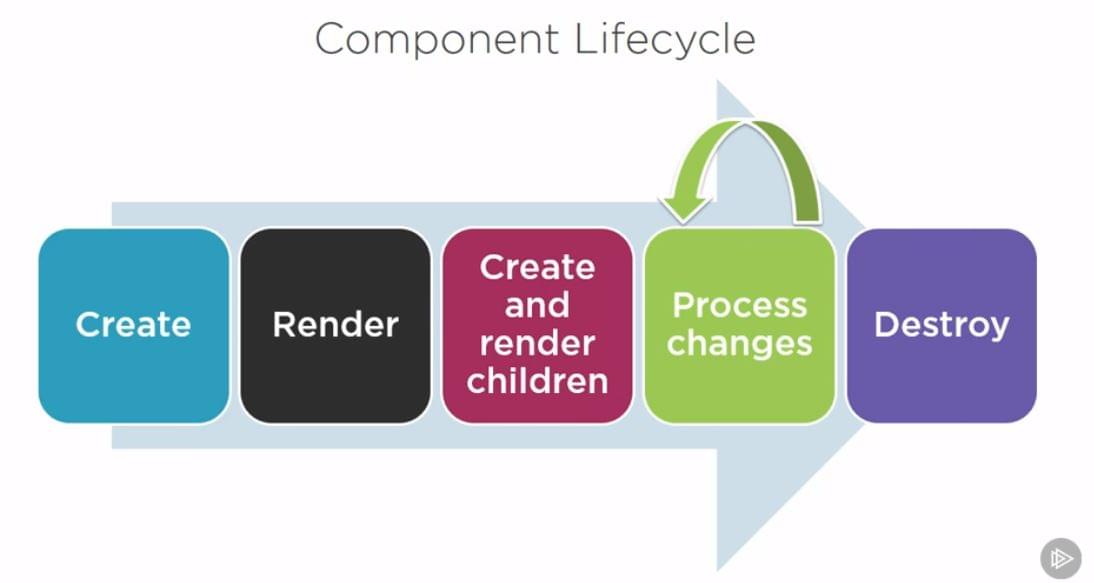
Component lifecycle hooks,
- OnInit -> Perform component inicialization, retrive data.
- OnChanges => Perform action after change to input properties
- OnDestroy => Perform cleanup
Transforming Data with Pipes
There are several pipes built-in in angular, like date, number and so on … the idea with this part is to build our own custom pipes to transform data.
1 | {% raw %}@Pipe({ |
Nested Components
Using a Component
- As a Directive
App Component OR Nested Component - As a Routing Target
Full page style view
What makes a Component Nest-able?
- Its template only manages a fragment of a larger view
- It has a selector
- it optionally communicates with its container
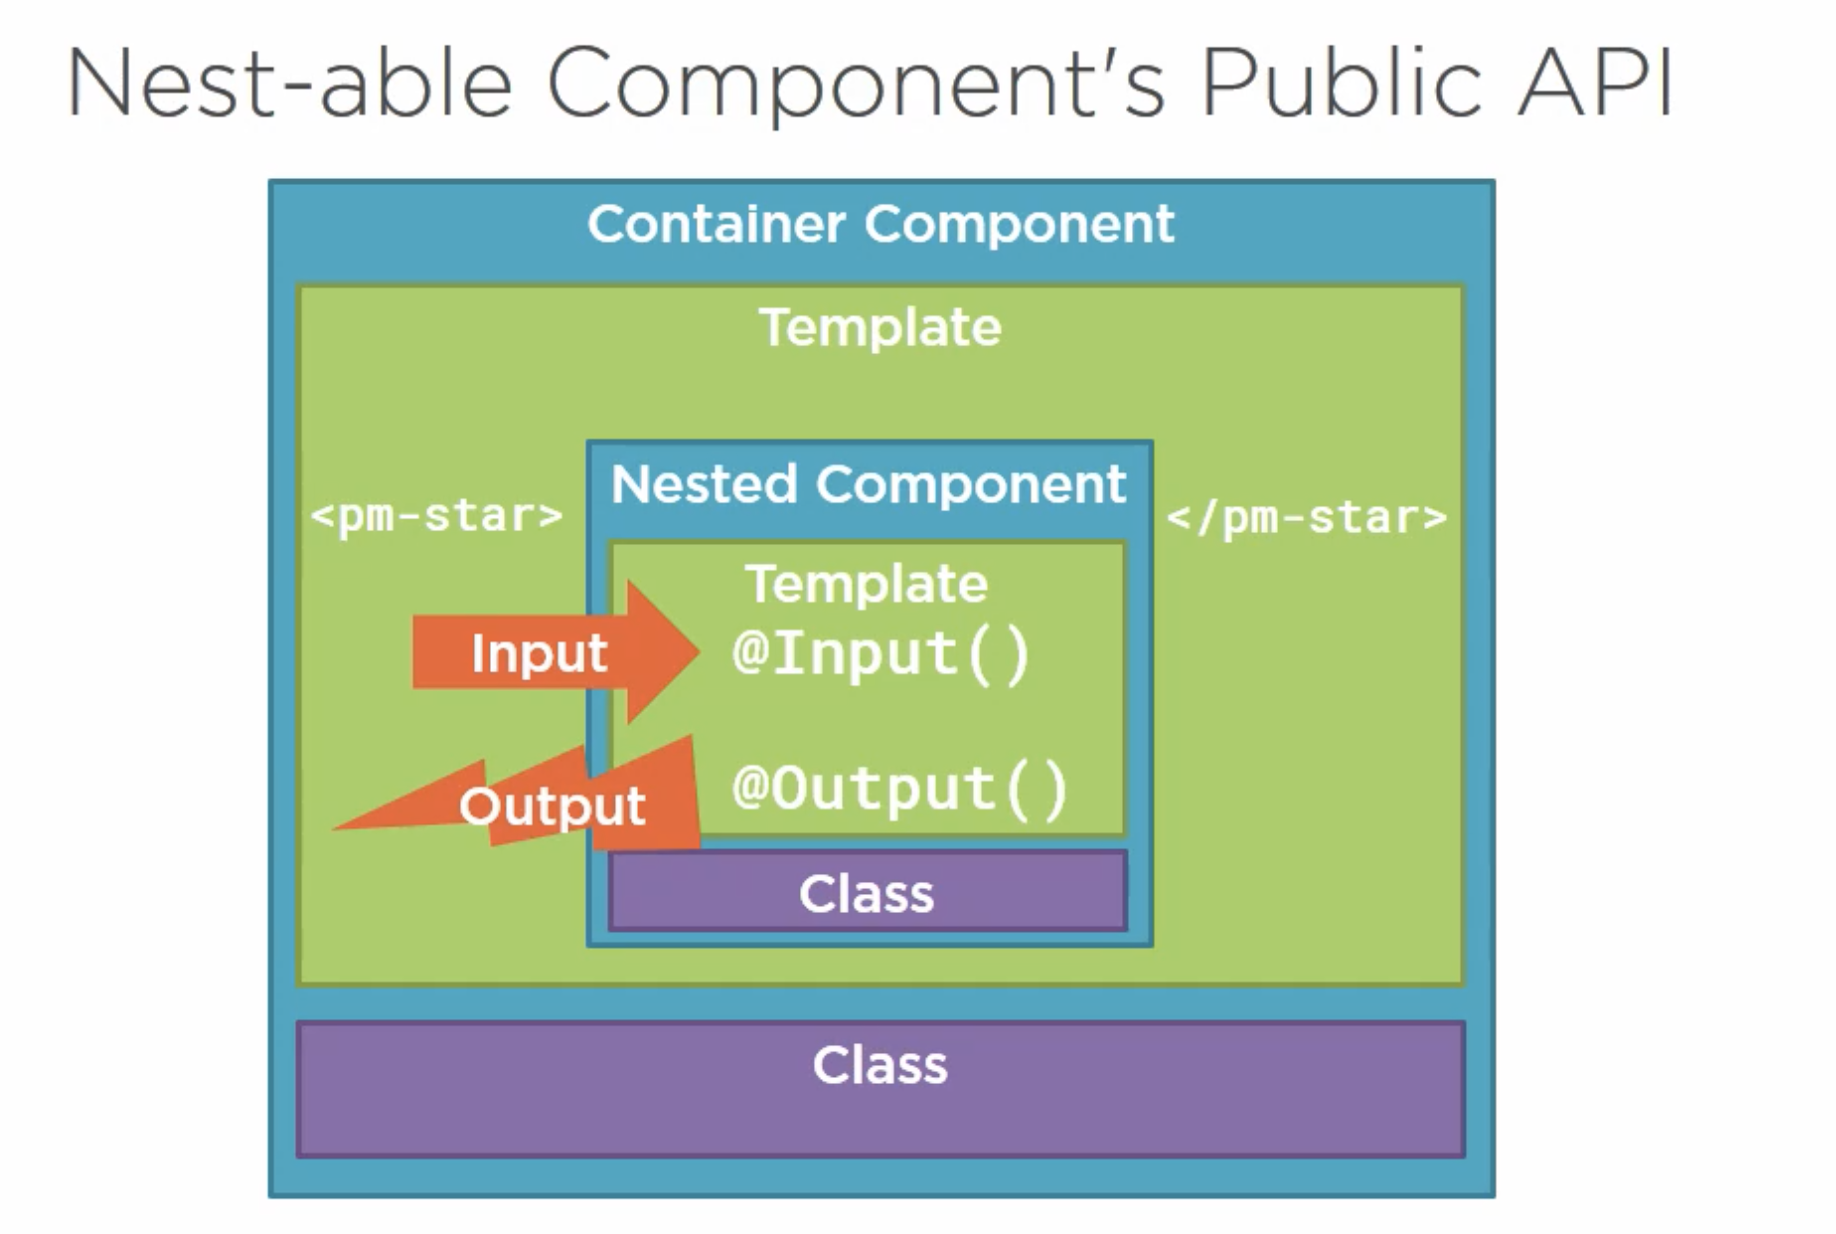
Building and Using a Nested Component
1 | {% raw %}import { Component, OnChanges } from '@angular/core'; |
And Using on product-list.component.html
1 | <td> |
Passing data to a Nested Component Using @input
1 | {% raw %}import { Component, OnChanges, Input } from '@angular/core'; |
And Using on product-list.component.html
1 | <td> |
Raising an Event from a Nested Component using @Output
Using a EventEmitter Events.
We create the property @Output called ratingClicked, then we create a HTML click event called onClick, and use the this.ratingClicked.emit() to send the message necesary.
1 | <div |
1 | {% raw %}import { Component, OnChanges, Input, Output, EventEmitter } from '@angular/core'; |
then, in the parent component we delegate the new incoming event ratingClicked in a new method call onRatingClicked($event)
1 | <pm-star |
Then, We just create that method in the ts file
1 | {% raw %}onRatingClicked(message: string ) : void { |
Services and Dependency Injection
Used to handle data or logic that is not associated with a specific view or that we whant to share across services.
Service
A class with a focused propose, Used for features that:
- Are independient from any particular component
- Provide shared data or logic across components
- Encapsulate external interactions
In Angular we use the Angular Injector, like a dependency injector.
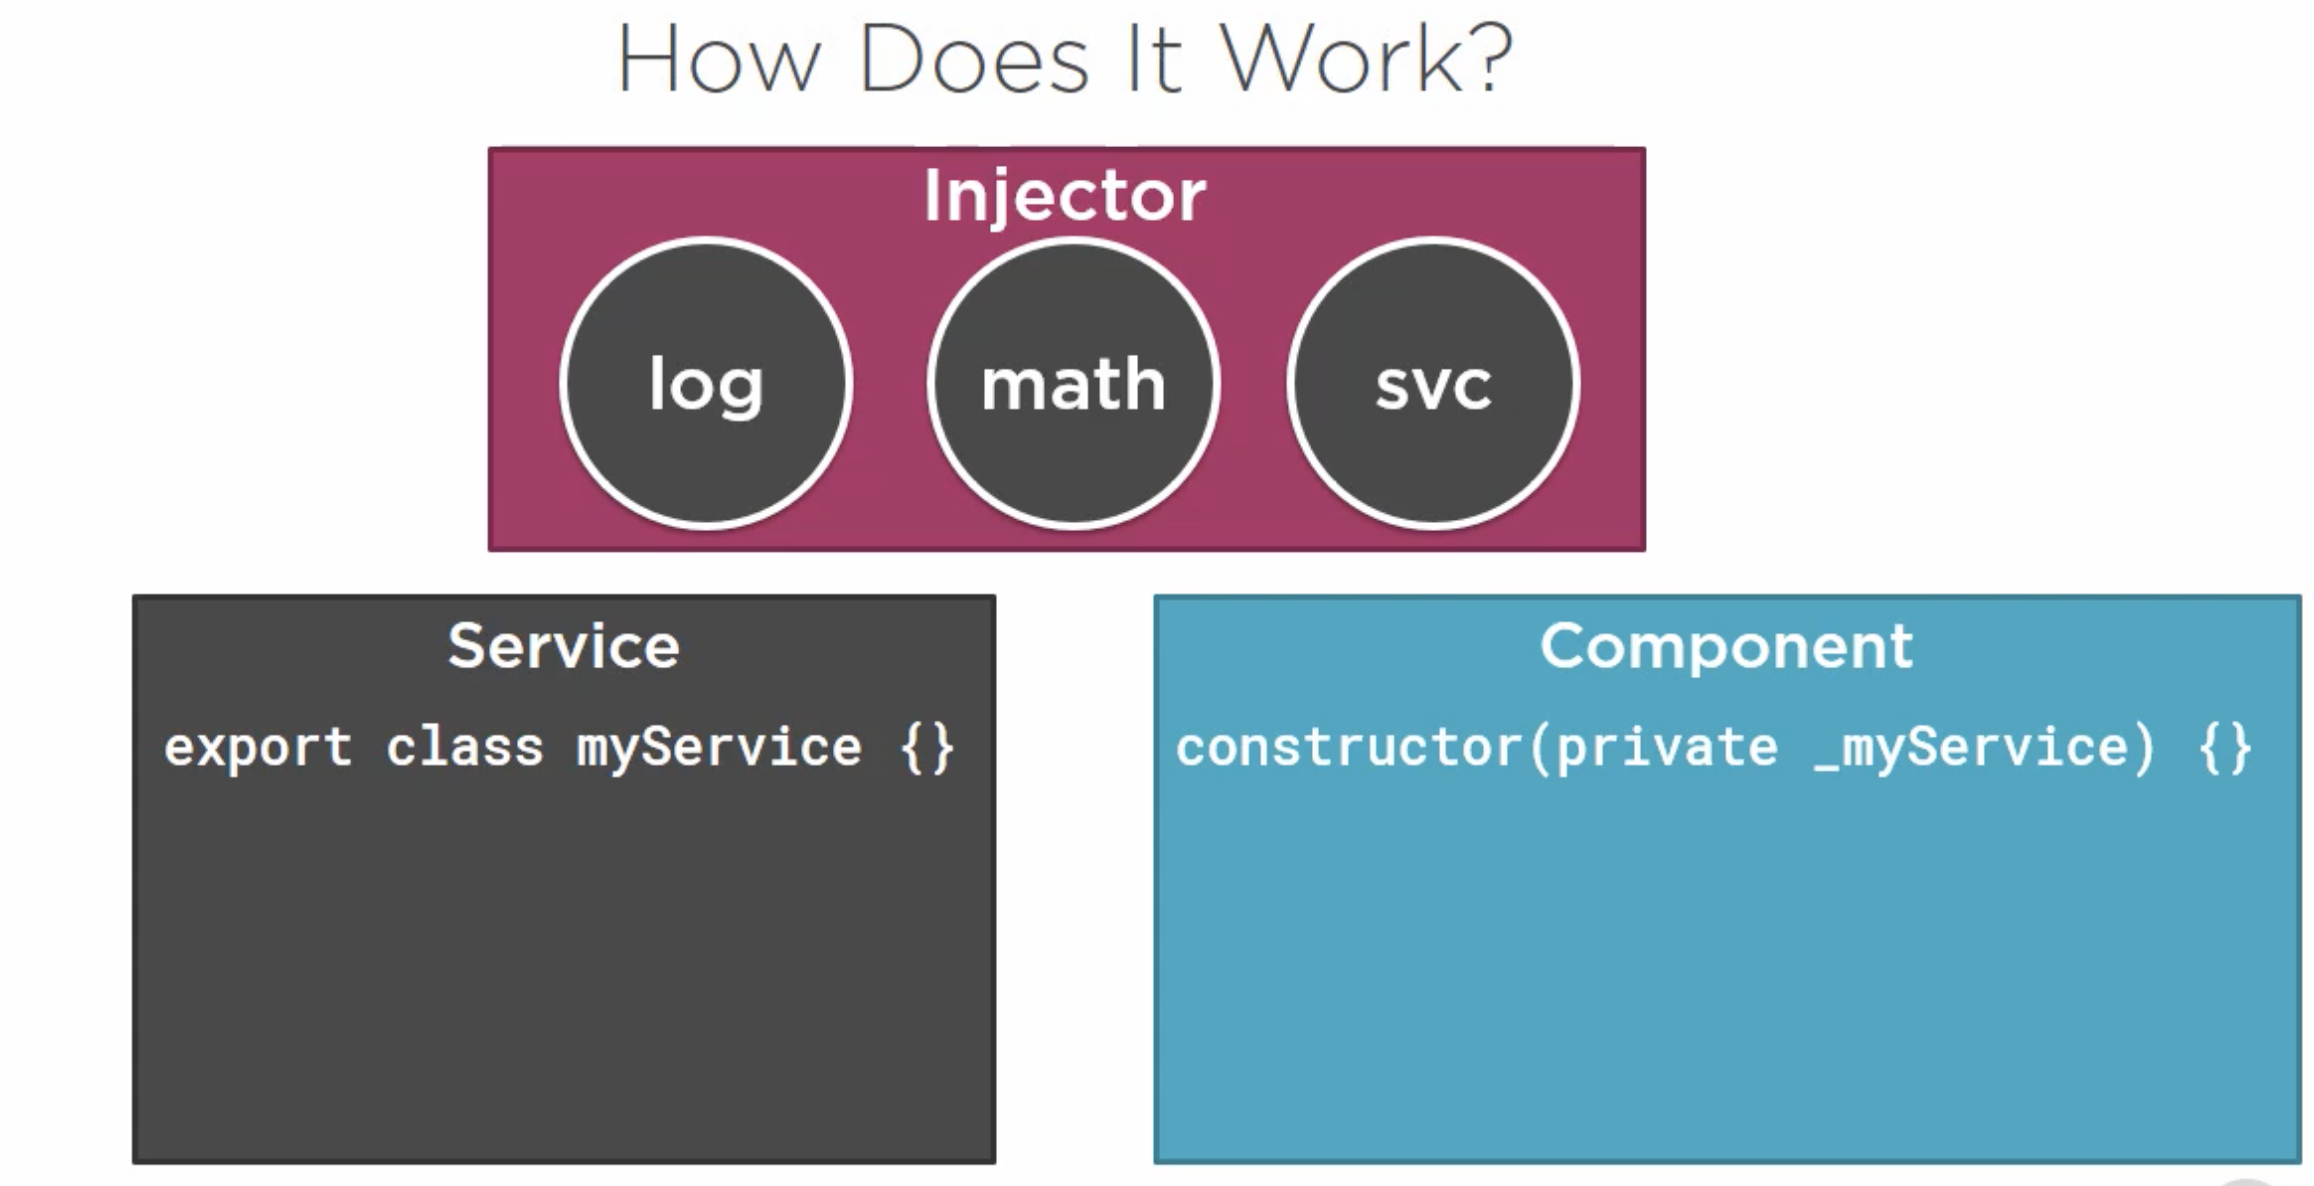
Dependency Injection: A coding pattern in which a class receives the instances of objects it needs (Called Dependencies) from an external source rather than creating them itself
Building a Service.
1 | {% raw %} |
Registering a Service
There are two ways:
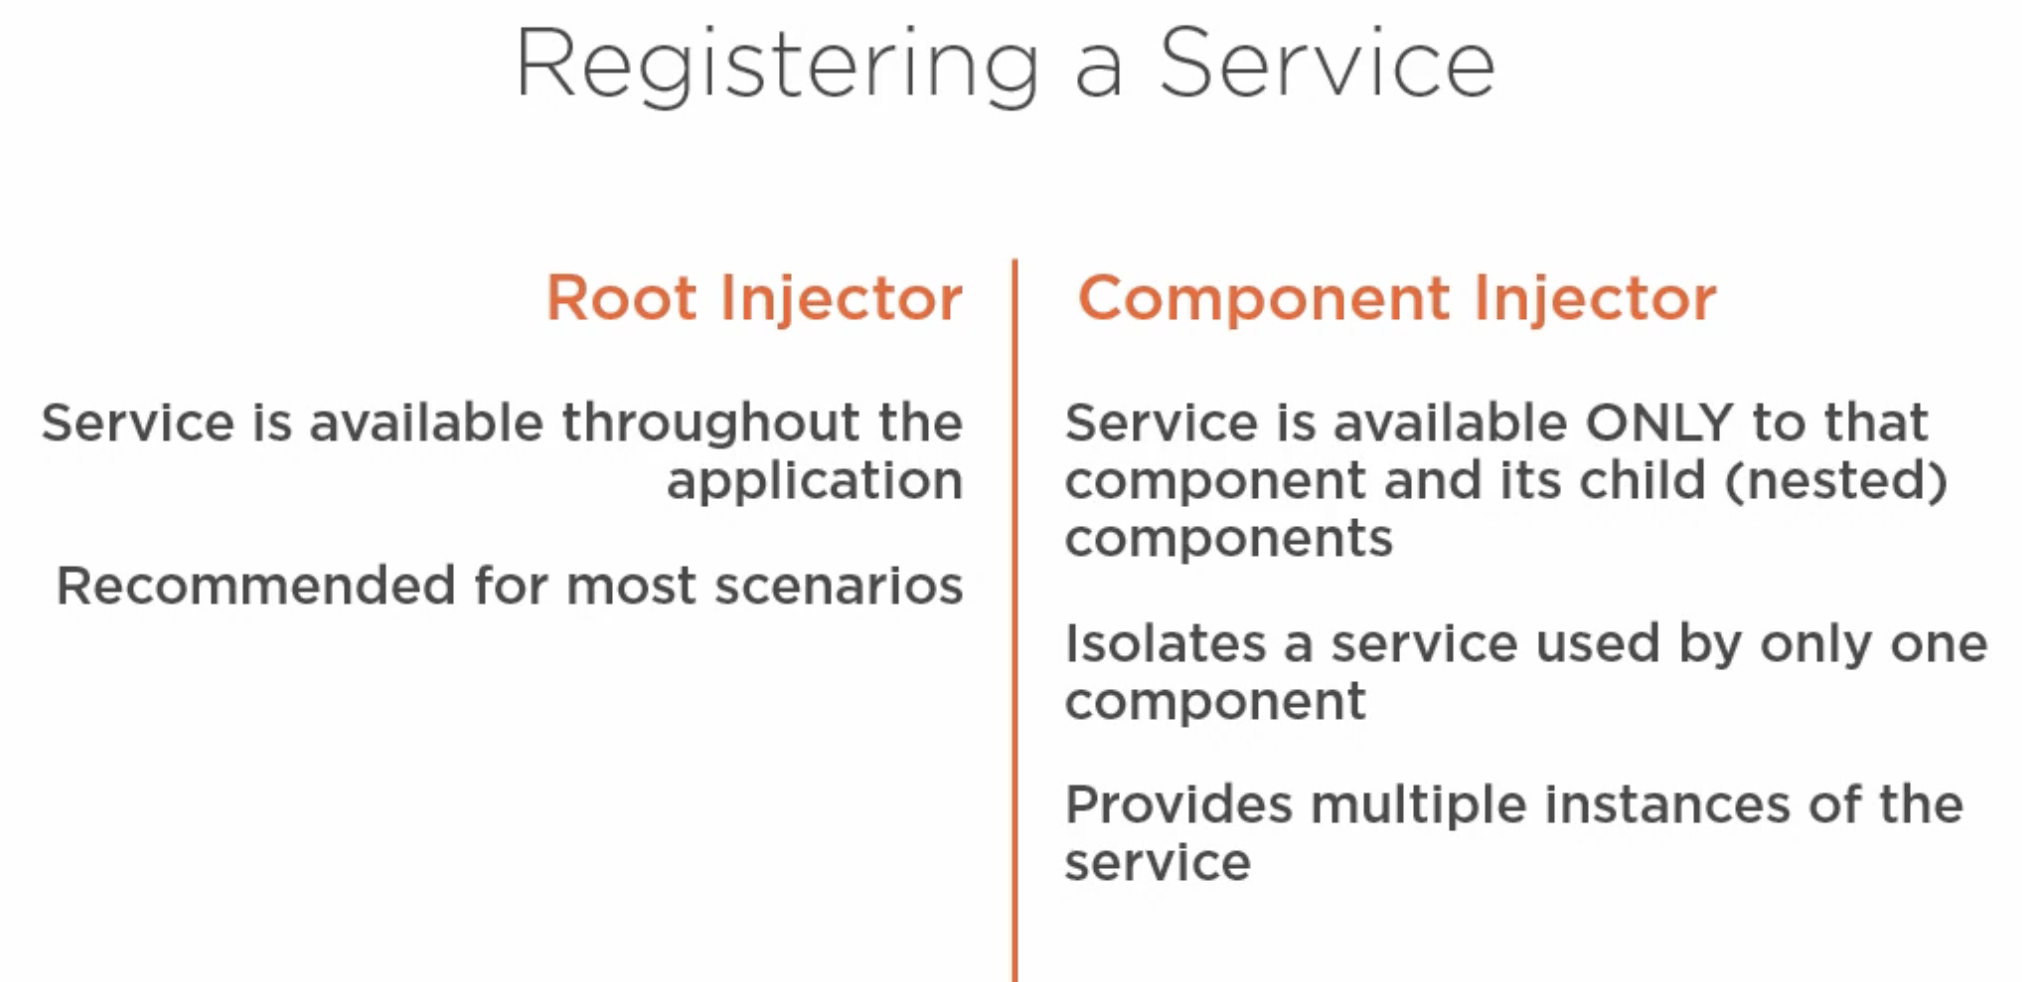
1 | {% raw %} |
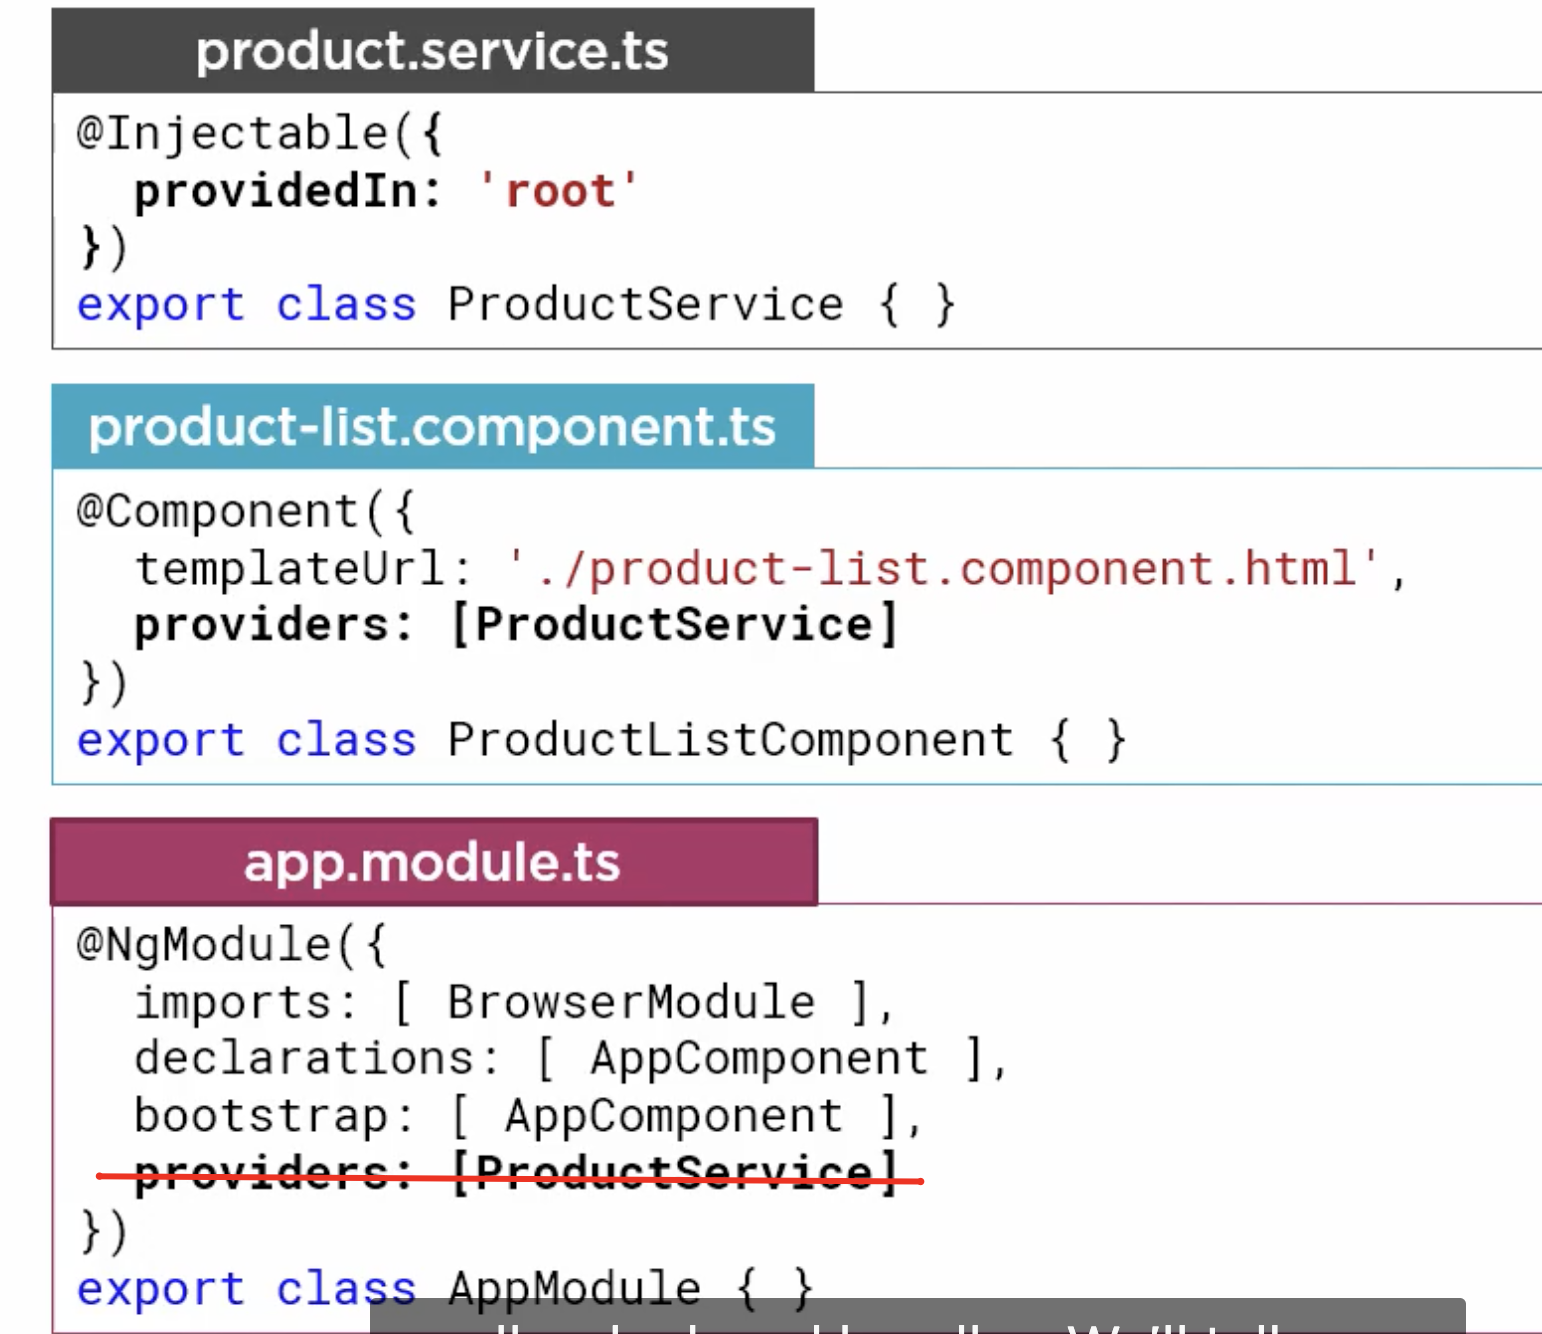
And then, we can use it in the component
1 | {% raw %} |
and then, you can use it
1 | {% raw %} |
Retrieving Data Using Http
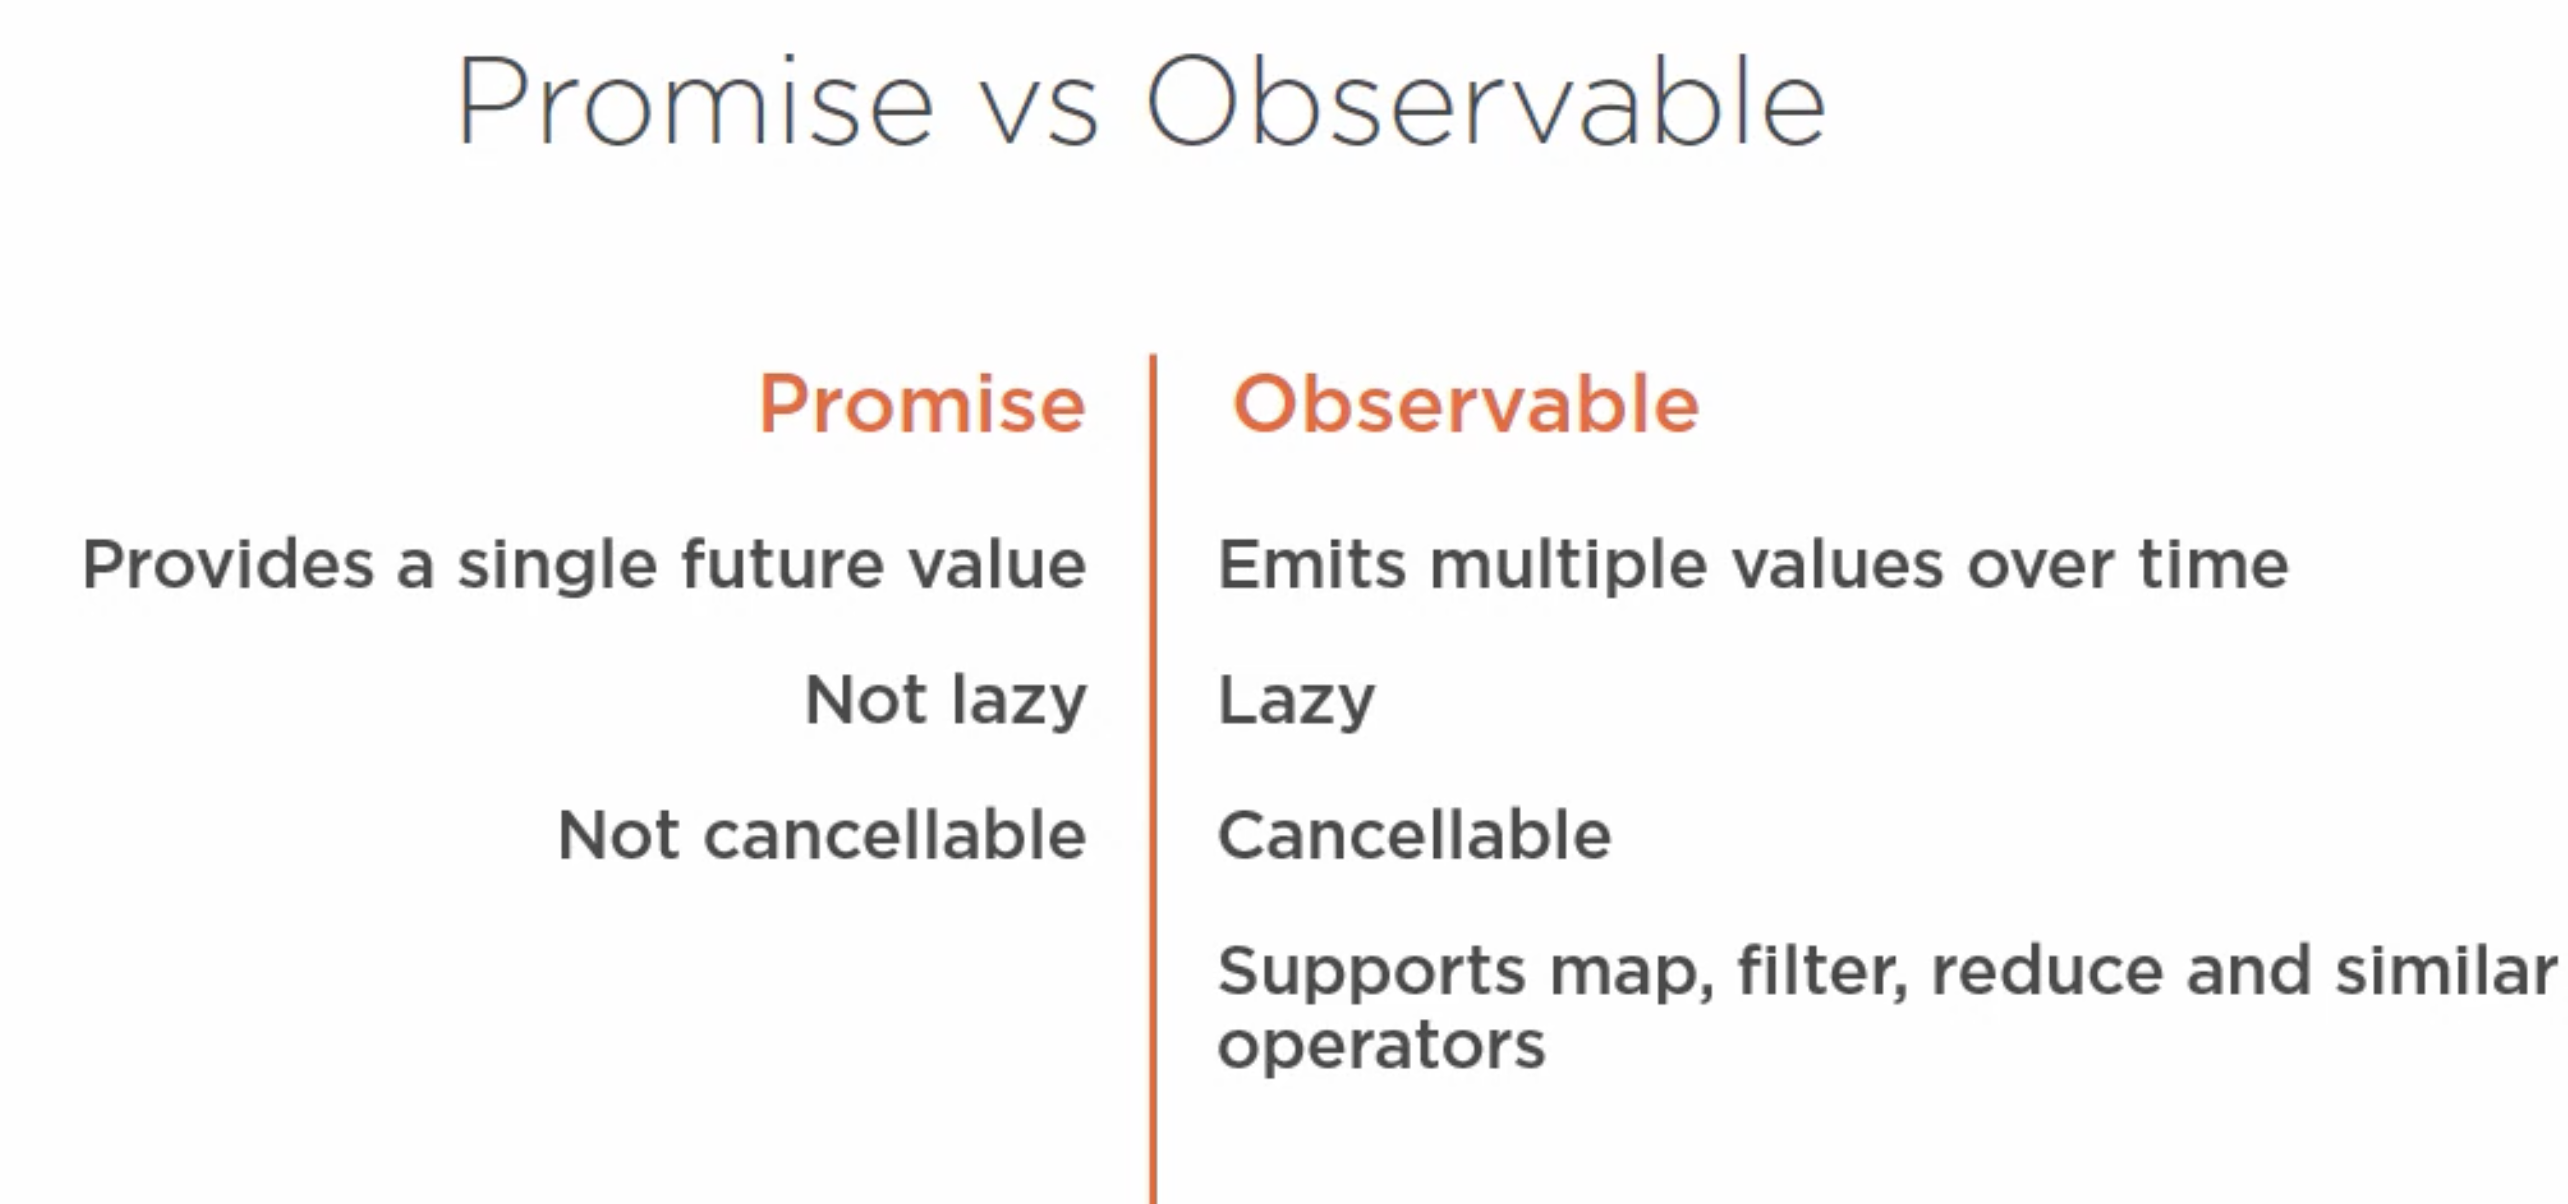
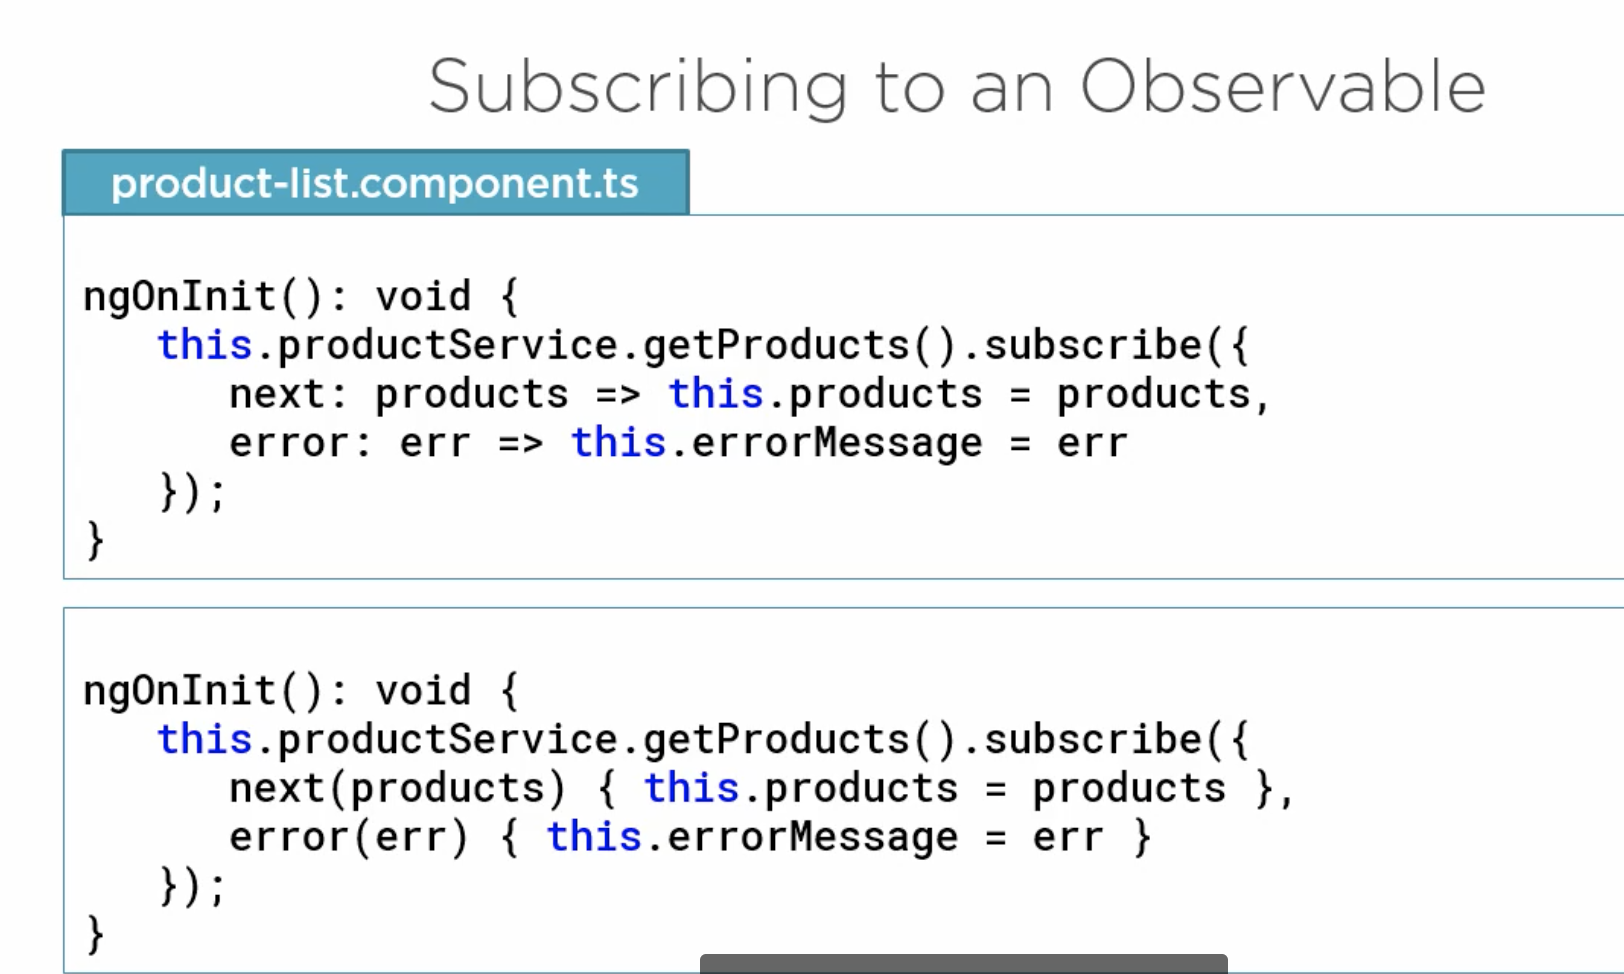
Observables and Reactive Extensions
- Reactive Extensions (RxJS)
- Help Manage asynchronous data
- Treat events as a Collection
- An array whose items arrive asynchronously over time
- Subcribe to receive notifications
Observable Operators
- Methods on observables that compose new Observables
- Transform the source observable in some way
- Process each value as it is emitted
- EJ: Map, filter, take, marge, …
Composing Operators
We can Compose Operators with the pipe method. Often Called Pipeable Operators.
1 | {% raw %} |
Retrieving Data Using Http
Fist, update the service to remove the moq data.
1 | {% raw %} |
An add HttpClientModule into the app.module.ts
1 | {% raw %} |
And then, use the service to get the data.
1 | {% raw %} |
Routes to navigate between multiple views in our application.
- How does routing works?
- Configure a route for each component
- Define options/actions
- Tie a route to each option/action
- Activate the route based on user action
- Activating a route displays the component’s view
- Configuring Routes
1 | {% raw %} |
- Link options with the routerLink
1 | <nav class="navbar navbar-expand navbar-light bg-light"> |
Passing Parameters
https://medium.com/better-programming/angular-6-url-parameters-860db789db85
Protecting routes with Guards
- CanActivate: Guard navitation to a route
- CanDeactivate: Guard navigation from a route
- Resolve: Pre-fetch data before activating a route
- CanLoad: Prevent asynchronous routing
ProTip CLI: ng g g products/product-detail
1 | {% raw %} |
Angular Modules
- An angular module is just a class with an NgModule decorator
Its purpose:
- Organize the pieces of our application
- Arrange them into blocks
- Extend our application with capabilities from external libraries
- provide a template resolution environment
- Aggregate and re-export
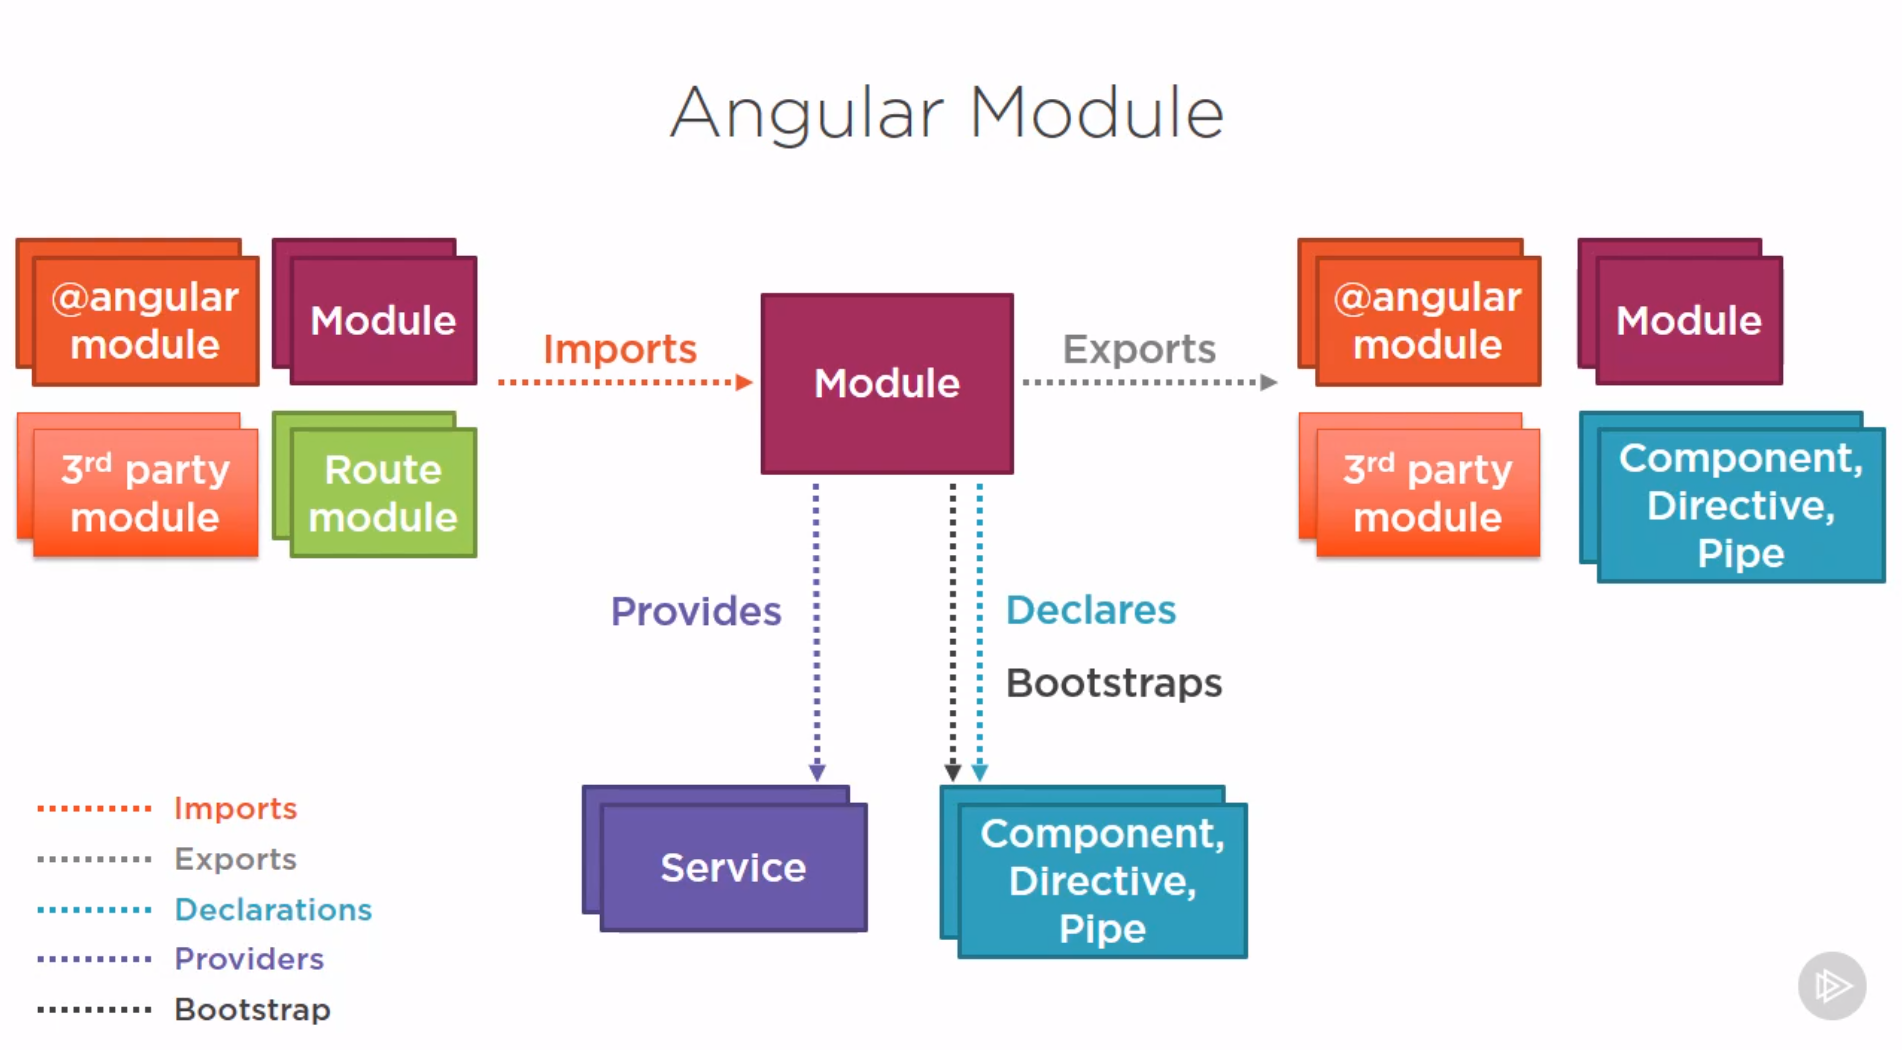
Notes:
- Every component, directive and pipe we create must belong to one and only one Angular Module.
- Only declare components, directives and pipes… dont add clases, services or modules to the declarations array.
- Never re-declare components, directives or pipes that belong to another module.
- All declared componets, directives and pipes are private by default.
- They are only accessible to other components, directives, and pipes declared in the same module.
- Is necesary to export them.
- The angular module provides the template resolution environment for its component templates.
Exports Array
- Export any component, directive, or pipe if other components need it.
- Re-export modules to re-export their components, directives and pipes.
- We can re-export something without importing it first.
- Never export a service.
Utils
$ npm install bootstrap font-awesome
On the Style.css@import '~bootstrap/dist/css/bootstrap.min.css';@import '~font-awesome/css/font-awesome.min.css';
Useful Links
https://www.youtube.com/watch?v=OL3JppHRluE | Angular 8 Tutorial | Learn Angular from Scratch | Angular Tutorial | Edureka - YouTube
https://angular.io/guide/lifecycle-hooks | Angular - Lifecycle Hooks
https://angular.io/guide/observables | Angular - Observables
https://angular.io/guide/rx-library | Angular - The RxJS library
https://angular.io/guide/pipes | Angular - Pipes
https://stackoverflow.com/questions/39800616/asp-net-core-application-lifecycle | c# - ASP.NET Core Application Lifecycle - Stack Overflow
https://gist.github.com/Whistler092/5b784894ce551f3450d2efcc30f6c8f8#file-preguntas_entrevista-txt | preguntas entrevista
https://medium.com/frontend-fun/angular-unit-testing-jasmine-karma-step-by-step-e3376d110ab4 | Angular: Unit Testing Jasmine, Karma (step by step)
https://scotch.io/tutorials/testing-angular-with-jasmine-and-karma-part-1 | Testing Angular with Jasmine and Karma (Part 1) ― Scotch.io
https://frontendmasters.com/courses/angular-core/creating-the-nx-workspace/ | Learn Creating the Nx Workspace – Angular Core
https://www.udemy.com/home/my-courses/search/?p=2&q=angular | Cursos online - en cualquier momento y en cualquier lugar | Udemy
https://www.udemy.com/course/draft/833398/learn/lecture/5317694#overview | Angular Masterclass | Udemy
https://www.udemy.com/course/the-complete-angular-master-class/learn/lecture/7251988#overview | The Complete Angular Course: Beginner to Advanced | Udemy
https://www.udemy.com/course/build-amazon-clone-angular5-node/learn/lecture/9112636#overview | Complete Modern Amazon clone: Angular 5 and Node.js | Udemy
https://www.udemy.com/course/angular-con-devops-tdd-pruebas-unitarias-pipelines-git/learn/lecture/11624584#overview | Angular con DevOps, TDD, Pruebas Unitarias, Pipelines, Azure | Udemy
https://onedrive.live.com/?cid=59ADDE0BBFFF7842&id=59ADDE0BBFFF7842%21420582&parId=59ADDE0BBFFF7842%21420552&o=OneUp | 001 Antes de continuar aprendiendo Angular.mp4 - OneDrive
https://angular.io/start | Angular - Getting Started with Angular: Your First App
https://stackblitz.com/angular/eporrqrnoxe | Angular Example - Getting Started - StackBlitz
https://angular.io/cli | Angular - CLI Overview and Command Reference
https://angular.io/tutorial/toh-pt3 | Angular - Master/Detail Components
https://angular.io/guide/template-syntax#event-binding | Angular - Template Syntax
https://angular.io/api/common | Angular - @angular/common
https://angular.io/guide/lifecycle-hooks#oninit | Angular - Lifecycle Hooks
How to Avoid Observables in Angular
https://dev.to/angular/how-to-avoid-observables-in-angular-273h