Git, the basics
TLDR: The idea of this post is to encapsulate the basic commands and concepts of GIT.
Why is so important to use a version control system?
Well, it’s kind of a difficult question to answer. But, it’s a good one that everyone made one day. My answer it’s, shit happens. Sometimes you will need to roll back some changes because a new feature is not working fine or just check what did you do one week ago?.
Version control is the best way to identify the exact changes made in the application. Keep track of the changes, collaborate with other developers keeping track of all the changes that the team made.
Version control Tools.
There are several version control tools available in the market. In more recent times, git has become the most popular one.
There are some other tools available:
- TFS (Team Foundation Version Control)
- SVN (Subversion)
- Mercurial
What is Git?
Git is a free and open-source distributed version control system designed to handle everything from small to very large projects with speed and efficiency.
In summary, Git will provide you a complete copy of the entire codebase of your project on every contributor’s computer. Codebase also can be called local repository.
So, the main functionality of Git is to track all changes in the codebase inside a local database.
Git Snapshots
The git snapshot is the state of the project files at a given point in time.
So, instead of maintaining a full copy of the entire codebase, Git will only maintain a snapshot of the project files at a given point in time.
Git States
There are three main states that project’s files can be in:
- Modified: The file has been modified. But that doesn’t mean that the file will be part of the next snapshot.
- Staged: The file change has been tracked by Git and will be part of the next snapshot.
- Committed: The staged files included in the previous step have been committed and are now ps part of the latest snapshot.
Git install and Config
Install Git and configure it. Verify the install is working.
1 | $ git --version |
The config in git can work on different levels. But the main goal is to set the credencials that will identify the user changes. That can be locally or globally.
Setting the email and username for Git globally.
1 | git config --global user.email "hi@example.com" |
And verify the current config.
1 | git config user.email |
If they work fine, you should be able to see your email and username.
Create a new project with Git
So, when you want to create a new project, you need to create a new directory as you will see in the following command.
1 | $ mkdir cats-project |
Inside the new directory, we can initialize the project with Git with the following command.
1 | $ git init |
The git init command simply creates an empty repository in the current directory. Internally, Git will create a directory called .git and inside that directory, and that directory will contain all the metadata that git will require for tracking the project.
The git add command.
The git add command will help us to add files to the staging area. Git will track the content of the file and will keep track of the changes. So, enter the command in the current path.
1 | ➜ cats-project/ git:(master) $ git add . |
The . is the current directory. But, if you want to track a specific file like cats_list.txt you can use the following command.
1 | ➜ cats-project/ git:(master) $ git add cats_list.txt |
The git status command.
The git status command will show the status of the project. It will show the files that are staged, modified, untracked, etc. That command doesn’t change or update anything.
1 | ➜ cats-project/ git:(master) ✗ git status |
1 | ➜ cats-project/ git:(master) ✗ git add cats_list.txt |
1 | ➜ cats-project/ git:(master) ✗ git status |
The information that is shown in the git status command is very detailed. You can see the files that are untracked in the first block. Then, there is the git add command, and finally, you can see the files that are staged.
The git commit command.
Right now, we have a local repository that is tracking our folder. But, we need to commit the changes that we made in the project. So, we need to use the git commit command.
A commit is a snapshot of the entire state of the project at that specific moment. The most recent snapshot of your repository is the HEAD. As soon as you create a new commit, the HEAD will point to the new commit.
1 | ➜ State 1 |
It’s mandatory to add a message to the commit. The message will be used to identify the commit. To do so, we can use the git commit -m 'Text to be included to describe the commit content' command with the -m flag and then the text. The idea of this text is to make sure it is sufficiently descriptive, and give a clear idea of what the commit is about.
The first commit of the project.
1 | ➜ cats-project/ git:(master) ✗ git commit -m 'Initial commit' |
After the commit command is executed, the git status command will show the message nothing to commit, working tree clean.
The git log command.
Basically, the git log command will show the history of commits performed in the project. If the project has multiple collaborators, you can find several commits and his authors.
1 | ➜ cats-project/ git:(master) git log |
You can press esc key to exit the command.
As you can see, each log will contain information about the author of the commit, the date of the commit, and the message of the commit. Another important piece of information is the unique hash of the commit. That hash helps to identify the commit. That hash uses the cryptographic hash function SHA-1.
The git reset command.
The git reset command is a powerful tool to undo commits. For example, if you want to undo the last commit, you can use the following commands.
1 | ➜ cats-project/ git:(master) touch dogs_list.txt |
I create a new file call dogs_list.txt and, I add it to the staging area. Then, I commit the changes.
The flag --soft
This flag is used to modify or update the changes from the previous commit without removing them completely. The complete command for the latest commit is git reset --soft HEAD~1. The HEAD~1 indicates how many commits you want to go back.
1 | ➜ cats-project/ git:(master) git reset --soft HEAD~1 |
This flag changes the state of the committed files to staged.
The flag --hard
This flag is used to remove the complete changes from the previous commit. So, with the git reset --hard HEAD~1 command, the state will show the message nothing to commit, working tree clean.
Branches
I believe this is one of the most common causes. Let’s say that you are working in a special feature for the project. There is a lot of changes but the development is still in progress. Let’s say that you need to fix a bug with a high priority. So, here is the best situation where the branches are used.
If you are working with branches, you can easily commit your changes to the current branch, then change into main and create a new branch. After that, you can fix the bug and merge those changes into the main. Finally, you can go back to the feature branch and resume the work.
The master branch
In Git, the master branch is the default branch created in a new repository.
All the commits executed in the previous example will be stored in the master branch. However, if you want to create a new branch, you can do it with the git branch command.
The idea with the branches is that you can create new branches that divert away from the master and you can continue to do your work from that new branch. The changes made in the new branch only will be reflected in this branch and won’t affect the master branch.
The task that Git does when a new branch is created is a new pointer to the current commit of the project. Therefore, the master branch has its pointer, and when you take a new branch out from the master branch, your new branch will have its pointer separate from the master.
Let’s see an example of that pointer. Right now we have the following commits:
1 | | Commit 1 | - master |
When you create a new branch, a new pointer is created pointing to the latest commit.
1 | [new_branch] |
The Commits created on the new branch are separated from the master branch.
1 | | Commit 1a | - [new_branch] |
You can keep performing commits into the master branch.
1 | [new_branch] - | Commit 1a | |
You can create branches from any other branch. A new branch doesn’t necessarily have to come from the master branch. The follow image descrive a tipical workflow with multiple branches.
Source: Atlassian git tutorial
The git branch command
This one is a really powerful command. It allows you to create new branches, delete branches, rename branches, and list all the branches in the project.
1 | ➜ cats-project/ git:(main) git branch |
The git branch command will show all the branches in the project. The one with the asterisk is the current branch. To create a new one, let’s execute the following command
1 | ➜ cats-project/ git:(main) git branch new_branch |
Executing the git branch command again will show the new branch. But you’ll realize that the new branch is not the current branch. To make the new branch the current one, you can use the git checkout command.
The git checkout command
With this command, git will allow you to change the current branch. Once you create the new branch with the previous command, you can switch into that new branch created with the following command:
1 | ➜ cats-project/ git:(main) git checkout new_branch |
You can combine both commands with the flag -b, creating the branch and then switch over to it.
1 | ➜ cats-project/ git:(main) git branch |
Renaming branches
At some point, you may have a typo while creating the branch, but after several commits, you realize that error. So, to rename the branch use the following commands:
1 | ➜ cats-project/ git:(main) git checkout new_banch |
If you do not want to change into the branch to be renamed, you can use the following command:
1 | ➜ cats-project git:(main) |
Deleting the branch
As I wrote before, the git branch is a powerful command. With just the -d flag, you can remove a specific branch. Just be sure to change into another branch before deleting it.
1 | ➜ cats-project git:(main) git branch -d new_branch |
The powerful git stash command.
I must to confess that I learn about this feature really late, but after that, it changes everything.
There is a very specific case in which this command has improved my life. Many times, I was working on a specific feature, but it’s not ready. The code is totally unpresentable to perform a commit, but I need to change into another branch real quick.
This is where git stash comes in to shine. This command stores the staged and modified fields in a kind of cache, making all the current branch clean of changes.
Let’s see the following scenario
1 | ➜ cats-project/ git:(main) git checkout -b new_branch |
In the code above, we are in the new branch and create a new file called file1.txt. If you hit git status, a new untracked file will be shown.
But, right now I need to change into another branch, and I don’t want to lose the changes I made in the new branch. So, I can use the git stash command to save the changes in the new branch.
Steps to perform the stash:
- Hit
git stashin the branch you want to stash. If the file is new, make sure to hit-uflag to include the untracked files - The console will show a message like this one:
Saved working directory and index state WIP on new_branch: 033c02f Initial Commit - Now, you can switch into another branch and make the corresponding changes.
- To restore the changes, just hit
git stash apply. And you will see the previous changes.
NOTE: if you want to remove the stash, you can use the git stash drop command.
Let’s say that you decide not to use git stash command. Well, git would have prevented you from switching over to another branch if the other branch had changes that would be overwritten with the new uncommitted changes.
But, there is always the possibility to commit the unfinished work even if that work is failing, and then switch over to another branch.
Merging Branches
One of the biggest benefits of using git is the ability to have multiple branches in the same project without any interference from changes in another branch. This is very useful when you have branches like a feature branch, a hotfix branch, a release branch, and a master branch. Well, when you finish a feature or hotfix, you can merge it into the master branch. So, all the changes created in the feature branch will be present in the master branch.
the git merge command
I have the following scenario:
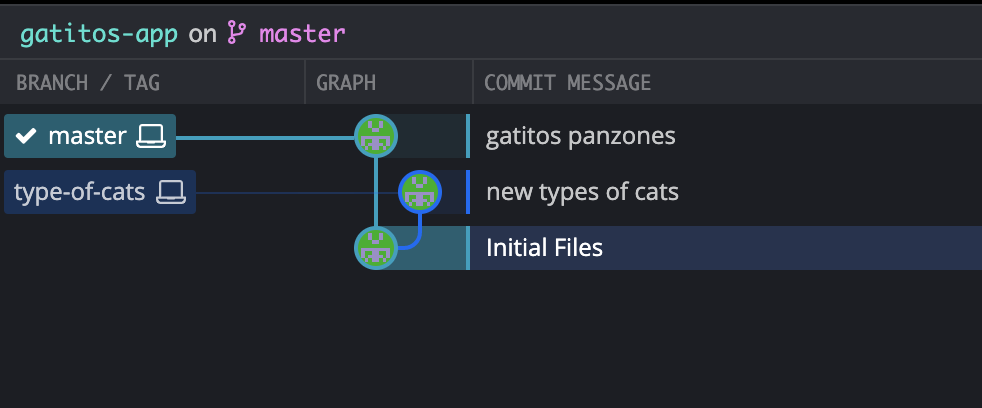
First, I have a master branch and another branch with a new feature called type-of-cats.
In the master branch, I have the file /hola-git.md, and in the feature branch, I have the files /gatitos-hardcore.md and gatitos-tiernos.md.
The idea is to merge the feature branch type-of-cats into the master branch. By the end of the merge, the master branch will have the files /hola-git.md, /gatitos-tiernos.md and /gatitos-hardcore.md.
So, to perform the merge operation, I can use the following steps:
Switch to the branch in which you want to contain the merging branch needed to be merged. For example, I want to merge the
type-of-catsbranch into themasterbranch. So I will switch to themasterbranch.- Use the command:
git checkout master
- Use the command:
Then I will merge the
type-of-catsbranch into themasterbranch using the commandgit merge <branch_to_be_merged>.- Use the command:
git merge type-of-cats.
- Use the command:
In most cases you will see a vi application opening the merge commit with the following message:
1 | Merge branch 'type-of-cats' |
To exit vi hit esc and then in the bottom of the screen hit :wq to save the changes and exit.
- Hit
lsto see the files that are present in the master branch.
1 | ➜ cats-project/ ramiroandres$ ls |
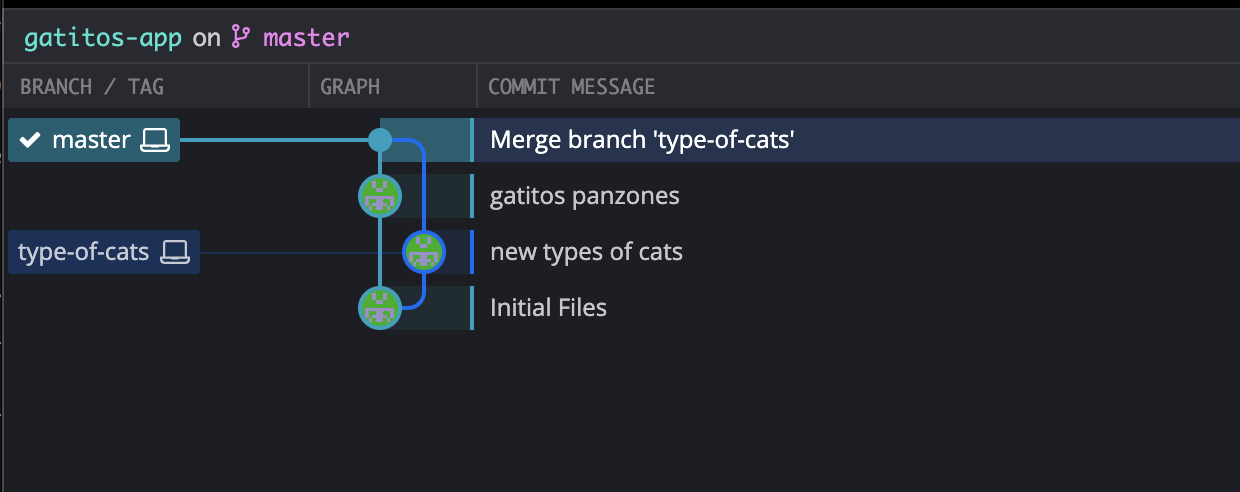
Finally, git log should list the commits from the master branch and the type-of-cats. You can verify this by yourself in the terminal provided below:
1 | ➜ cats-project/ ramiroandres$ git log |
Fixing merge conflicts
Well, merge conflicts are a common problem in git, especially when there are more than one contributor. Most of the time merge conflict exists when: A file has been changed at the same line or when a file has been removed in one branch and being updated in another one. When the branches are merged, git can not know which one is the correct one. So, the developer has to resolve the merge conflict manually.
To generate a merge conflict, you can use the following steps:
First: Create a new branch and make the changes in the branch.
1 | ➜ cats-project/ ramiroandres$ git checkout -b feature/new-fat-cats |
Then, we will switch to the master branch and make changes in the same file
1 | ➜ cats-project/ ramiroandres$ git checkout main |

So, right now we have two branches with the same file updated. So, let’s check what happens when two branches are merged.
Make sure you are in the master branch and execute:
git merge feature/new-fat-cats

So, as we saw before, git can not merge the branches because there is a merge conflict due to the file gatitos-panzones.md having been updated in both branches.
So, the first step is to open the file with the conflict and resolve it manually.
In the output log, the message says the file name: CONFLICT (content): Merge conflict in gatitos-panzones.md. So, open gatitos-panzones.md file and take a look.
Opening the file, you need to identify the conflicts founding the tag <<<<<<< HEAD and >>>>>>> feature/new-fat-cats. Those will separate the differences in each branch by the line =======.
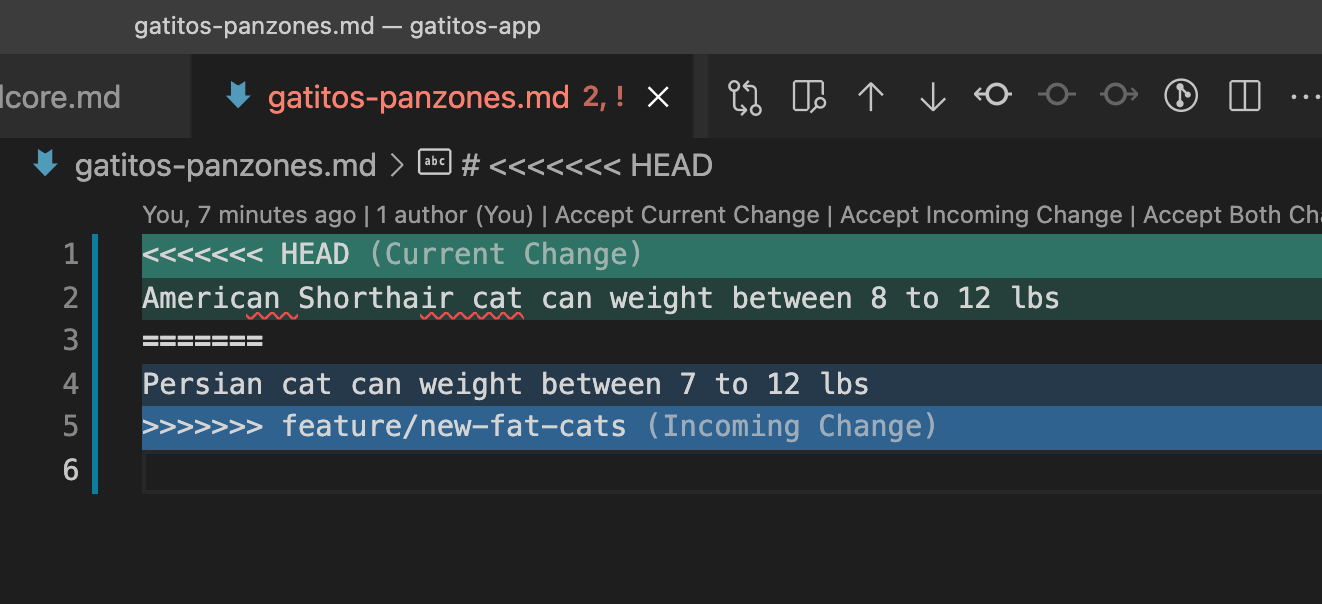
If you are using a text editor like VS Code, you can see the options of Accept Current Change | Accept Incoming Change | Accept both changes.
After you decide which one is the correct one, you can edit the file and resolve the conflict.
To finish the merge process, add the file to a staged state and commit the changes.
git add gatitos-panzones.mdgit commit -m 'resolved conflict in gatitos-panzones.md'
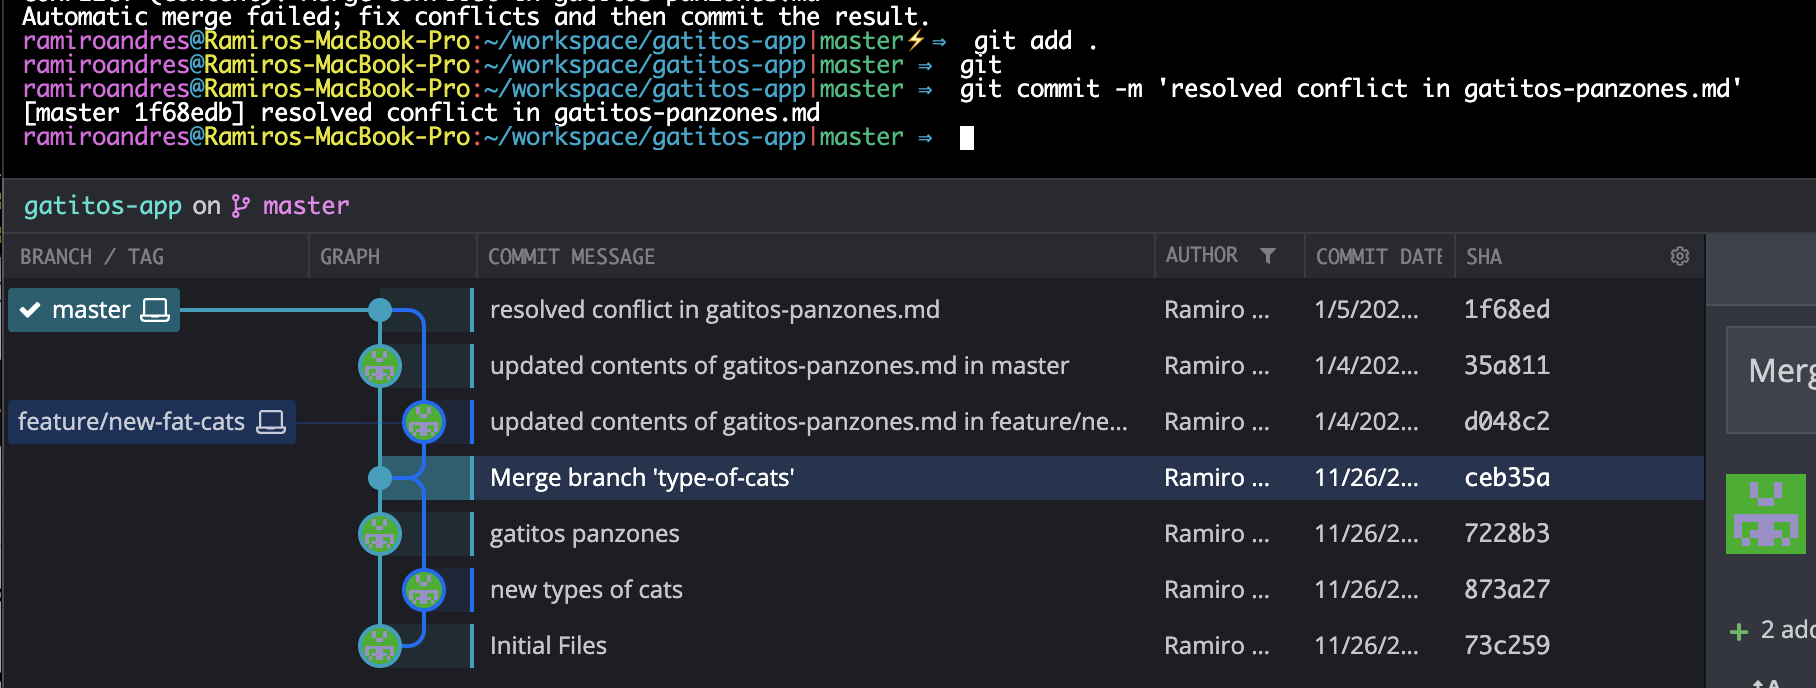
if I hit git log command, I should see the following:

That commit will contain a special line that tells us that the merge was successful.
Merge: 35a8114 d048c2f
Working with Remote Repositories
Most people think that git is the same thing as github, but the truth is that git is the software that allows us to control the version control of our projects.
Then, you can connect your local repository to a remote repository. That repository can be github, bitbucket, gitlab, Azure DevOps, etc.
Github is a popular repository hosting service that allows you to share your projects with the world. You can create private and public repositories, and you can also collaborate with other developers.
There are many tools to interact with github, but the most common one is the command line. I will try to use the command line because the output is the clearest.
Create a new remote repository in github.
This is a pretty straightforward process. After you create your account, go to Create a new repository link and follow the steps.
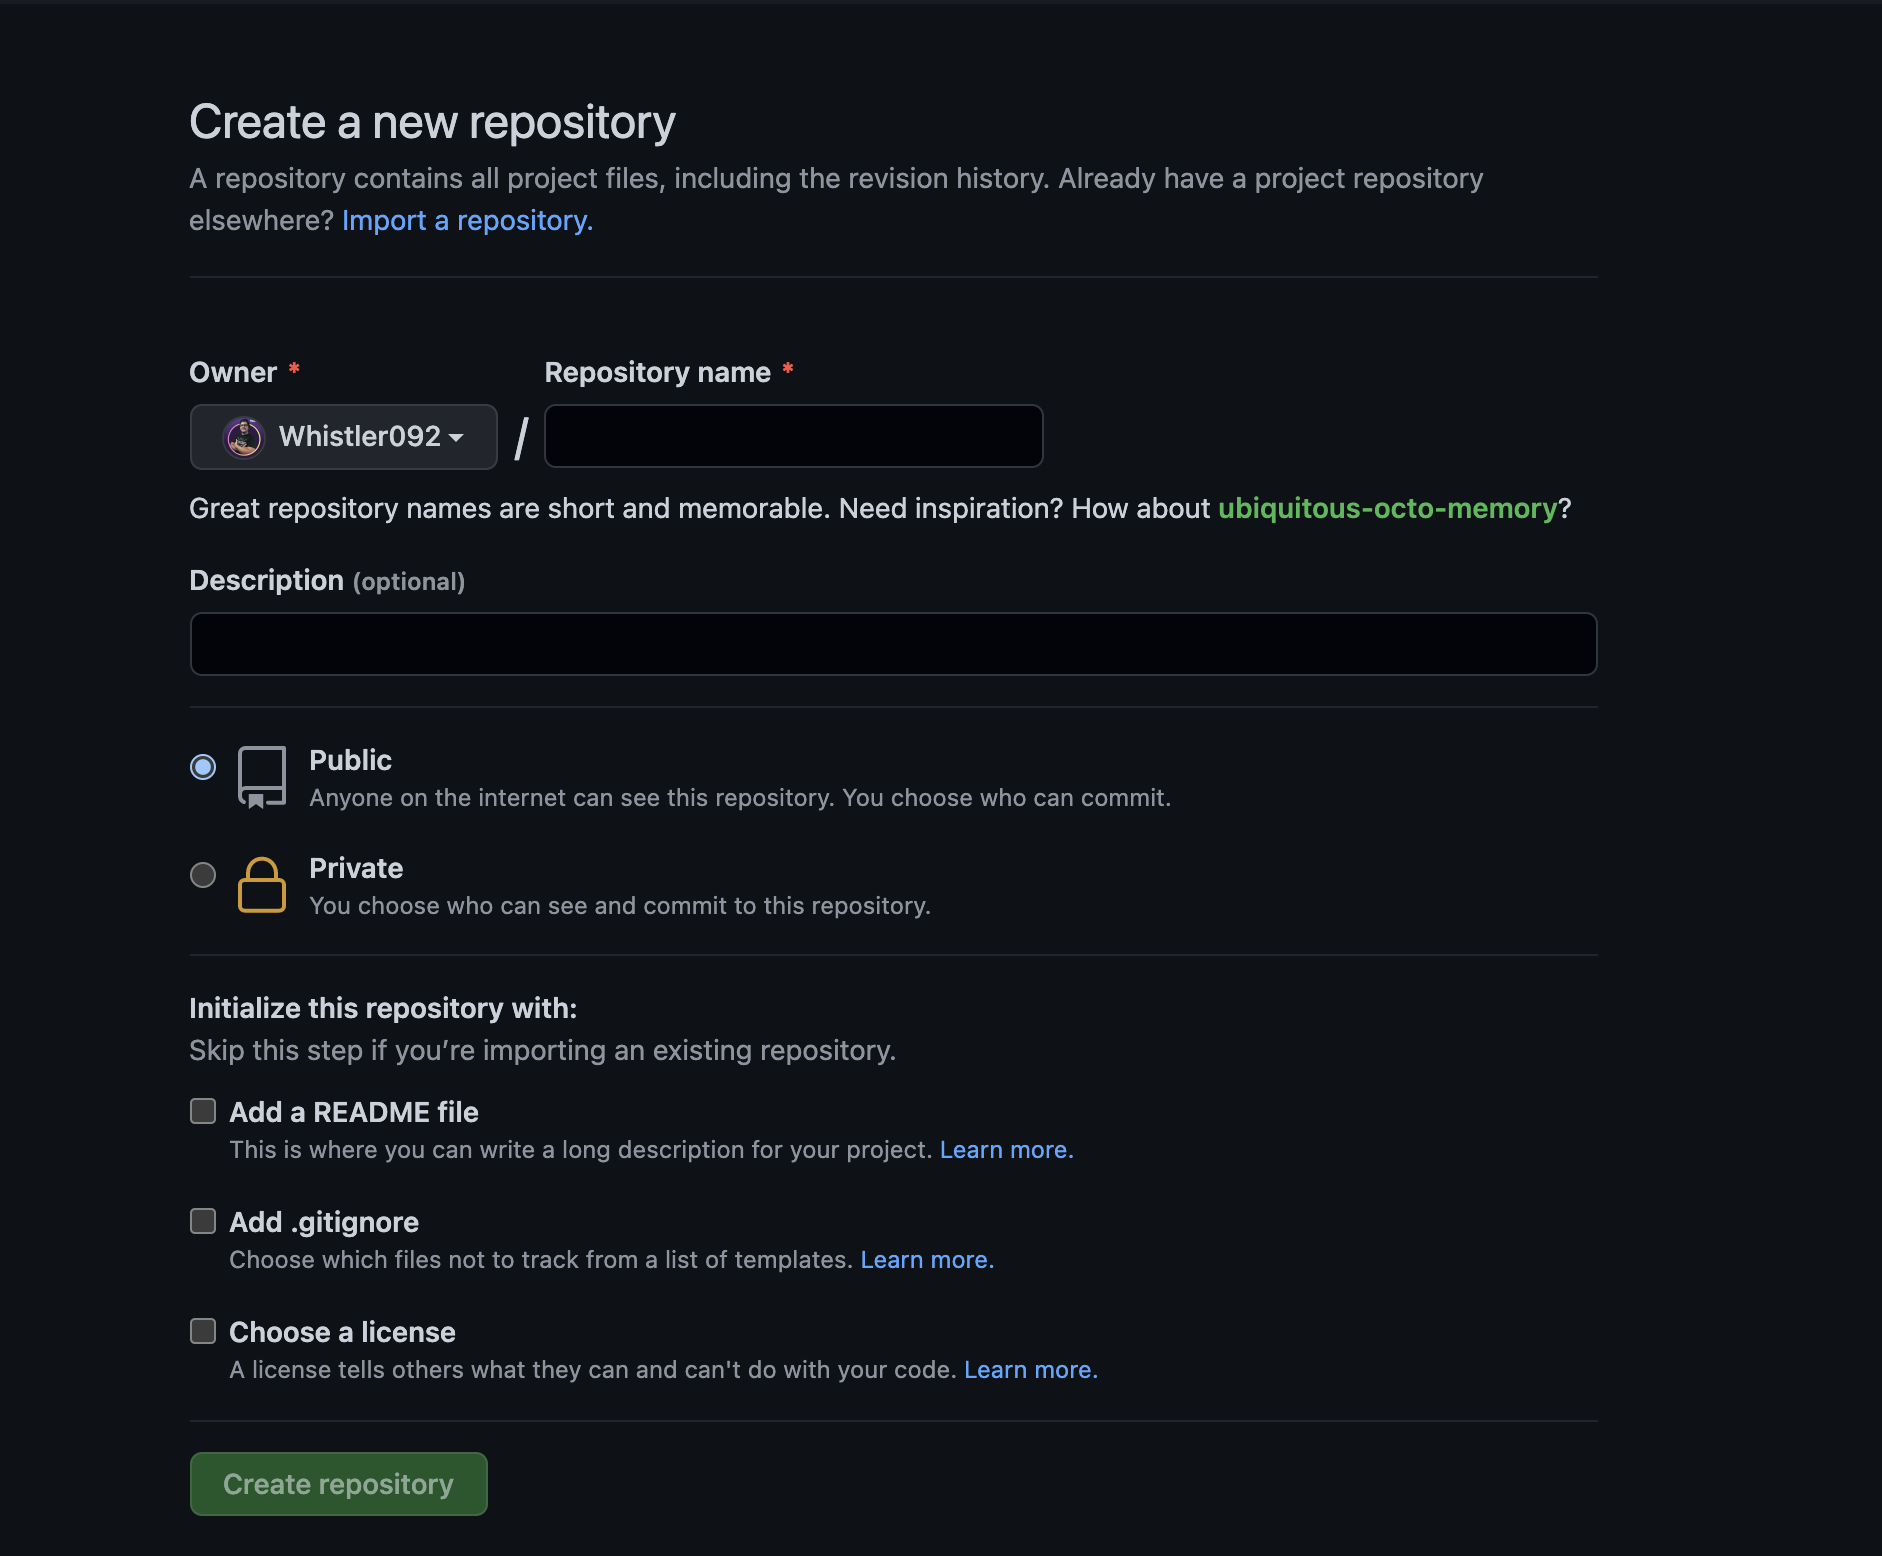
It is recommended to create a new repository with a README file and a license. Regularly, the README.md file contains necessary information about the repository like the description, the installation instructions, the usage, etc.
When you already have a repository locally, you can connect it to a remote repository. In this case, avoid adding the README.md file.
The .gitignore file is another really important that you should add to ignore the files that you don’t want to be tracked by git. This file is usually added to the root of the repository, and there is a webpage called gitignore.io that can help you to generate your .gitignore file according to your needs.
Push some code into GitHub.
So, when you create a new remote repository on GitHub, it will be empty. You will need to link your local repository to the remote repository and then push all the changes made in the local repository into the remote one.
When you create a new repository on GitHub, you will be redirected to a page that contains all the information that I’m going to describe in the next section.
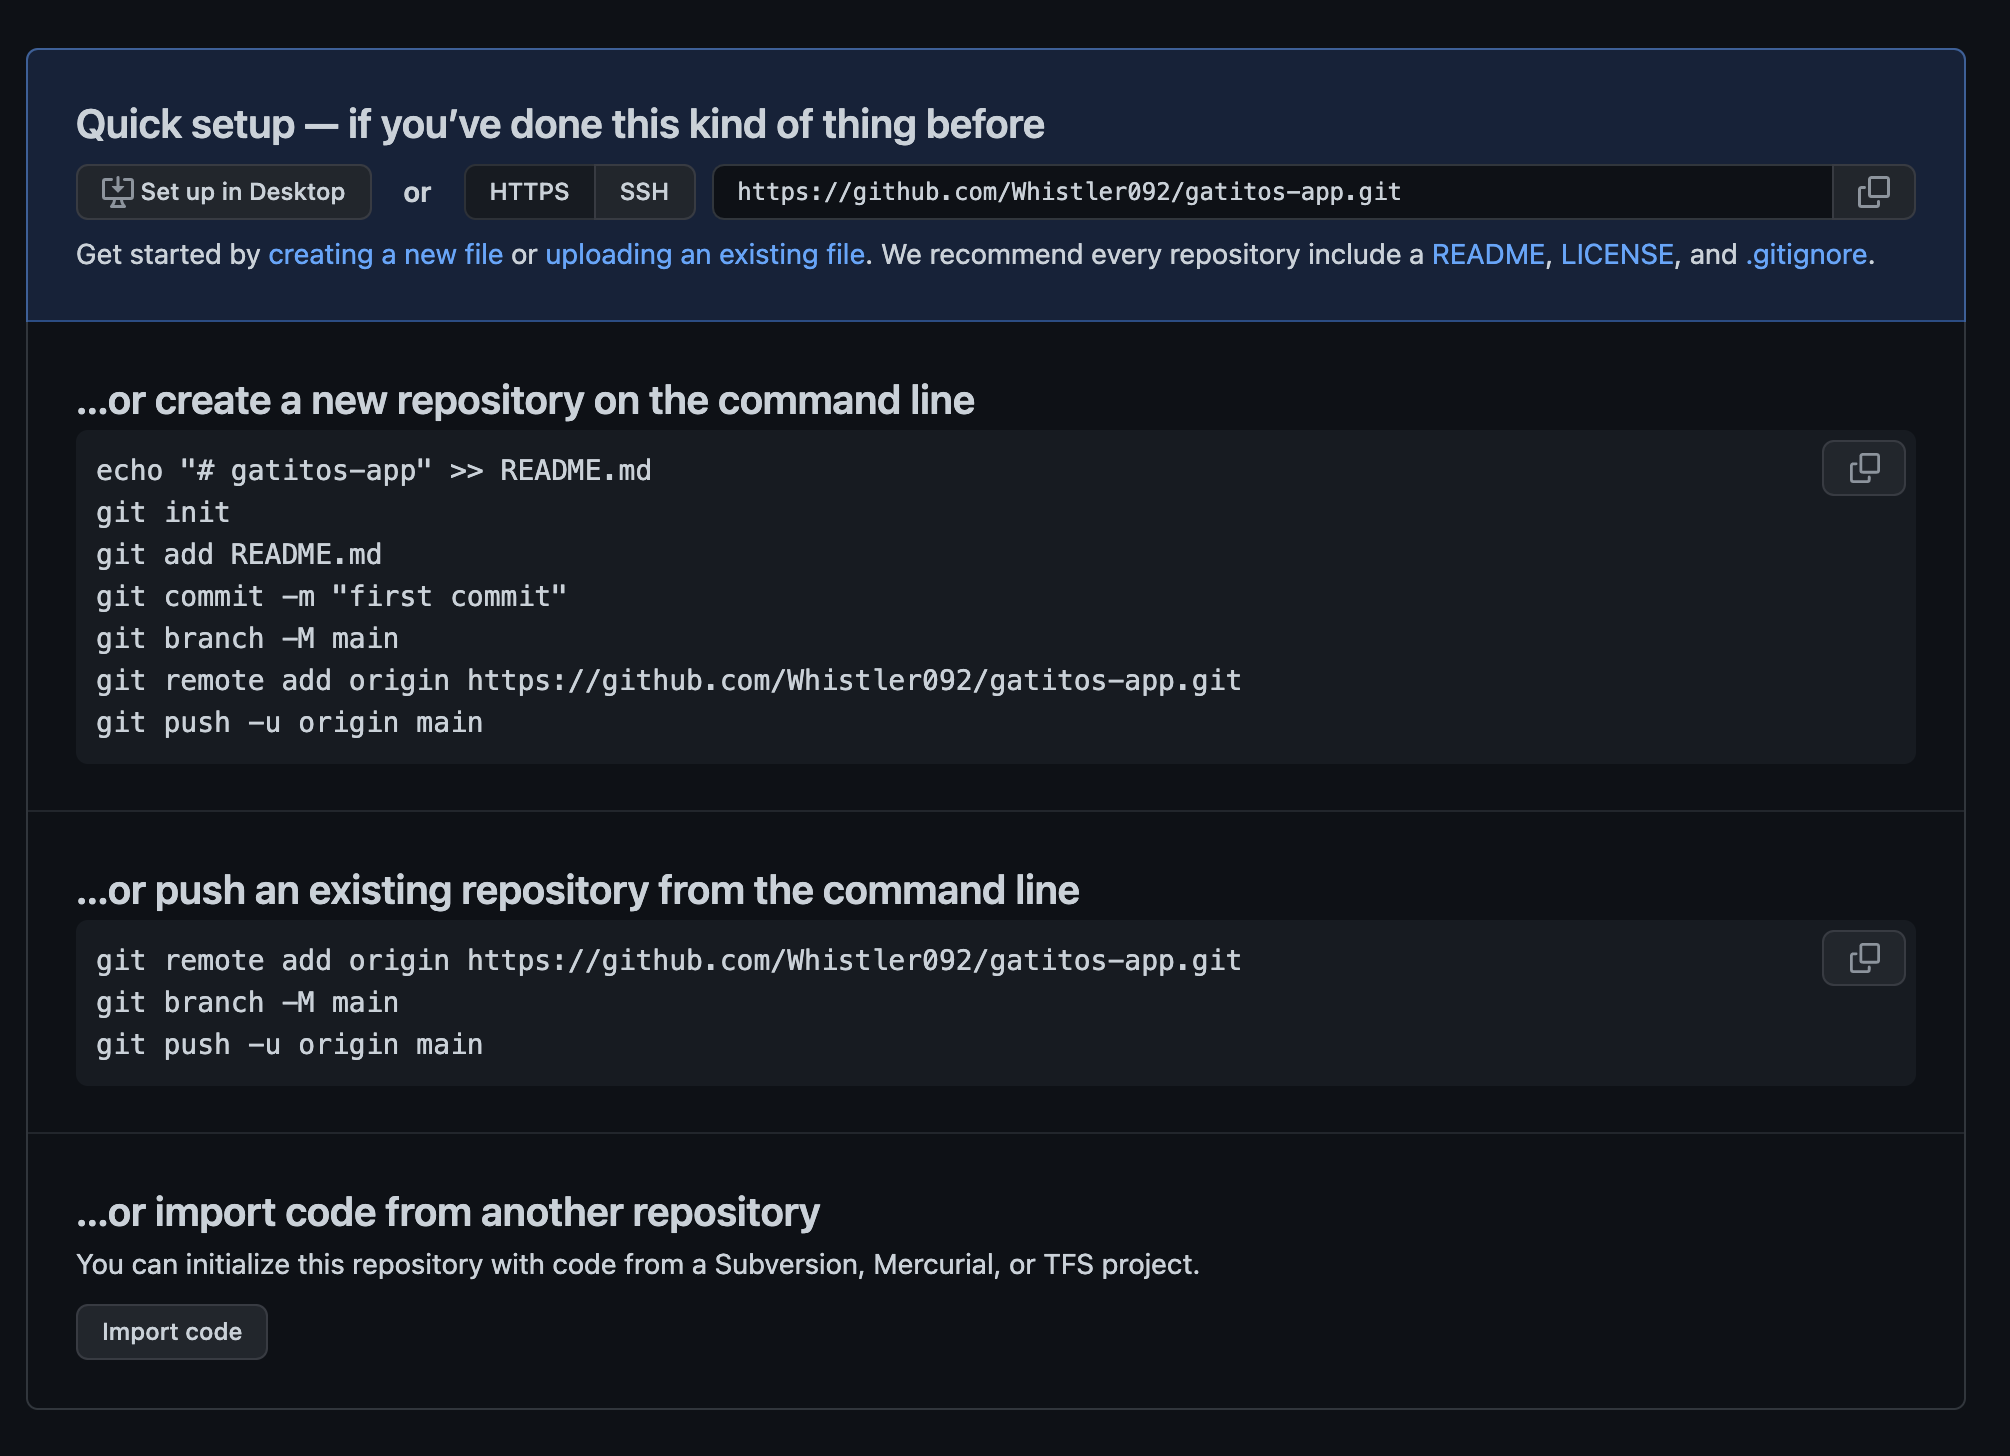
The first command is git remote, this command allows connecting the local repository with the remote one.
git remote add origin <url_to_remote_repository>
To verify what remote repository we have, we can use the plain command git remote
After we create the new repository, hit the command.git remote add origin https://github.com/Whistler092/gatitos-app.git
Once we have added the remote repository URL to our local repository, we need to push our commits into the remote repository. For that use the command:
git push origin master
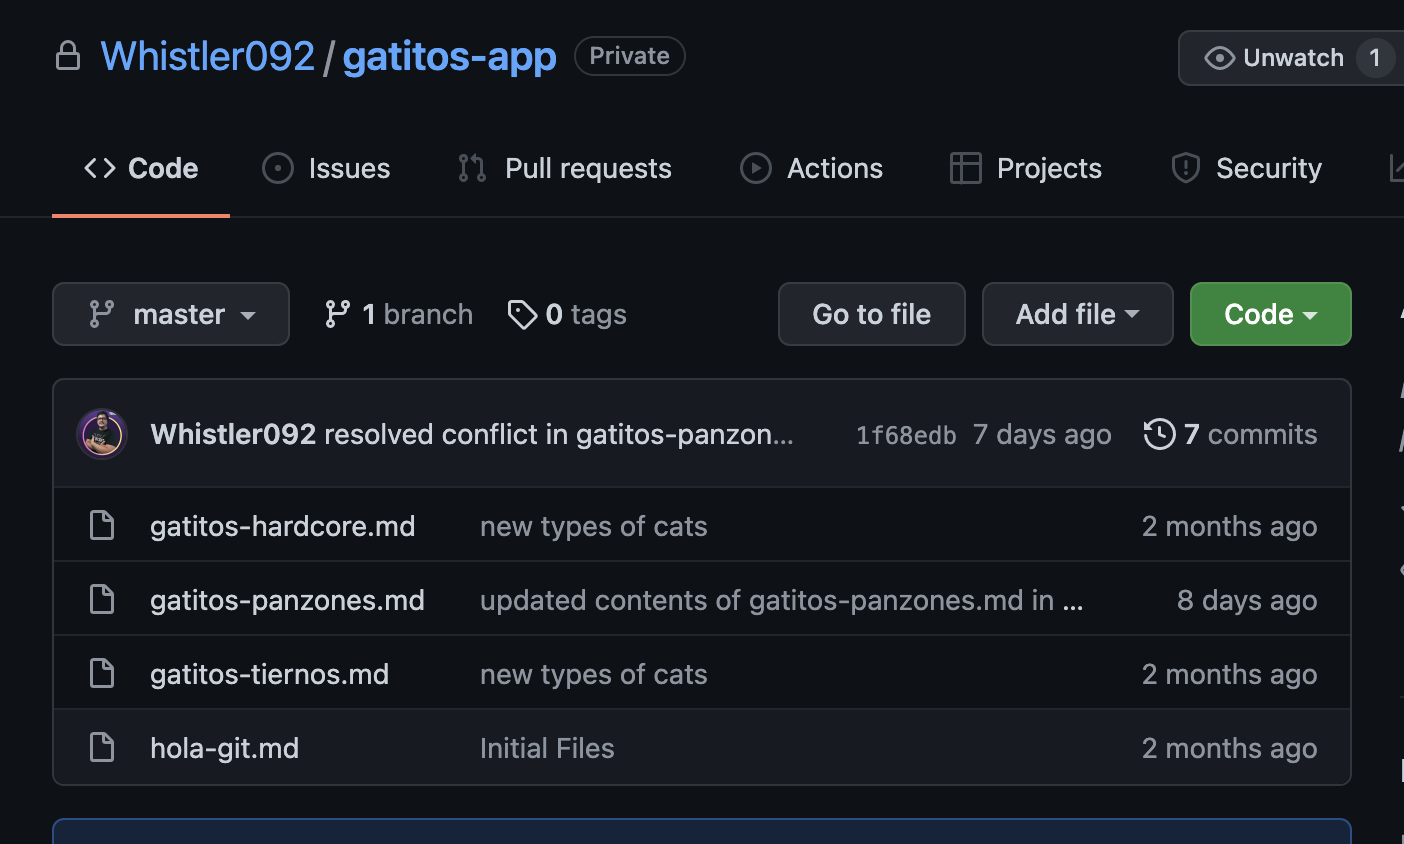
Here is the result of all the commands:
1 | ➜ cats-project/ ramiroandres$ git remote add origin https://github.com/Whistler092/gatitos-app.git |
Clone remote respositories
As you may know, the easiest way to install a remote repository into your local workspace is using the command git clone <link_to_repository>.
You can clone the repository into a specific branch instead of the master branch. For that, you can use the command git clone --branch <branch_name> <link_to_repository>.
e.g. git clone https://github.com/Whistler092/gatitos-app.git
Check changes from a remote repository
When you work in a collaborative environment, and you want to check what had been made by the rest of the team made, you can use the command git fetch.
The git fetch command is a lightweight version of the git pull command because it does check the latest changes but does not affect the local database.
This command is sometimes used to check if there are any new branches pushed to the remote repository. This command won’t affect the local repository.
If you want to do so, hit git fetch origin and then git merge origin/master to update your local changes with the remote branches.
Update changes from a remote repository
This command is similar to the git fetch command, but it will affect the local repository merging the downloaded updates from the remote repository with the local one.
git pull origin branch_name
Create a Pull Request
The pull request (aka PR) is a way to share your changes with the rest of the team. The team will take a look and give you feedback about the changes. Then, that changes can be merged with the main branch.
Most of the git providers have their PR process. For GitHub in specific, you can create a pull request going into the repository and click in the pull request tab. In that tab, you can create new pull requests. After being redirected, set the origin branch (The working feature/bug branch) and the branch to be merged (In most of the cases can be development, Main, etc).
The PR process is really useful to avoid any developer member pushing changes into the stable branch without verification. That PR can have pre-builds associated checking if the code is building, can be merged and, all the unit tests pass.
The git rebase command
The git rebase command is used to update your feature branch commits with the latest one of your base branch.
Warning:
git rebaserewrites the commit history. Itcan be harmfulto do it in shared branches. It can cause complex and hard to resolve merge conflicts. In these cases, instead of rebasing your branch against the default branch, consider pulling it instead (git pull origin master). It has a similar effect without compromising the work of your contributors.
Here is a good guide to understanding the git rebase command:
https://docs.gitlab.com/ee/topics/git/git_rebase.html
I will try to explain the git rebase command with the following example.
We have a feature branch created from the main branch. So, you add new commits into that branch, and during this time in the main branch, somebody else makes new changes.

So, the idea is to make sure your feature branch gets based on the latest version of the main branch. For this, you will need to enter to rebase your branch with the latest version of the master branch with the command: git rebase parent_branch

If there are no errors or conflicts, your feature branch now will originate from the latest version of the master branch. To validate this, check the git log command.
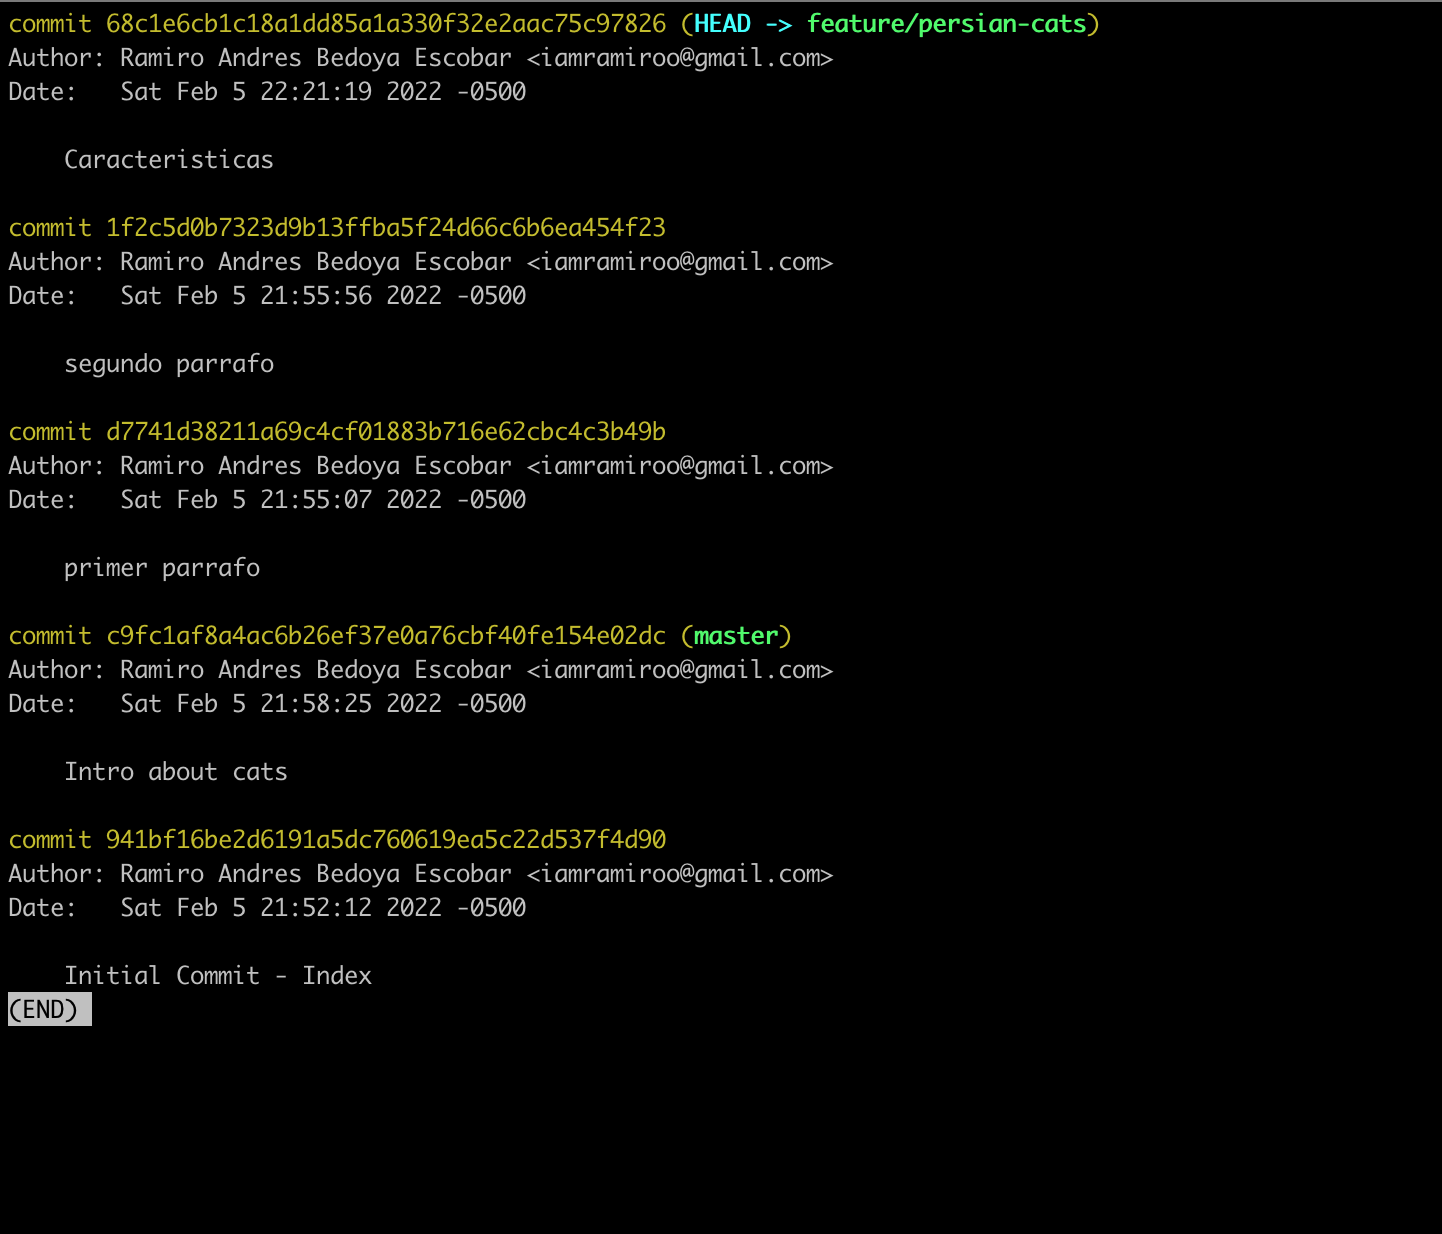
One of the big differences between git merge and git rebase is that git merge will generate a new commit with the other is merge. Git rebase does not. It updates the rebased branch’s commit history to look like it was taken out from a more recent version of the parent branch.
References
https://www.atlassian.com/git/tutorials/rewriting-history/git-rebase | git rebase | Atlassian Git Tutorial
https://git-scm.com/docs/git-rebase | Git - git-rebase Documentation
https://docs.gitlab.com/ee/topics/git/git_rebase.html | Introduction to Git rebase and force-push | GitLab
https://www.freecodecamp.org/espanol/news/la-guia-definitiva-para-git-merge-y-git-rebase/ | La Guía Definitiva para Git Merge y Git Rebase