GraphQL - Get Started

Notes for my GraphQL learning path

What is GraphQL?

The GraphQL website says:

GraphQL is a query language for APIs and a runtime for fulfilling those queries with your existing data. GraphQL provides a complete and understandable description of the data in your API, gives clients the power to ask for exactly what they need and nothing more, makes it easier to evolve APIs over time, and enables powerful developer tools.

Pretty cool, right?

In summary, it’s a query language for APIs that helps you get only the data you need. Built by Facebook, it was made opensource in 2015.

GraphQL is a specification, so there are implementations of it in almost every language.

GraphQL vs REST

REST has been around for a while, but the landscape has changed. Both have their advantages and disadvantages.

REST is a stateless and uniform format for decouple the client from the server. It’s a format that’s easy to understand and easy to use using the HTTP transport layer.

Each operation in REST is called through a specific URL or Endpoint. Like:

api/users/1

Decoupling this url, we ask the server to get the user with id 1.

When using REST, you usually need to make multiple requests to get data from the server. Or create a big API request to get all the data you need in a single request.

By another hand, GraphQL arrives to offer a more flexible way to work with REST, reducing the number of requests you need to make.

From the previous example, let’s say we need to get the user and their pictures.

query {
    user {
        name 
        photos {
            id
            path
        }
    }
}

With REST, depending on the approach, you need to make two requests to get the user and the photos.

And in that case, we only need the name of the user, nothing else.

Saying all this, both have his pros and cons, GraphQL add some complexity to the process. So, all depends of the use case, there is no better or worse, they are just different 😊.

Here is a simple example of how to use GraphQL:

var { graphql, buildSchema } = require('graphql');
// Construct a schema, using GraphQL schema language
var schema = buildSchema(`
  type Query {
    user: User
  }

 type Photos {
    id: String
    path: String
  }

  type User {
    id: String
    name: String
    email: String
    photos: [Photos]
  }

 
`);

// The root provides a resolver function for each API endpoint
var root = {
  user: () => {
    return {
      id: 3232324,
      name: 'John Doe',
      email: 'john.doe@example.com',
      photos: [{
        id: 123,
        path: '/img/path/here'
      }]
    }
  },
  photos: () => {
    return {
      id: 123,
      path: '/img/path/here'
    }
  }
};

// Run the GraphQL query '{ user  {...} }' and print out the response
graphql(schema, '{ user { id, name, email, photos {id, path }} }', root).then((response) => {
  console.log(response);
});

But, before looking at the code, let’s take a look at some important graphql concepts.

The GraphQL Types and Fields

The schema is one of the most important parts of GraphQL. Defines the types of data you can use in your queries. This schema is written in SDL (Schema Definition Language).

There is a lot of documentation about the types and fields in the GraphQL Spec.

The best way to define a type is as an object or entity, and properties are the fields.

Let’s see an example:

type User {
   id: String!
   email: String!
   name: String
}

In this case, the type is User, and the properties id, email and name are the fields.

The field with the ! is because they are non-nullable fields. This means that graphQL always returns a value when you query this field.

The String part is called scalar. GraphQL has several scalars, you can find all the scalars in the GraphQL Spec. Some of the most important are:

  • String
  • Int
  • Float
  • Boolean
  • ID

In addition to this, you can also return types. Let’s see an example:

query {
   listUsers { 
    id
    email
    name
    photos {
        url
    }
   }
}

Here we perform a query called listUsers and get the user’s photos as a field. GraphQL can understand the relationship between fields.

A better way to explain this is by showing the following example of the GraphQL schema:

type Query {
listUsers: [User]
}

type User {
    id: String!
    email: String!
    name: String
    photos: [Image] 
}

type Image {
    url: String!
}

Naming

Mostly, we try to create API endpoints with intuitive names that allow the user to understand what the endpoint is. But the most important part is be consistent with the naming pattern. For Example, getUsers is the same of listUsers. Both are okay but try to keep your naming consistent in the rest of the application.

In graphQL, well, in general with API design, it’s better to be specific to avoid confusion. The naming of objects with generic names can generate confusion to the user. A quick example of this can be, instead of type Photo {} for storing the photo of the user, we can called type UserProfilePhoto {}.

Mutations

In GraphQL, exist a special type called mutation. It’s a type that can be used to create, update or delete data. Not using mutation It’s a restriction to update data, but it’s a good practice to use it. Like using POST in REST.

One quick example of a mutation is the following:

mutation createUser(email: String!, name: String) {
    createUser(email: email, name: name) {
        id
        email
        name
    }
}

If the mutation is triggered, the type of return may be a field or payload. Returning a field is not bad, but, it is better practice to return a payload. This gives your API responses a consistent structure that makes the API easier to use.

One important tip to generate uniform responses can be with something like this:

interface MutationResponse {
    success: Boolean!
    message: String
    code: String!
}

With something like this in every response type, a very consistent API experience will be created for the user. Not all mutations will give the same answer. In that case, you can use something like this:

type RegistrationMutationResponse implements MutationResponse {
    success: Boolean!
    message: String
    code: String!
    user: User
}

Implementing GrahpQL with Node.js

Let’s try to implement GraphQL with Node.js and Express. To get started, we install the following libraries:

npm install express express-graphql graphql --save

Let’s create a new file called server.js and follow the next code:

import express from 'express';
import { graphqlHTTP } from 'express-graphql';
import { buildSchema } from 'graphql';

// Construct a schema, using GraphQL schema language
const schema = buildSchema(`
  type Query {
    hello: String
  }
`);

// The root provides a resolver function for each API endpoint
const root = {
  hello: () => {
    return 'Hello world!';
  },
};

const app = express();
app.use('/graphql', graphqlHTTP({
  schema: schema,
  rootValue: root,
  graphiql: true,
}));
app.listen(4000);
console.log('Running a GraphQL API server at http://localhost:4000/graphql');

https://graphql.org/graphql-js/basic-types/

There are several important steps in the code below to take care of:

// Construct a schema, using GraphQL schema language
const schema = buildSchema(`
  type Query {
    hello: String
  }
`);

In the code above, we are creating a schema. The schema is the structure of the data created with the buildSchema imported property. In this case, we are creating a pretty straightforward schema with one field, the hello field.

// The root provides a resolver function for each API endpoint
const root = {
  hello: () => {
    return 'Hello world!';
  },
};

Then, we need to tell GraphQL where to enter our root query field and resolve our hello query. In this case, we simply return ‘Hello world!’.

const app = express();
app.use('/graphql', graphqlHTTP({
  schema: schema,
  rootValue: root,
  graphiql: true,
}));

In the end, we are telling the server to use the graphqlHTTP middleware. This middleware will handle the request and send the response. Additionally to this, with the flag graphiql we can enable the GraphiQL interface.

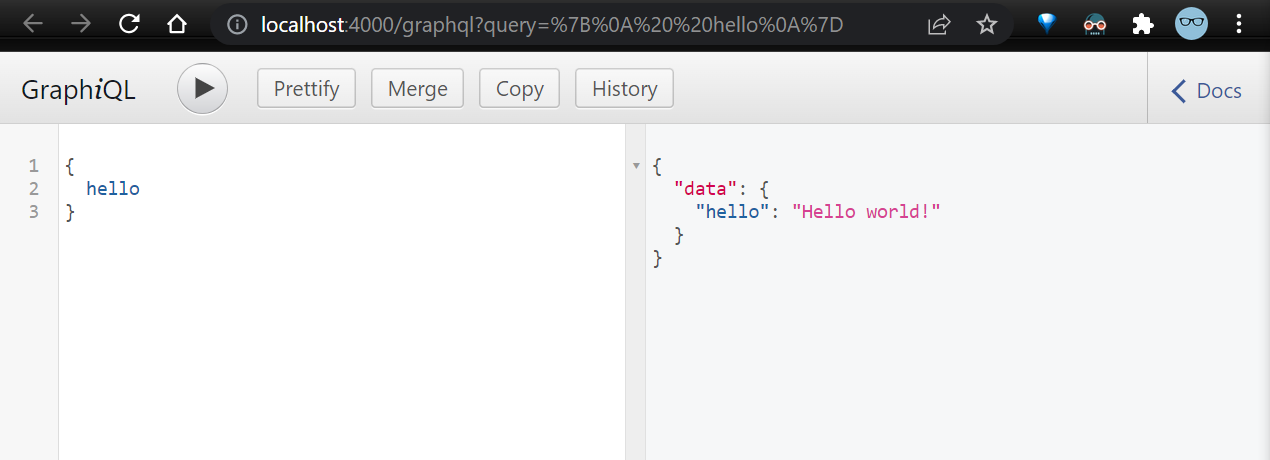
So, we are ready to run our server. node server.js and open the browser to http://localhost:4000/graphql.
buildSchema vs GraphQLSchema

In the previous example, we are using the buildSchema function to create the schema. This contains several limitations like:

  • It will not allow you to write resolvers for individual fields

  • You cannot use Unions or Interfaces due to the fact that you cannot specify resolveType or isTypeOf properties on your types

  • You cannot use custom scalars

In the next example, we are using the makeExecutableSchema from graphql-tools to create the schema that is a more powerful version of the buildSchema function. Adding some flexibility to write your schema in SDL and also have a separate resolver objects.

import { makeExecutableSchema } from '@graphql-tools/schema'

const typeDefs  = `
  type Query {
    hello: String
  }
`;

const resolvers = {
    Query: {
        hello: () => "Hello world!"
    }
}

const schema = makeExecutableSchema({ typeDefs, resolvers });


const app = express();
app.use('/graphql', graphqlHTTP({
  schema: schema,
  graphiql: true,
}));

Dont forget to install npm install graphql-tools --save.

There is a good explanation about using this tool in the following link:

https://www.graphql-tools.com/docs/introduction

Final Considerations

  • Grahpql provides a way to create large queries with a lot of parameters in a single request. But, this can create a big problem of performance, to analyze the data take a look at the following library to analyze the cost of determinate query https://github.com/pa-bru/graphql-cost-analysis
  • Also you can query data with pagination or restrict the depth of a query.
  • If you are using Autontication, It is not necessary to do everything with graphql, some endpoints like login or logout can be done with REST. Try to handle the authentication with a different middleware.
  • For authorization considerations, try to consider delegate this responsibility with another middleware, but, if is really necessary a good approach is to use GraphQL shield

Thanks!

https://book.productionreadygraphql.com/ | Production Ready GraphQL | The Book
https://graphql.org/ | GraphQL | A query language for your API
https://www.howtographql.com/ | How to GraphQL - The Fullstack Tutorial for GraphQL
https://www.apollographql.com/ | Apollo GraphQL | Apollo Graph Platform— unify APIs, microservices, and databases into a graph that you can query with GraphQL
https://www.youtube.com/watch?v=DyvsMKsEsyE&list=PLN3n1USn4xln0j_NN9k4j5hS1thsGibKi | GraphQL Hello World - YouTube

Connect Graphql with Mysql

Initial commands to create the project:

npm init -y
npm i express express-graphql graphql graphql mysql typeorm cors bcryptjs 

https://typeorm.io/#/ | TypeORM - Amazing ORM for TypeScript and JavaScript (ES7, ES6, ES5). Supports MySQL, PostgreSQL, MariaDB, SQLite, MS SQL Server, Oracle, WebSQL databases. Works in NodeJS, Browser, Ionic, Cordova and Electron platforms.

For development

npm i -D typescript ts-node-dev @types/bcryptjs @types/cors @types/express @types/node dotenv

ts-node-dev is like nodemoon but with typescript.

Typescript configuration

Init typescript in the project npx tsc --init and open the file tsconfig.json and follow update the next code:

"rootDir": "./src",                                  /* Specify the root folder within your source files. */
"outDir": "./dist",                                   /* Specify an output folder for all emitted files. */

Run npx tsc to compile the project.

Update the package.json file to add the next code:

"scripts": {
    "dev": "ts-node-dev src/index.ts",
    "build": "tsc -p ."
  },

Graphql configuration


// src/index.ts
import express from 'express';
import { graphqlHTTP } from 'express-graphql';
import { schema } from './schema';

const app = express();

app.use('/graphql', graphqlHTTP({
    schema: schema,
    graphiql: true,
}));

app.listen(3000)

console.log('Server is running on port 3000');

// src/schema/index.ts

import { GREETING } from './Queries/Greeting';
import { GraphQLObjectType, GraphQLSchema } from "graphql";

const RootQuery = new GraphQLObjectType({
    name: 'RootQuery',
    fields: {
        greeting: GREETING
    }
})

export const schema = new GraphQLSchema({
    query: RootQuery,
});


// src/schema/Queries/Greeting.ts
import { GraphQLString } from "graphql";

export const GREETING = {
    type: GraphQLString,
    resolve: () => 'Hello World'
}

Go to localhost:3000/graphql and the GraphiQL interface will be available.

Typeorm with mysql configuration

If you are using a container, this tutorial can be useful. Tutorial

$ docker volume create mysql-db-data
$ docker run -d -p 33060:3306 --name mysql-db  -e MYSQL_ROOT_PASSWORD=secret --mount src=mysql-db-data,dst=/var/lib/mysql mysql

$ docker exec -it mysql-db mysql -p

Sign in to MySQL and create your database. Configure MySQL to log in with the user and password

CREATE DATABASE usersdb;

ALTER USER 'root' IDENTIFIED WITH mysql_native_password BY '102030';
-- OR
ALTER USER 'root'@'localhost' IDENTIFIED WITH mysql_native_password BY '102030';

flush privileges;

Update your code to connect into the database

// First. A quick refactor encapsulating the app into a file 
// src/index.ts

import { connectDb } from './schema/db';
import app from "./app";


async function main() {

    try {
        await connectDb();

        app.listen(3000, () => {
            console.log("Server is listening on port 3000");
        });
    } catch (error) {
        console.log(error);
    }
}

main();


// src/app.ts
import express from 'express';
import { graphqlHTTP } from 'express-graphql';
import { schema } from './schema';

const app = express();

app.use('/graphql', graphqlHTTP({
    schema: schema,
    graphiql: true,
}));

export default app;


// src/schema/db.ts

import { createConnection } from "typeorm";

export const connectDb = async () => {
    await createConnection({
        type: "mysql",
        host: "localhost",
        port: 3306,
        username: "root",
        password: "102030",
        database: 'usersdb',

        entities: [],
        synchronize: false,
        ssl: false,
    });

};

Run the application

Create TypeORM entities

First of all, we need to enable some flags in the TypeScript configuration file tsconfig.json.

"emitDecoratorMetadata": true,
"experimentalDecorators": true,

Disable the following property in the TypeScript configuration file tsconfig.json:

"strictPropertyInitialization": false,             /* Check for class properties that are declared but not set in the constructor. */

Let’s create the first entity:

// src/Entities/User.ts

import { BaseEntity, Column, Entity, PrimaryGeneratedColumn } from "typeorm";


@Entity()
export class Users extends BaseEntity {

    @PrimaryGeneratedColumn()
    id: number;

    @Column()
    name: string;

    @Column()
    username: string;

    @Column()
    password: string;

}

// src/schema/db.ts

import { createConnection } from "typeorm";
import { Users } from "../Entities/Users";

export const connectDb = async () => {
    await createConnection({
        type: "mysql",
        host: "localhost",
        port: 33060,
        username: "root",
        password: "102030",
        database: 'usersdb',

        entities: [
            Users
        ],
        synchronize: false,
        ssl: false,
    });

};

According to the documentation, the @Entity() decorator is used to mark the class as an entity. And then, import that class into the entities array in the TypeORM connection.

If you want to make sure that the database is created with the tables, you can use the synchronize property. Just turning true will create the tables.
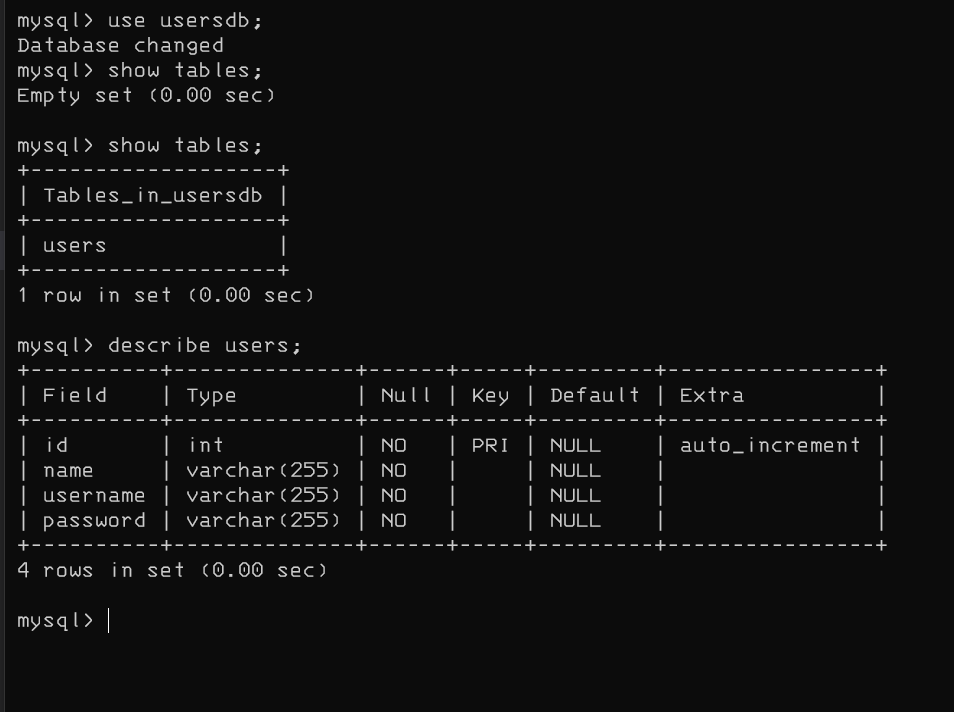
And as you can see, the table User is created in the database.

Create our first mutation

To create a mutation, we need to create a new folder called mutations under the schema folder. Then, create a new file called User.ts in that folder.

// src/schema/Mutations/User.ts
import { GraphQLString  } from "graphql";


export const CREATE_USER = {
    type: GraphQLString,
    args: {
        name: { type: GraphQLString },
        username: { type: GraphQLString },
        password: { type: GraphQLString }
    },
    resolve(_: any, args: any) {
        console.log(args);
        return "User Created";
    }
}

// src/schema/index.ts
import { GREETING } from './Queries/Greeting';
import { GraphQLObjectType, GraphQLSchema } from "graphql";
import { CREATE_USER } from './Mutations/User';

const RootQuery = new GraphQLObjectType({
    name: 'RootQuery',
    fields: {
        greeting: GREETING
    }
})

const Mutation = new GraphQLObjectType({
    name: 'Mutation',
    fields: {
        createUser: CREATE_USER
    },
})

export const schema = new GraphQLSchema({
    query: RootQuery,
    mutation: Mutation
});

Let’s execute the mutation:

Console log with fields

Let’s persist in the database:

// src/schema/mutations/User.ts

import { GraphQLString  } from "graphql";
import { Users } from "../../Entities/Users";


export const CREATE_USER = {
    type: GraphQLString,
    args: {
        name: { type: GraphQLString },
        username: { type: GraphQLString },
        password: { type: GraphQLString }
    },
    async resolve(_: any, args: any) {
        const { name, username, password } = args;

        const result = await Users.insert({
            name,
            username,
            password
        });

        console.log(result);

        return "User Created";
    }
}

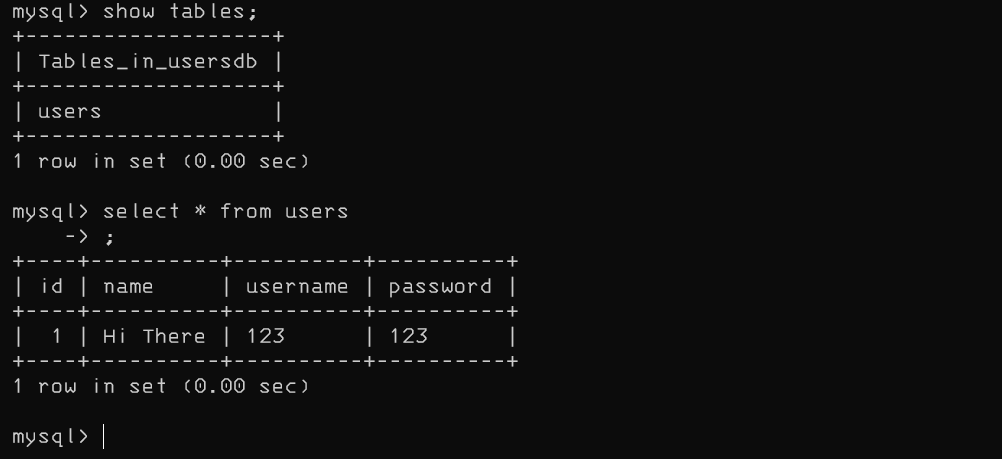
Just using the Entity with the .insert() method you can insert a new user in the database. Just with that like works, in fact you can see the answer in the following screenshot:
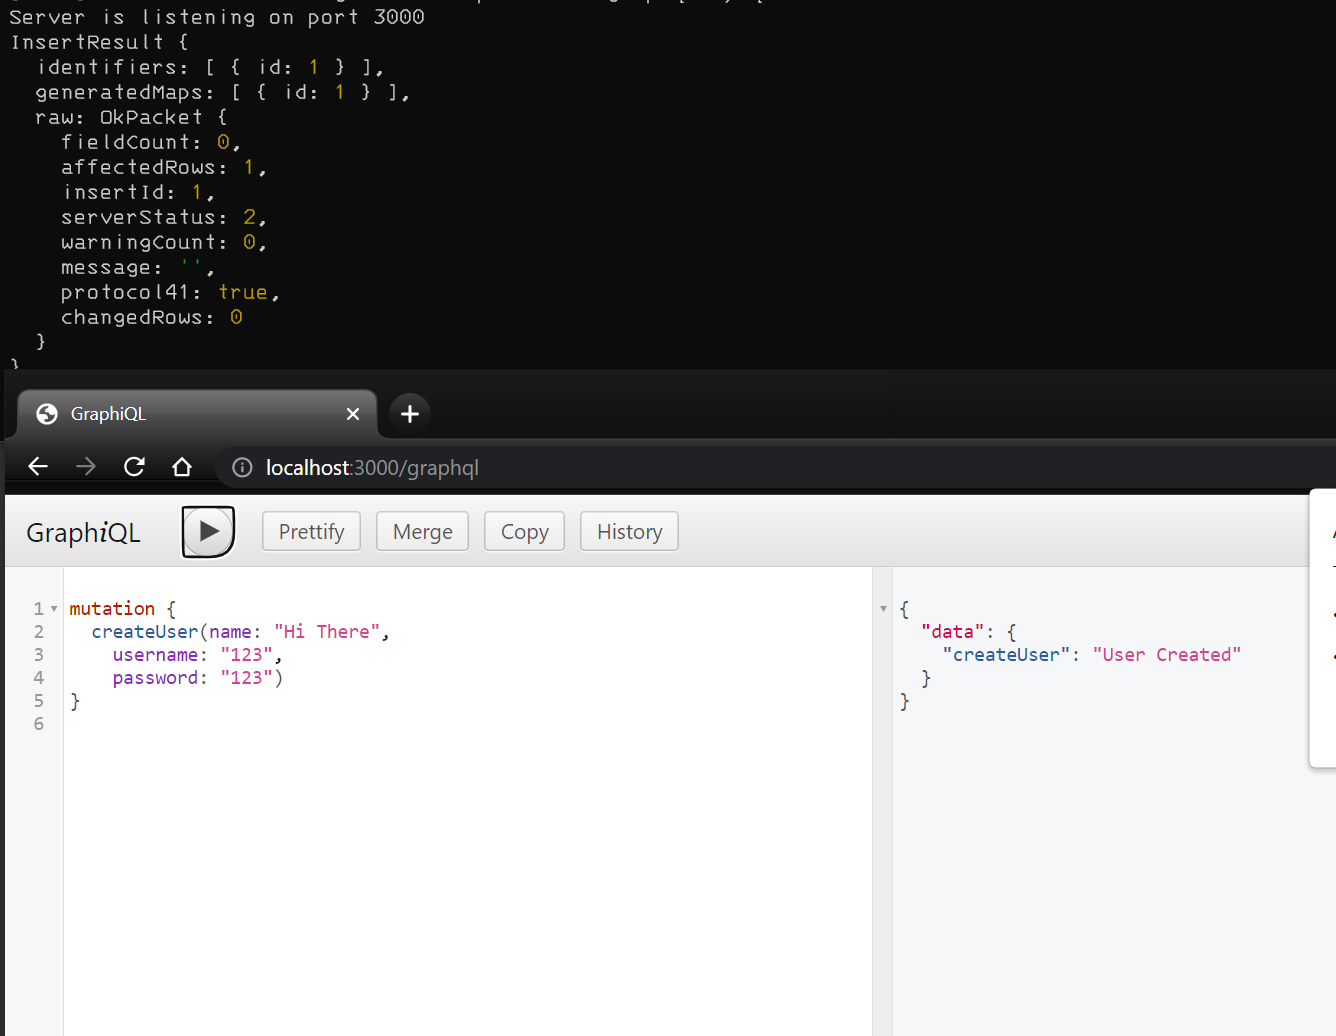
and in the database:
Return the object created.

For that, let’s create a custom type in the schema/typeDets folder.

// src/typeDefs/User.ts
import { GraphQLString, GraphQLObjectType, GraphQLID } from 'graphql';

export const UserType = new GraphQLObjectType({
    name: 'User',
    fields: {
        id: { type: GraphQLID },
        name: { type: GraphQLString },
        username: { type: GraphQLString },
        password: { type: GraphQLString }
    }
})

// src/schema/Mutations/User.ts
import { UserType } from './../../typeDefs/User';
import { GraphQLString  } from "graphql";
import { Users } from "../../Entities/Users";
import bcrypt from 'bcryptjs';

export const CREATE_USER = {
    type: UserType,
    args: {
        name: { type: GraphQLString },
        username: { type: GraphQLString },
        password: { type: GraphQLString }
    },
    async resolve(_: any, args: any) {
        const { name, username, password } = args;

        const encryptdPassword = await bcrypt.hash(password, 10);

        const result = await Users.insert({
            name,
            username,
            password: encryptdPassword
        });

        console.log(result);

        return {
            ...args,
            id: result.identifiers[0].id,
        password: encryptdPassword
        }
    }
}

NOTE: before we save the user in the database, we need to encrypt the password with the bcryptjs library.

Query users

Let’s create a new User.ts class in the queries folder.

// src/schema/Queries/User.ts
import { GraphQLList, GraphQLID } from 'graphql';
import { Users } from '../../Entities/Users';
import { UserType } from '../../typeDefs/User';

export const GET_ALL_USERS = {
    type: GraphQLList(UserType),
    async resolve() { 
        return  await Users.find();
    }
}

export const GET_USER = {
    type: UserType,
    args: {
        id: { type: GraphQLID }
    },
    async resolve(_: any, args: any) {
        
        return await Users.findOne(args.id);
    }
}

// stc/index,t

import { GREETING } from './Queries/Greeting';
import { GraphQLObjectType, GraphQLSchema } from "graphql";
import { CREATE_USER } from './Mutations/User';
import { GET_ALL_USERS, GET_USER } from './Queries/User';

const RootQuery = new GraphQLObjectType({
    name: 'RootQuery',
    fields: {
        greeting: GREETING,
        getAllUsers: GET_ALL_USERS,
        getUser: GET_USER
    }
})

const Mutation = new GraphQLObjectType({
    name: 'Mutation',
    fields: {
        createUser: CREATE_USER
    },
})

export const schema = new GraphQLSchema({
    query: RootQuery,
    mutation: Mutation
});

We just create two new methods in the query part.

One for getting all the users
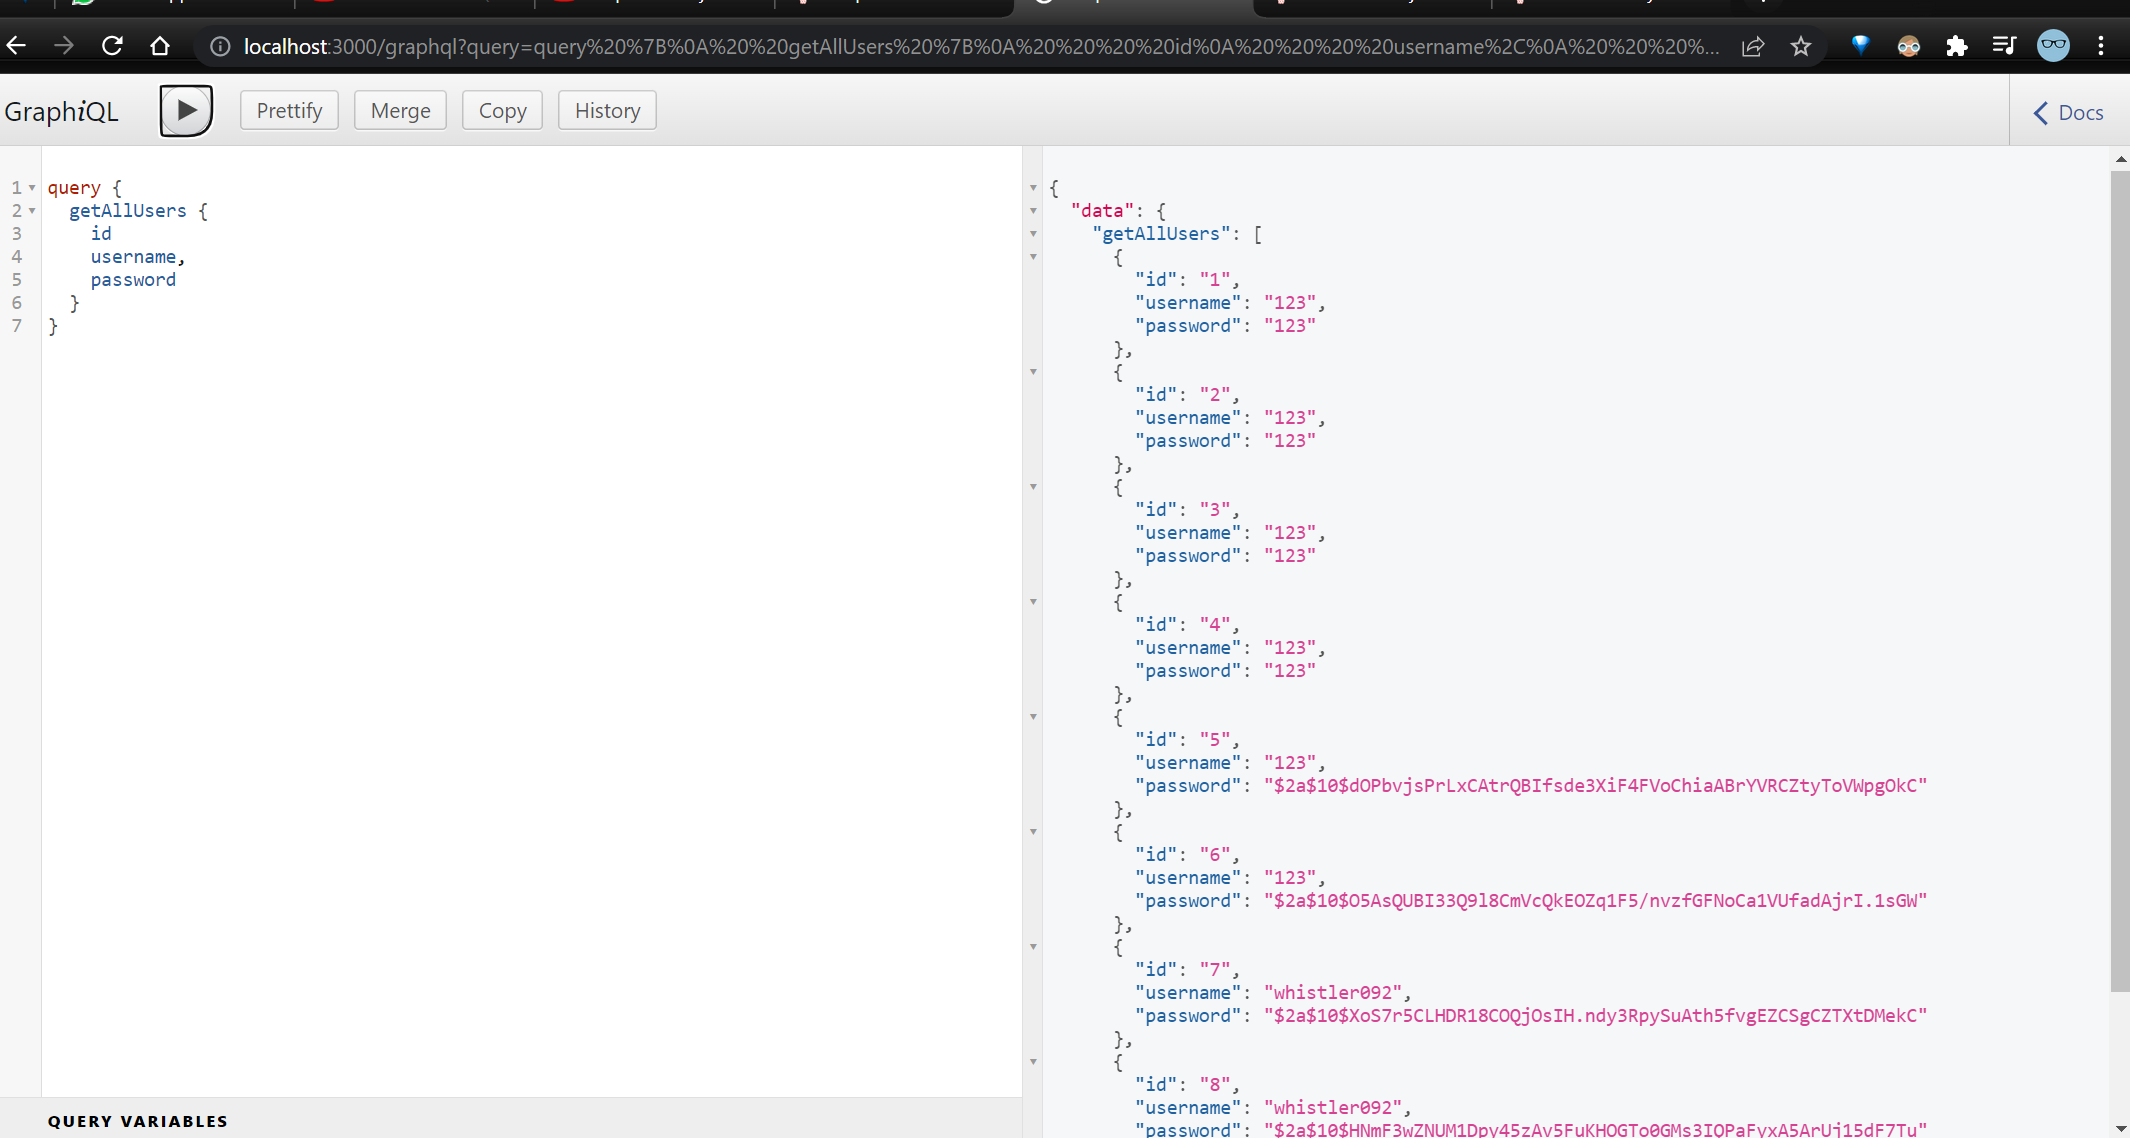
And one for getting a specific user.

Delete the user

We can easly delete a user. Typeorm provides a method to perform the delete operation.

// src/schema/Mutations/User.ts

//... 
export const DELETE_USER = {
    type: GraphQLBoolean,
    args: { 
        id: { type: GraphQLID }
    },
    async resolve(_: any, {id}: any) {
        const result = await Users.delete(id);
        return result.affected;
    }
}

// src/schema/index.ts
import { GREETING } from './Queries/Greeting';
import { GraphQLObjectType, GraphQLSchema } from "graphql";
import { CREATE_USER, DELETE_USER } from './Mutations/User';
import { GET_ALL_USERS, GET_USER } from './Queries/User';

const RootQuery = new GraphQLObjectType({
    name: 'RootQuery',
    fields: {
        greeting: GREETING,
        getAllUsers: GET_ALL_USERS,
        getUser: GET_USER
    }
})

const Mutation = new GraphQLObjectType({
    name: 'Mutation',
    fields: {
        createUser: CREATE_USER,
        deleteUser: DELETE_USER
    },
})

export const schema = new GraphQLSchema({
    query: RootQuery,
    mutation: Mutation
});

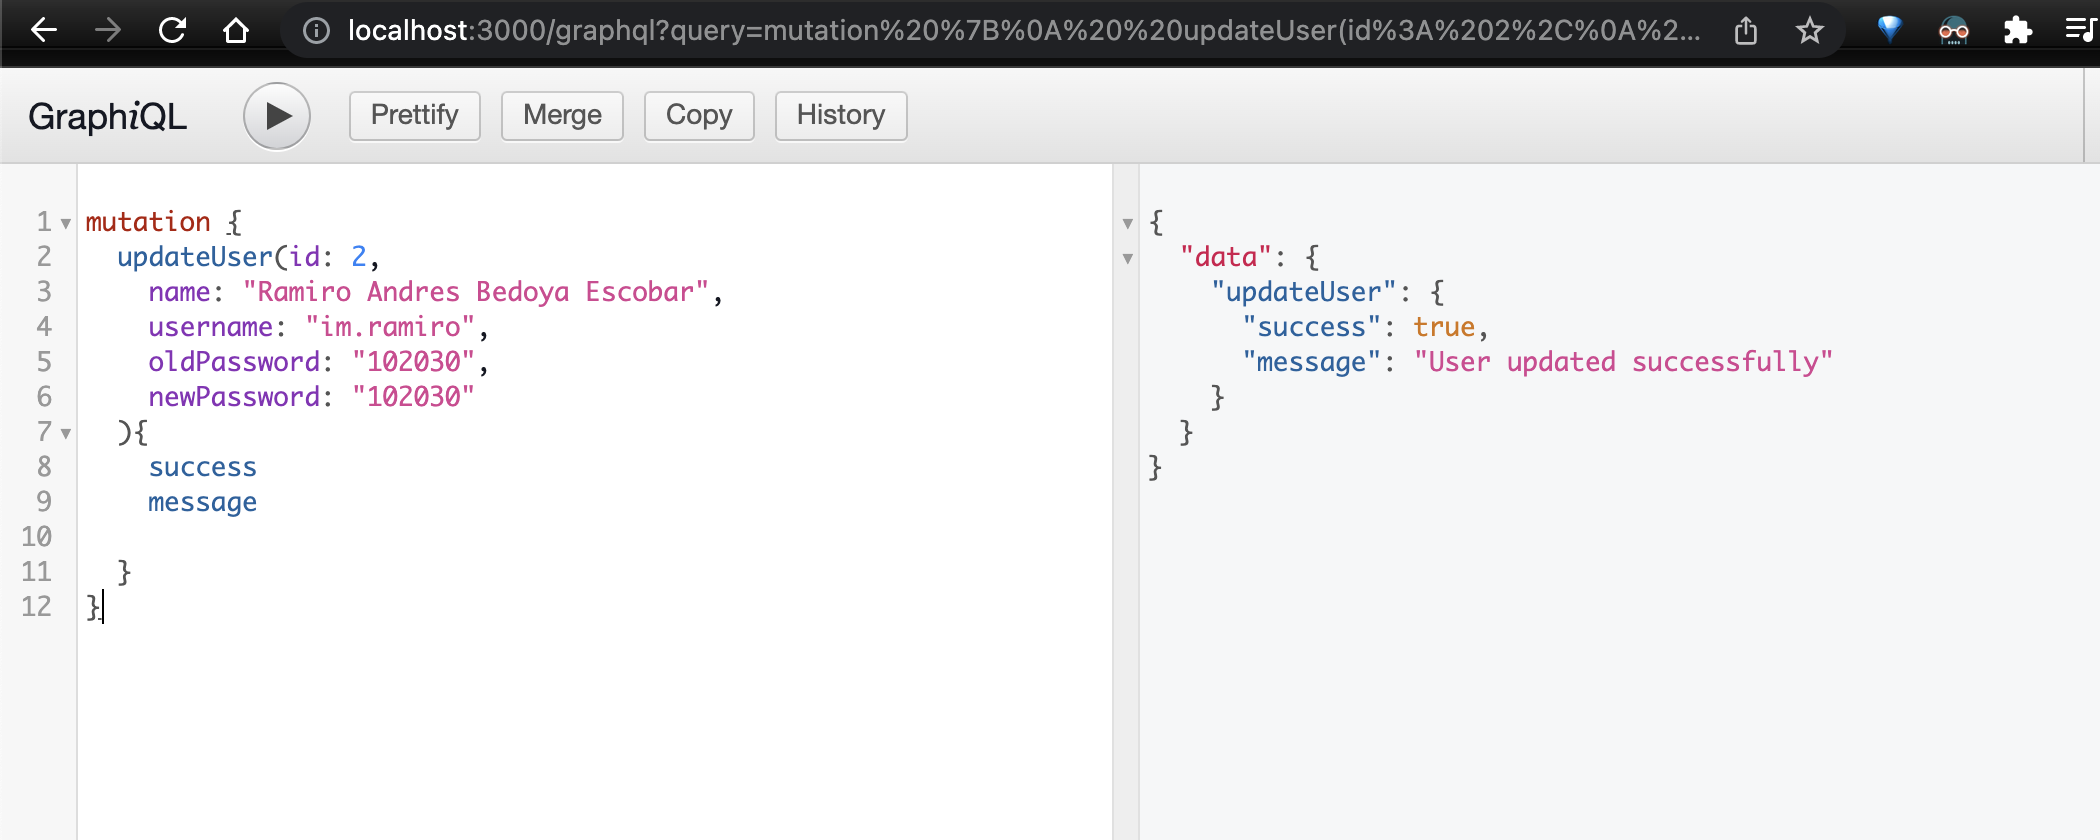
As result, we get the following screenshot:

Update the user

Updating the user is a bit more elaborated. As we made in the previous mutations, we need to create a new export for UPDATE_USER inside the User.ts file inside the Mutations folder. Let’s take a look:

// src/schema/Mutations/User.ts
// ...
export const UPDATE_USER = {
    type: GraphQLBoolean,
    args: {
        id: { type: GraphQLID },
        name: { type: GraphQLString },
        username: { type: GraphQLString },
        oldPassword: { type: GraphQLString },
        newPassword: { type: GraphQLString }
    },
    async resolve(_: any, args: any) {
        const { id, name, username, oldPassword, newPassword } = args;

        const userFound = await Users.findOne(id);

        if (!userFound) return false;

        const isMatch = await bcrypt.compare(oldPassword, userFound.password)

        if (!isMatch) return false;

        const newPasswordHash = await bcrypt.hash(newPassword, 10);

        const result = await Users.update({ id }, {
            username,
            name,
            password: newPasswordHash
        });

        return result.affected;
    }

}

In this code we can see many things, for now, we going to use GraphQLBoolean to return the result and accept all properties in the args object.

Then we have to find out if this user exists. For this reason, we use the await Users.findOne(id); method, and then when it does, use the method bcrypt.compare to check if the old password is the same as the one in the database.

So, if this information is correct, hash the new password with the bcryptjs library and then update the user.
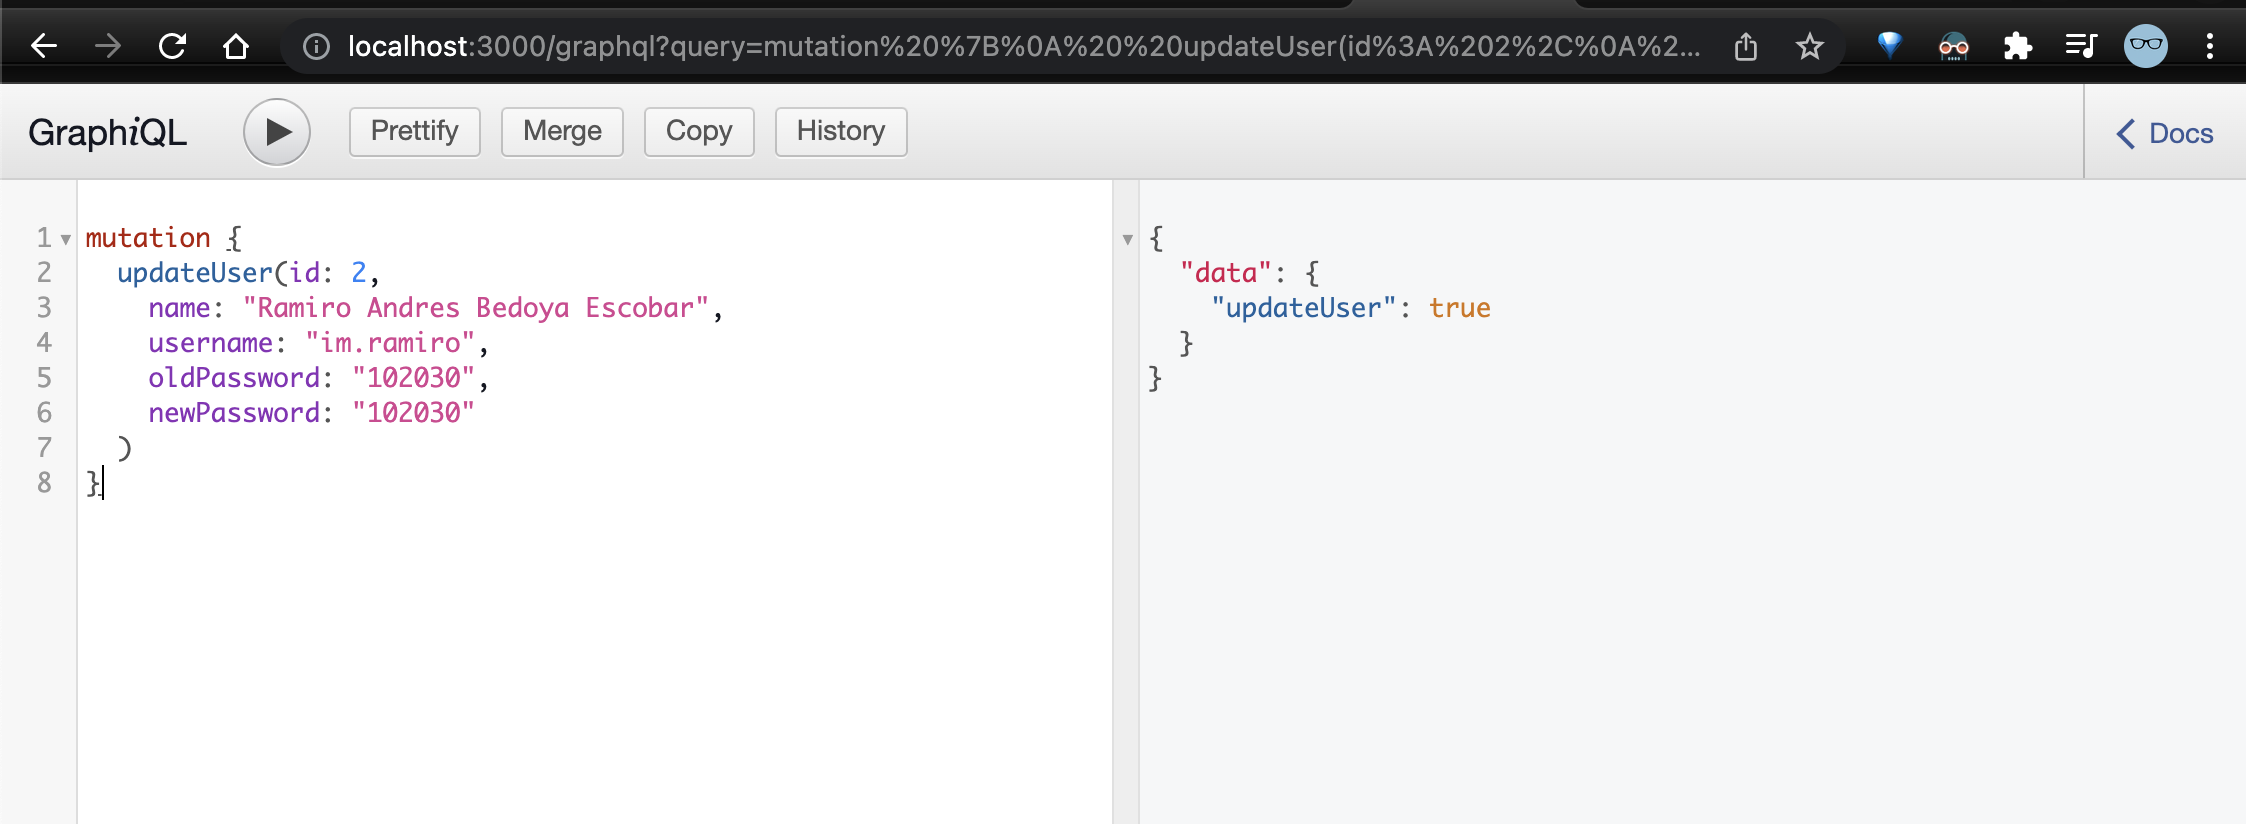
For a better answer, use the typeDefs to return the result more readable.

// src/typeDefs/Message.ts
import { GraphQLString, GraphQLBoolean, GraphQLObjectType } from 'graphql';

export const MessageType = new GraphQLObjectType({
    name: 'Message',
    fields: {
        success: { type: GraphQLBoolean },
        message: { type: GraphQLString }
    }
});

// src/schema/Mutations/User.ts
// ...
export const UPDATE_USER = {
    type: MessageType,
    args: {
        id: { type: GraphQLID },
        name: { type: GraphQLString },
        username: { type: GraphQLString },
        oldPassword: { type: GraphQLString },
        newPassword: { type: GraphQLString }
    },
    async resolve(_: any, args: any) {
        console.log(args)
        const { id, name, username, oldPassword, newPassword } = args;

        const userFound = await Users.findOne(id);

        if (!userFound) return {
            success: false,
            message: 'User not found'
        };

        const isMatch = await bcrypt.compare(oldPassword, userFound.password)

        if (!isMatch) return {
            success: false,
            message: 'Old password is incorrect'
        };

        const newPasswordHash = await bcrypt.hash(newPassword, 10);

        const result = await Users.update({ id }, {
            username,
            name,
            password: newPasswordHash
        });

        return {
            success: result.affected,
            message: result.affected ? 'User updated successfully' : 'User not updated'
        };
    }

}

Now we have a function response with the same answer. Let’s try to get a better refactor of the args code:

// src/schema/Mutations/User.ts

export const UPDATE_USER = {
    type: MessageType,
    args: {
        id: { type: GraphQLID },
        input: {
            type: new GraphQLInputObjectType({
                name: 'UserInput',
                fields: {
                    name: { type: GraphQLString },
                    username: { type: GraphQLString },
                    oldPassword: { type: GraphQLString },
                    newPassword: { type: GraphQLString }
                }
            })
        }
    },
    async resolve(_: any, args: any) {
        console.log(args)
        const { id, input } = args;

        const userFound = await Users.findOne(id);

        if (!userFound) return {
            success: false,
            message: 'User not found'
        };

        const isMatch = await bcrypt.compare(input.oldPassword, userFound.password)

        if (!isMatch) return {
            success: false,
            message: 'Old password is incorrect'
        };

        const newPasswordHash = await bcrypt.hash(input.newPassword, 10);

        const result = await Users.update({ id }, {
            username: input.username,
            name: input.name,
            password: newPasswordHash
        });

        return {
            success: result.affected,
            message: result.affected ? 'User updated successfully' : 'User not updated'
        };
    }

}

Insterad of having seveal paramters as a function paramter, we can have a GraphQLInputObjectType to define the input object.
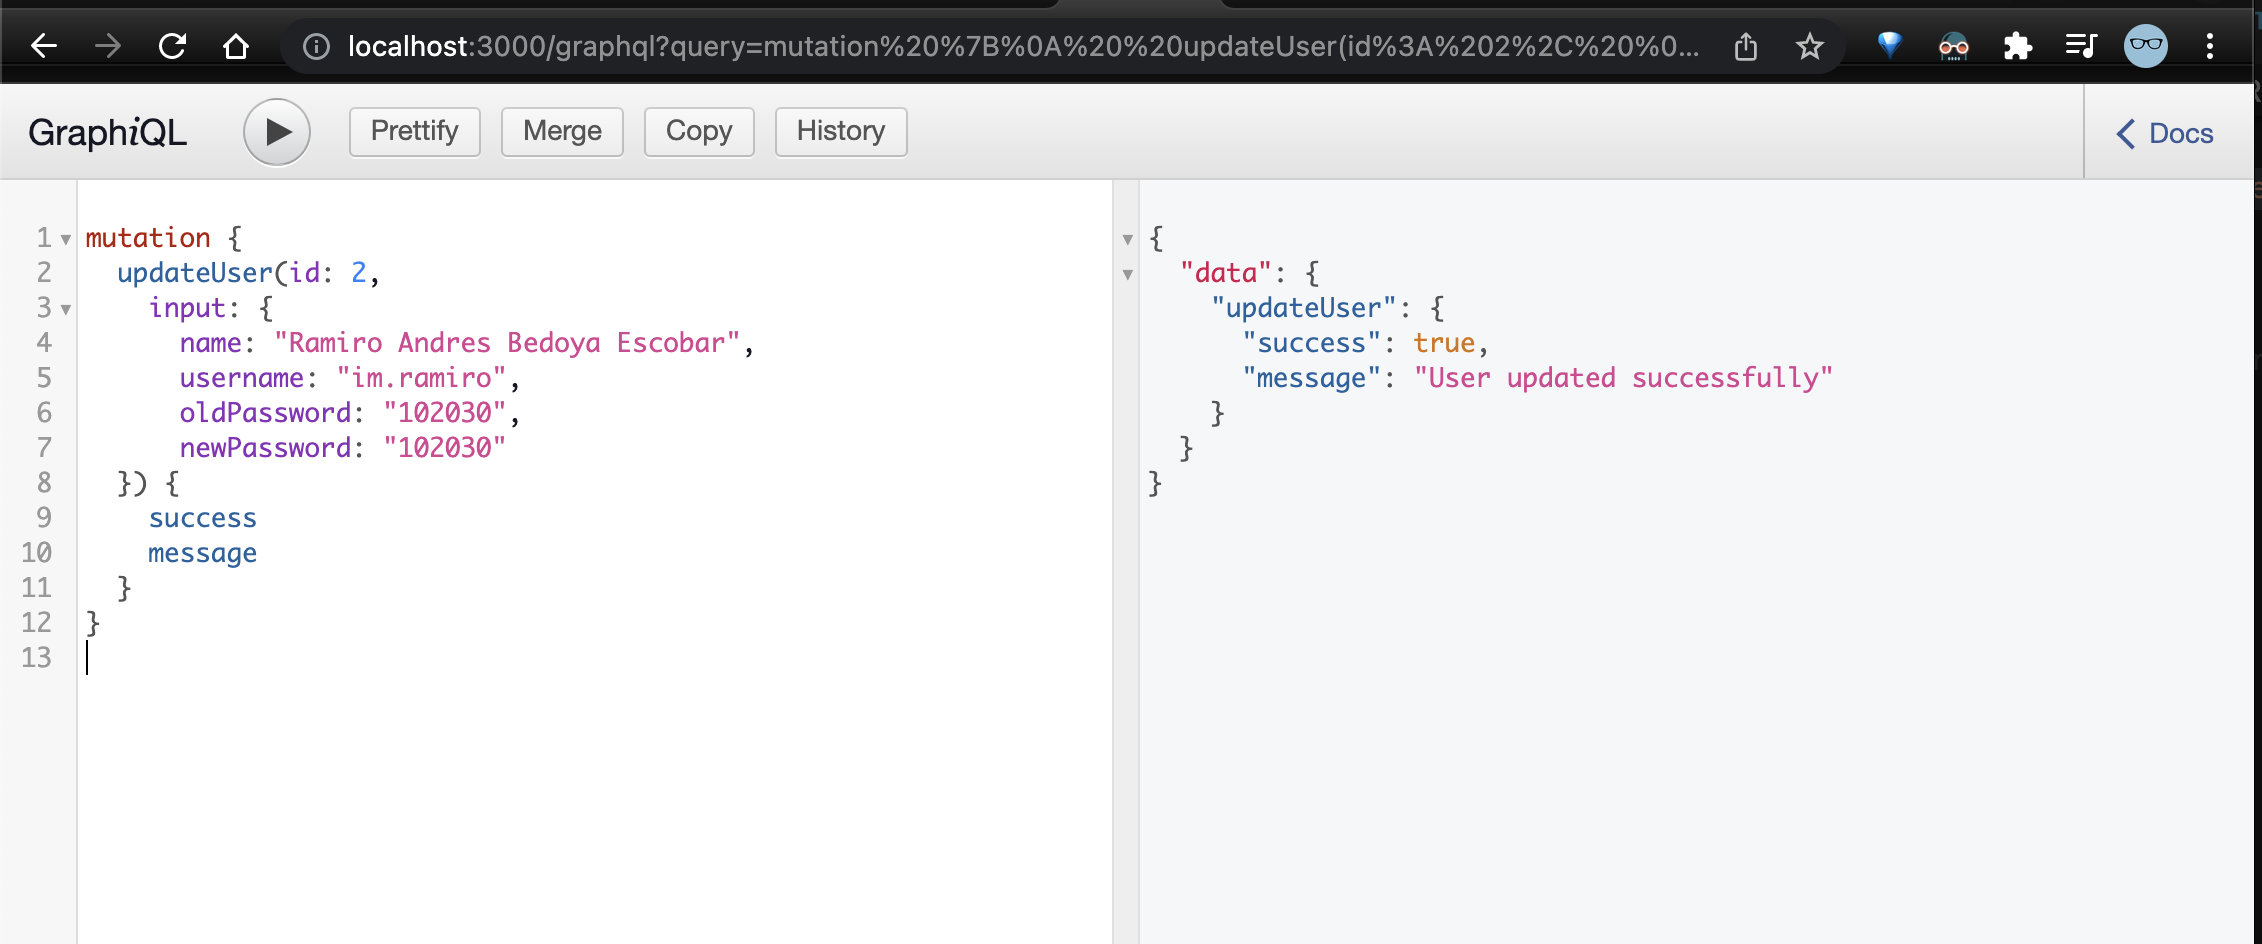
Offtopic, change code with dotenv variables

If you want to deploy your code in production, it is better to change the code with environment variables rather than keep sensitive data in the code, such as database credentials. For this reason, we need to create a file .env at the root of the project.

To do this, let’s install the dotenv package:

npm install dotenv --save

Then, we need to add the following properties in the .env file:

DB_HOST=localhost
DB_PORT=33060
DB_USER=root
DB_PASSWORD=102030
DB_NAME=usersdb

All environment variables are different for each operating system, so thedotenv library already has the implementation to handle this. To use it, let’s implement the following file.

// src/schema/config.ts

import { config } from 'dotenv';

config();

export const PORT = process.env.PORT || 3000;

export const DB_HOST = process.env.DB_HOST;
export const DB_PORT = process.env.DB_PORT;
export const DB_USER = process.env.DB_USER;
export const DB_PASSWORD = process.env.DB_PASSWORD;
export const DB_NAME = process.env.DB_NAME;

And now use the new config.ts files with the db.ts file.


// src/schema/db.ts

import { createConnection } from "typeorm";
import { Users } from "../Entities/Users";

import './config'
import {
    DB_HOST,
    DB_NAME,
    DB_PASSWORD,
    DB_PORT,
    DB_USER
} from "./config";

export const connectDb = async () => {
    await createConnection({
        type: "mysql",
        host: DB_HOST,
        port: Number(DB_PORT),
        username: DB_USER,
        password: DB_PASSWORD,
        database: DB_NAME,

        entities: [
            Users
        ],
        synchronize: true,
        ssl: false,
    });

};

Now you can safely remove the sensitive data from the code and commit it to the repository.