1. 1. Locations
  2. 2. Basic Azure CLI commands
  • Choose the best Azure service to automate your business processes
    1. The Design-first approach
    2. The Code-first approach
  • Create serverless logic with Azure Functions
    1. How to create a function
      1. 0.1. function.json
    2. 1. Secure HTTP triggers
  • Execute an Azure Function with triggers
    1. 1. The timer trigger
      1. 1.1. Special character Table
  • Execute an Azure Function with Blob Storage
    1. 1. Check the binding types
    2. 2. Search information inside a database with Azure Cosmos DB Account
    3. 3. Output binding types
      1. 3.1. Additional resources
  • Create a long-running serverless workflow with Durable Functions
    1. 1. Another example with .net
  • Develop, test, and publish Azure Functions by using Azure Functions Core Tools
    1. 1. Azure Storage account.
    2. 2. Azure Cosmos DB
    3. 3. Create Azure SignalR
    4. 4. Get the Connection string for all resources created
  • Use a storage account to host a static website
  • Azure API Management
    1. 1. The Custom Handlers in Azure Functions
      1. 1.1. Resources
  • Choose a messaging model in Azure to loosely connect your services
    1. 1. The Azure Service Bus
    2. 2. CLI commands for Azure Queue Storage
    3. 3. Nuget package for Azure Queue Storage
    4. 4. NuGet package for Azure Service Bus
    5. 5. The Azure Event Grid
  • Azure Event Hubs
    1. 1. Create and Configure an event Hub
    2. 2. Commands
  • Implement message-based communication workflows with Azure Service Bus
    1. 0.1. Decide between messages and events
  • 1. Conclusions
  • Data Storage
    1. Structured Data
    2. Semi-Structured Data
    3. Unstructured Data
      1. 1. Data types in Azure storage services
      2. 2. Useful commands for Azure storage services
      3. 3. Security inside Azure Storage
      4. 4. Additional resources
  • Store application data with Azure Blob storage
    1. 1. CLI for deploy and run code in azure
    2. 2. Further Reading
  • Azure Virtual Machines [IaaS]
    1. Networking
    2. Let’s create the VM
      1. 1. Azure Automation services
      2. 2. Availability sets
      3. 3. Backup the VM
    3. Create Linux VM
      1. 0.1. Connect to the VM with SSH
      2. 0.2. Initialize data disks
  • Let’s create a new Application
  • Align requirements with cloud types and service models in Azure
  • Control Azure services with the CLI
  • Automate Azure tasks using scripts with PowerShell
    1. TODO:
  • Preparation for the AZ-204 exam

    https://docs.microsoft.com/en-us/learn/certifications/exams/az-204

    https://docs.microsoft.com/en-us/users/cloudskillschallenge/collections/zkgzhwzmryg2?WT.mc_id=cloudskillschallenge_16a3536f-fd69-4f24-903d-3cc76f3e8314

    This is my learning path for the AZ-204 preparation examen.

    Azure URL sandbox

    Azure Labs

    Locations

    LocationsLocations
    * westus2* southcentralus
    * centralus* eastus
    * westeurope* southeastasia
    * japaneast* brazilsouth
    * australiasoutheast* centralindia

    Basic Azure CLI commands

    There are several ways to create a new Azure resource. The Azure Portal is the most common way to create a resource with a rich UI; it guides you throw it quickly and step by step. Another tool to create resources programmatically is the Azure PowerShell and Azure CLI to create a resource.

    How to install the Azure CLI

    https://github.com/Azure/azure-functions-core-tools#installing?azure-portal=true

    1
    2
    -- Set defaults
    az configure --defaults group=learn-2e618c3b-e26f-473c-a22c-5a18ffdaade0 location=westus2

    Choose the best Azure service to automate your business processes

    In business, to build high-quality applications and services, you need to implement a good business process.

    The Business processes modeled in software are often called workflows. Azure includes different technologies that can be used to build and implement workflows and integrate multiple systems:

    • Logic Apps
    • Microsoft Power Automate
    • WebJobs
    • Azure Functions

    All those technologies can accept inputs, run actions with several conditions and produce outputs.

    The Design-first approach

    With this approach, you can start with a design of the workflow with Logic Apps and Microsoft Power Automate. It’s like a tool to draw out the workflow.

    • Logic Apps provides a service to automate, orchestrate and integrate disparate components of a distributed application. It allows you to create complex models of workflows throw the designer or the code using JSON notation. You can connect over 200 connectors or extensions and you can create your own.

    • Microsoft Power Automate is a service to create workflows with no development or IT Pro experience. The type of flows you can create are Automated (By a trigger from some event), Button (Runs on demand), Scheduled (Runs at a specific time), and Business process (To build a business process). Easy to use the tool and behind the scenes it’s powered by Logic Apps.

    Why Choose a design-first approach?

    The principal question here is who will design the workflow: will it be developers or users?

    The Code-first approach

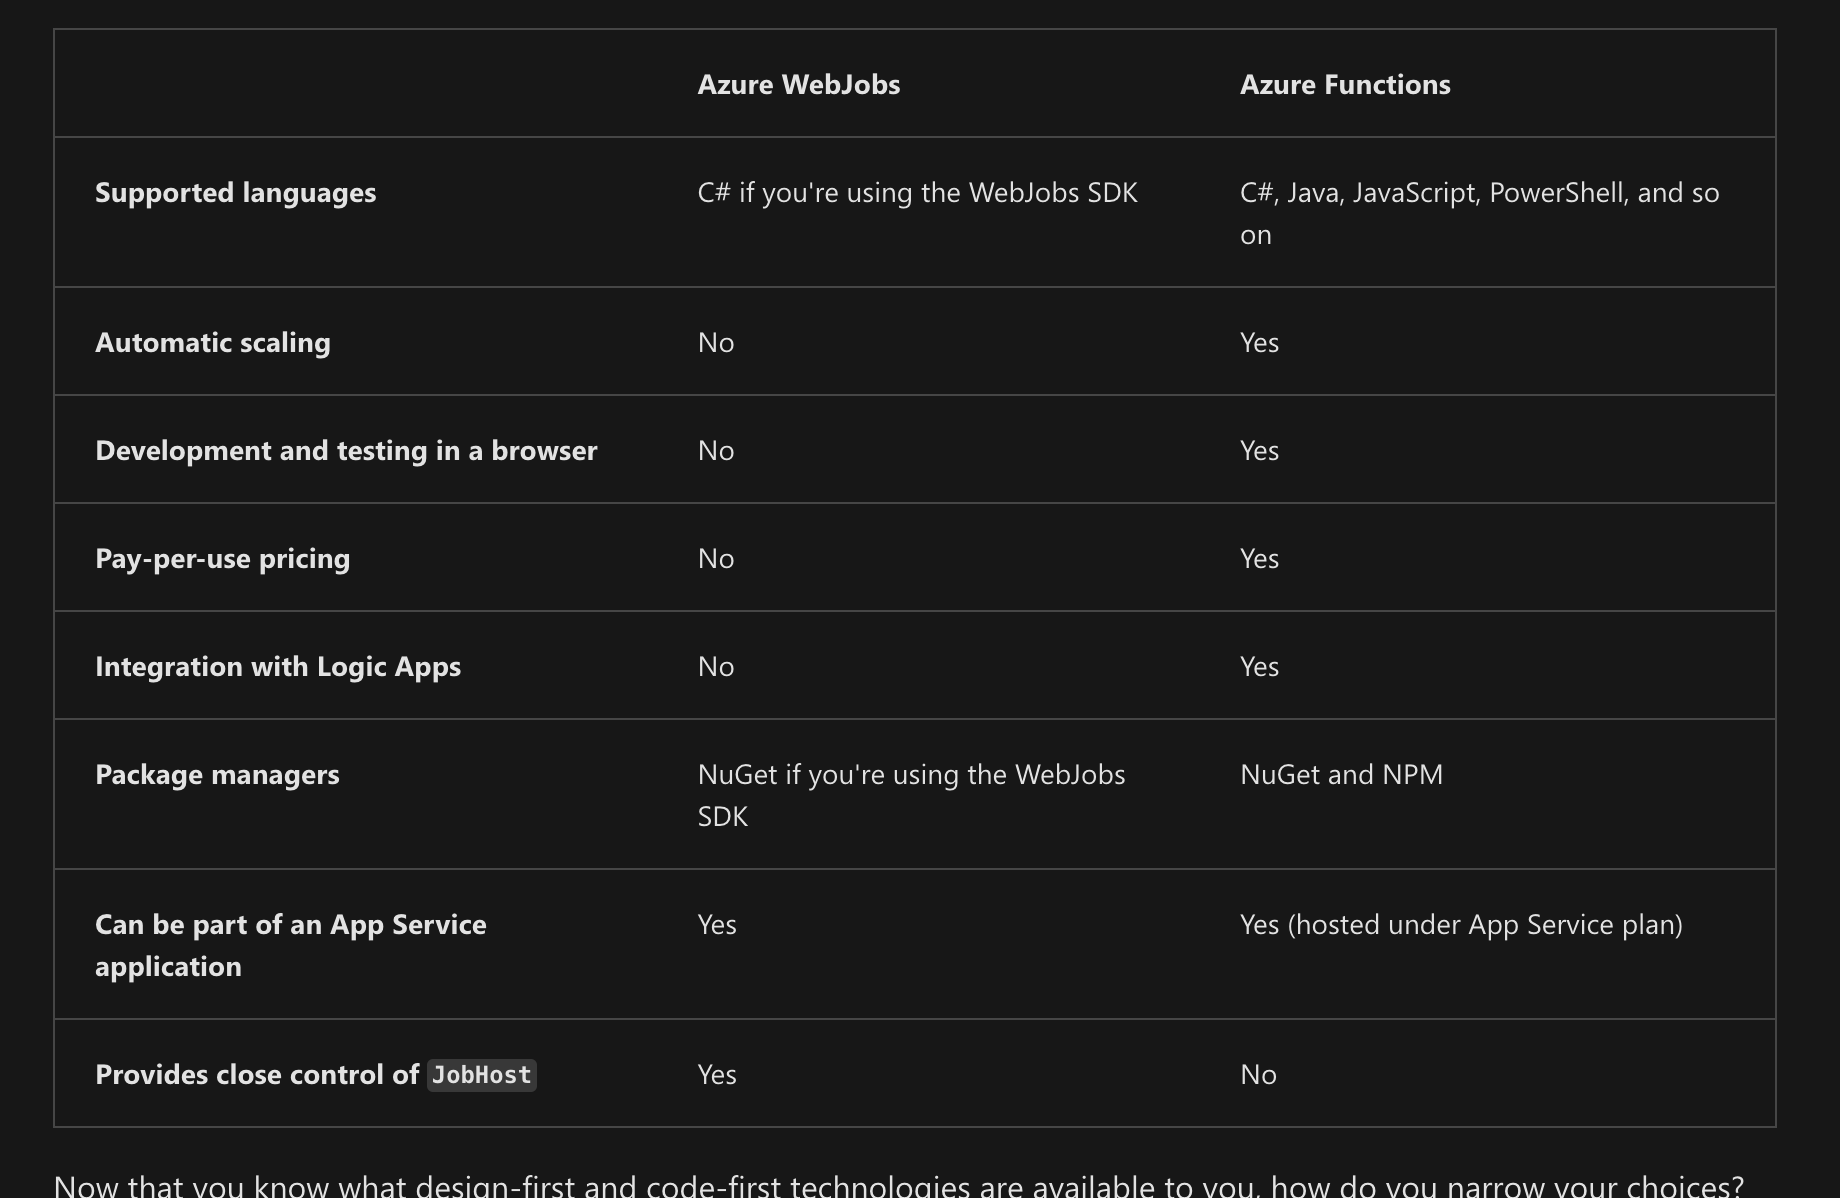
    With this approach, you can code all the workflows and you can have more control over the performance or if you need to write custom code. There are two services to handle this approach:

    • WebJobs and the WebJobs SDK.

      • The Azure App Service is a cloud-based hosting service for web applications.
      • The WebJobs are a part of the Azure App Service more focused to run a program or script automatically. It can be continuous or triggered.
    • Azure Functions is a simple way to run small pieces of code in the cloud without the need to develop a web application. You only pay for the time when the code runs.

      • HTTPTrigger. When you want the code to execute in response to a request sent through the HTTP protocol.
      • TimerTrigger. When you want the code to execute according to a schedule.
      • BlobTrigger. When you want the code to execute when a new blob is added to an Azure Storage account.
      • CosmosDBTrigger. When you want the code to execute in response to new or updated documents in a NoSQL database.
    Create serverless logic with Azure Functions

    The Azure Functions allow developers to host business logic in the cloud, it’s like a function or small piece of code. The good thing about this approach is that you don’t need to worry about the infrastructure. It’s run on serverless computing, which means Azure manages all the provisioning and maintenance of the infrastructure. The Manager automatically scaled out or down depending on load.

    Serverless computing can be interpreted as a function as a service (FaaS) or a microservice. You can find in Azure two approaches to run your code: Azure Logic Apps and Azure Functions.

    The Azure Functions is a serverless application that you can white functions code in languages like C#, F#, Javascript, Python and PowerShell Core. Support packages managers like NuGet and NPM. There are some characteristics that you need to know:

    • Not reserved time. It’s only charged based on what is used. So, you don’t need to allocate a full Virtual Machine server and configure it.
    • Stateless logic, which means created and destroyed on demand.
    • Event-driven, which means that only responds to events called a “trigger”, it can be an HTTP request or a message being added to a queue.
    • That functions can be deployed into a non-serverless environment. Which means it’s not fully associated with Azure.
    • There is an Execution Timeout of 5 minutes. Max 10 minutes with configuration. If the request it’s triggered by HTTP, the timeout will be of 2.5 minutes. Alternative Durable Functions
    • Under high load, hosting the function on VM can be cheaper.

    For the Azure Service, you can choose two service plans:

    • Consumption plan: It provides automatic scaling and bills only when your functions are running. This plan includes by default time out of 5 minutes and can be increased to 10 minutes.
    • Azure App Service Plan: With this plan, you can configure the time out of the function and can configure the function to run indefinitely.

    That function needs to be attached to a storage account for internal operations like logging functions executions and so on. So, you can select an existing one or create a new one.

    How to create a function

    Under Azure Portal, select => create a resource / Compute / Function App / Create a Function App

    There are several options here. But one of the important is to choose the Function App Name, which should be unique and the Runtime Stack and version. After we create the function, there are several options to configure.

    • Triggers: Each function must be configured with exactly one trigger.

    Several events can be used to trigger the function:

    • Blob storage: When a new/updated blob is detected.
    • CosmosDB: When a new/updated document is detected.
    • HTTP: When a request is sent.
    • Event Grid: When an event is received from the Event Grid
    • Timer: Schedule.
    • Microsoft Graph Events: When there is an incoming Webhook from the Microsoft Graph.
    • Queue Storage: When a new item is received on a queue.
    • Service Bus: When a new message is received on a topic/queue.
    • Bindings: A binding is a declarative way to connect data and services to your function. These are the bindings supported by Azure Functions.. There are two kinds of bindings, the Input binding that allows connecting with the data source and the Output binding that allows connecting with the data destination.

    This is an example of a binding:

    1
    2
    3
    4
    5
    6
    7
    8
    9
    10
    11
    12
    13
    14
    15
    16
    17
    18
    {
    "bindings": [
    {
    "name": "order",
    "type": "queueTrigger",
    "direction": "in",
    "queueName": "myqueue-items",
    "connection": "MY_STORAGE_ACCT_APP_SETTING"
    },
    {
    "name": "$return",
    "type": "table",
    "direction": "out",
    "tableName": "outTable",
    "connection": "MY_TABLE_STORAGE_ACCT_APP_SETTING"
    }
    ]
    }

    function.json

    In the previous example, in the first binding, we have implemented the direction “in” for a trigger in the Storage Queue for the queueName “myqueue-items”. And, the second binding with the direction “out” will insert into the table “outTable” on Azure Table Storage. The output and input bindings can be anything, for example, instead of a table, you can send an email using the SendGrid binding or both.

    When you want to create a function, follow the steps:
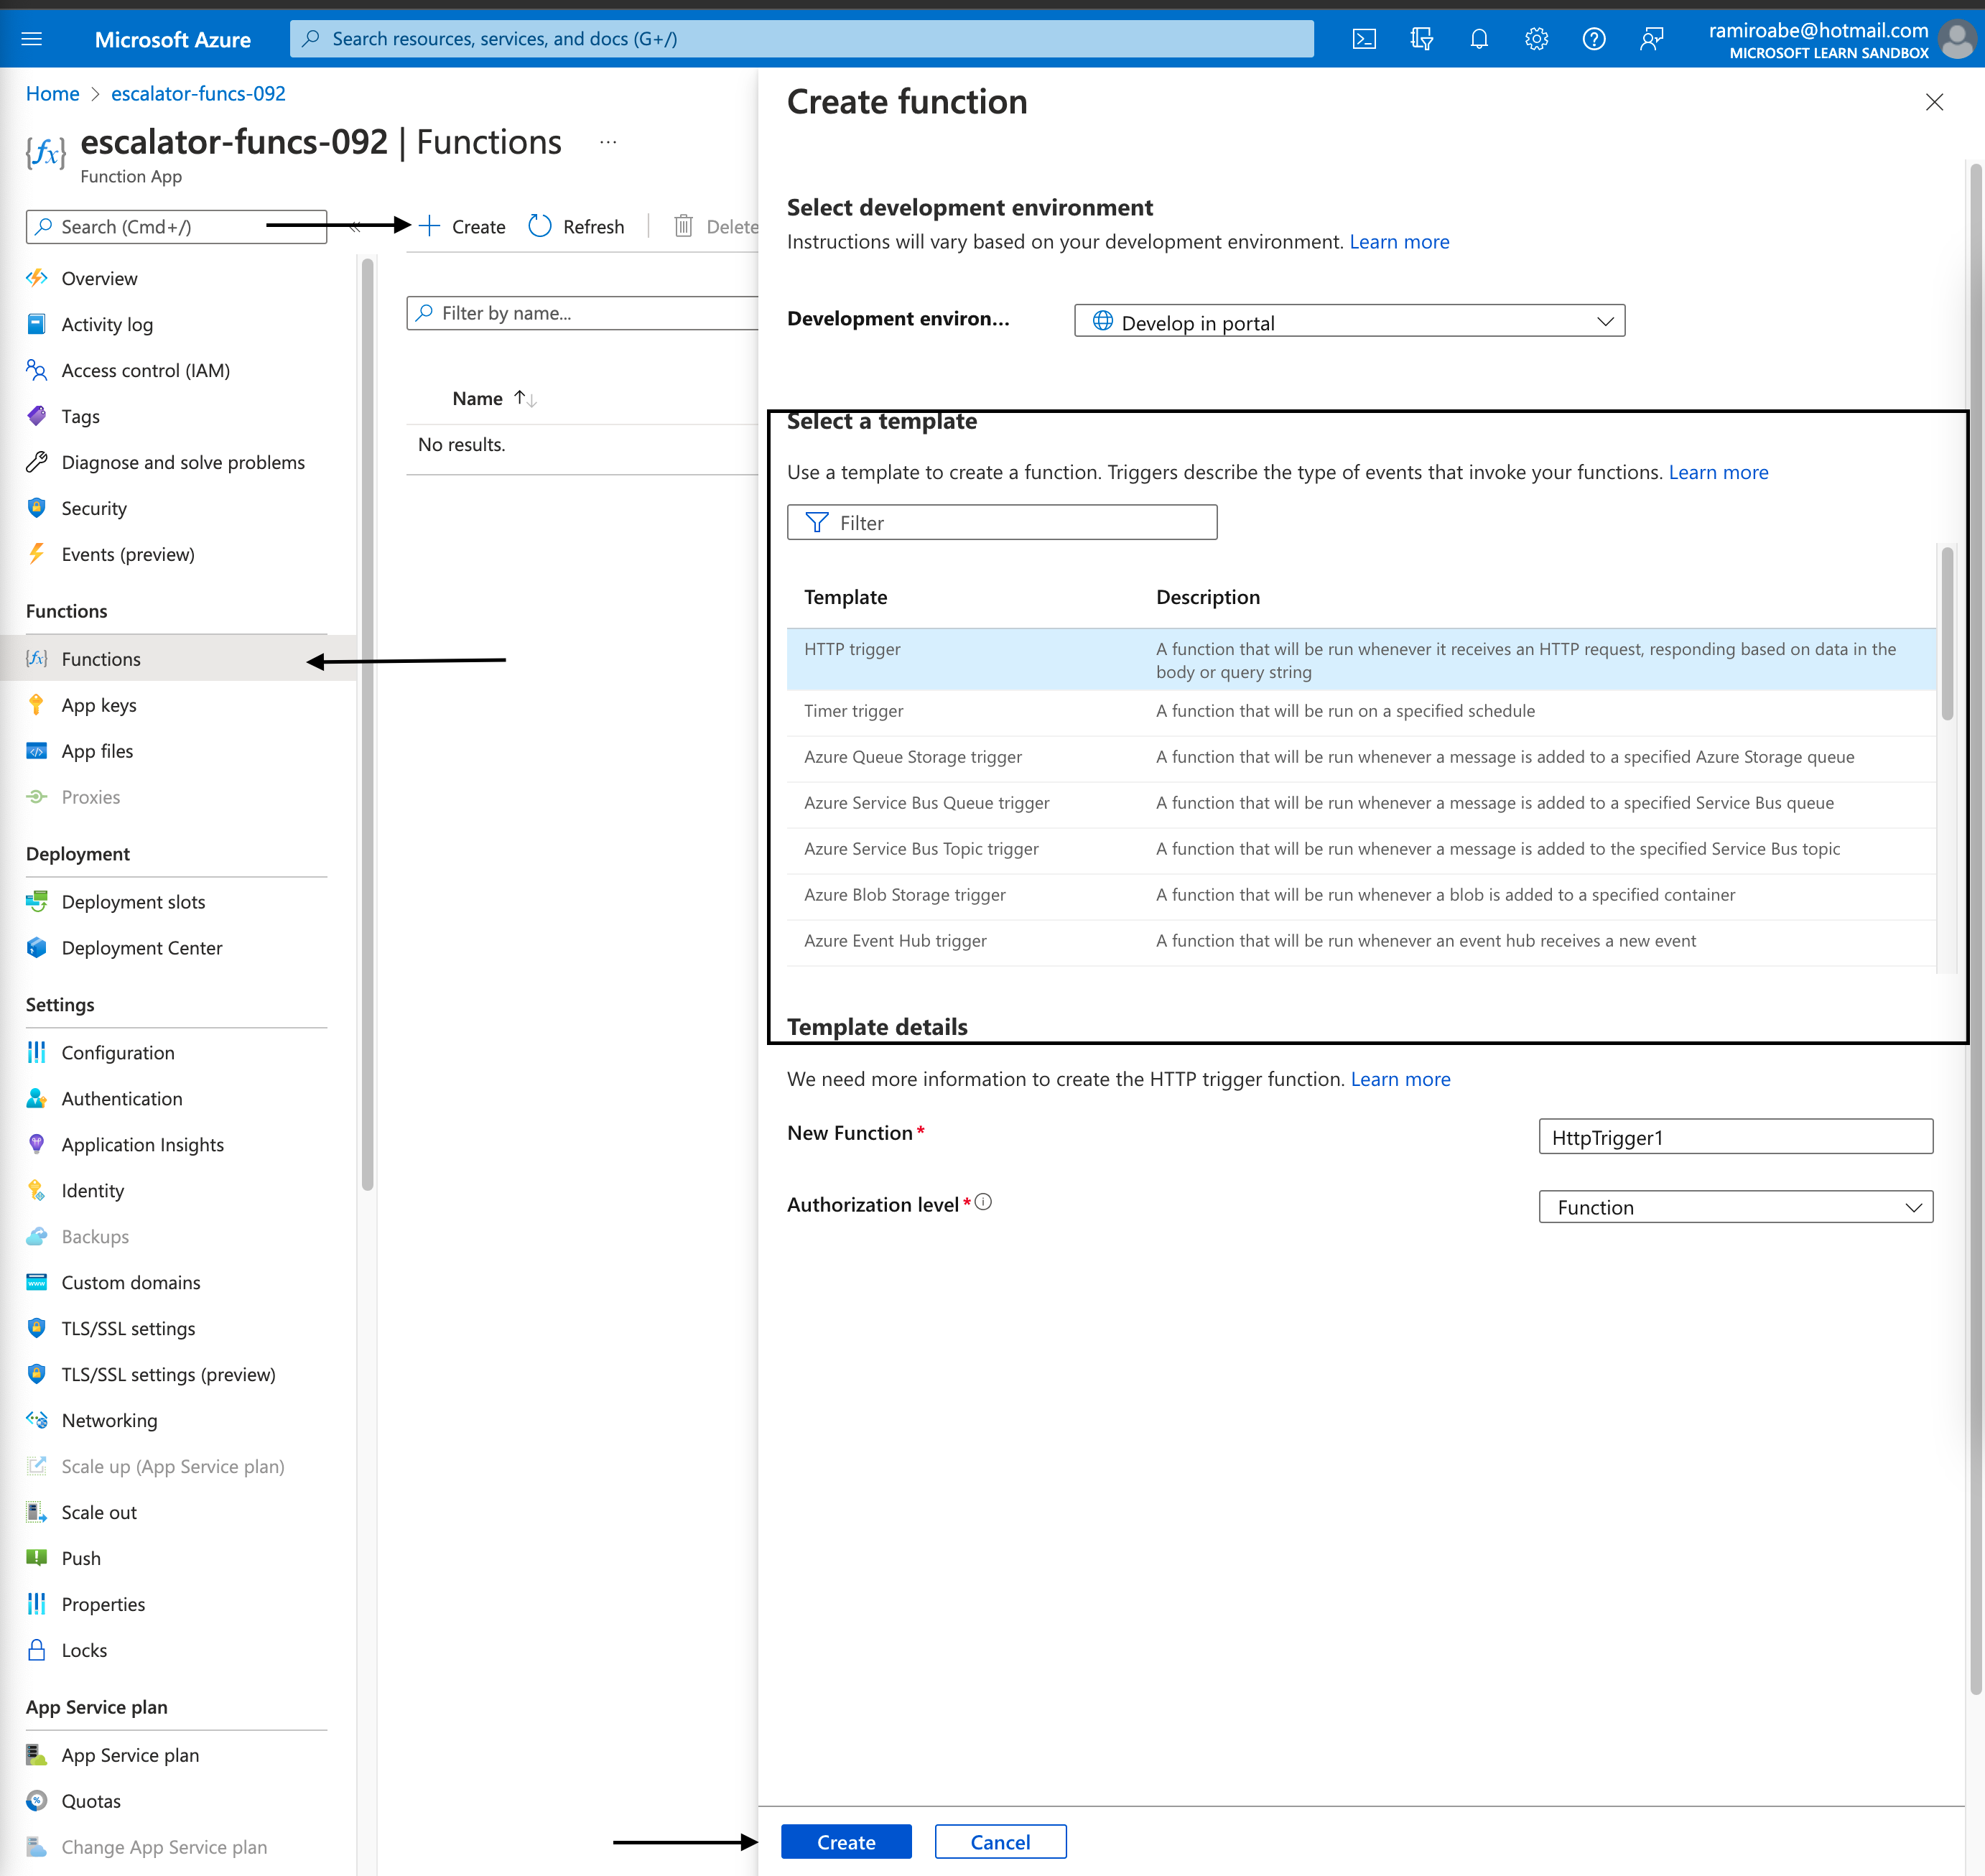
    As you can see, there are several templates to work with. We going to select HTTP trigger.

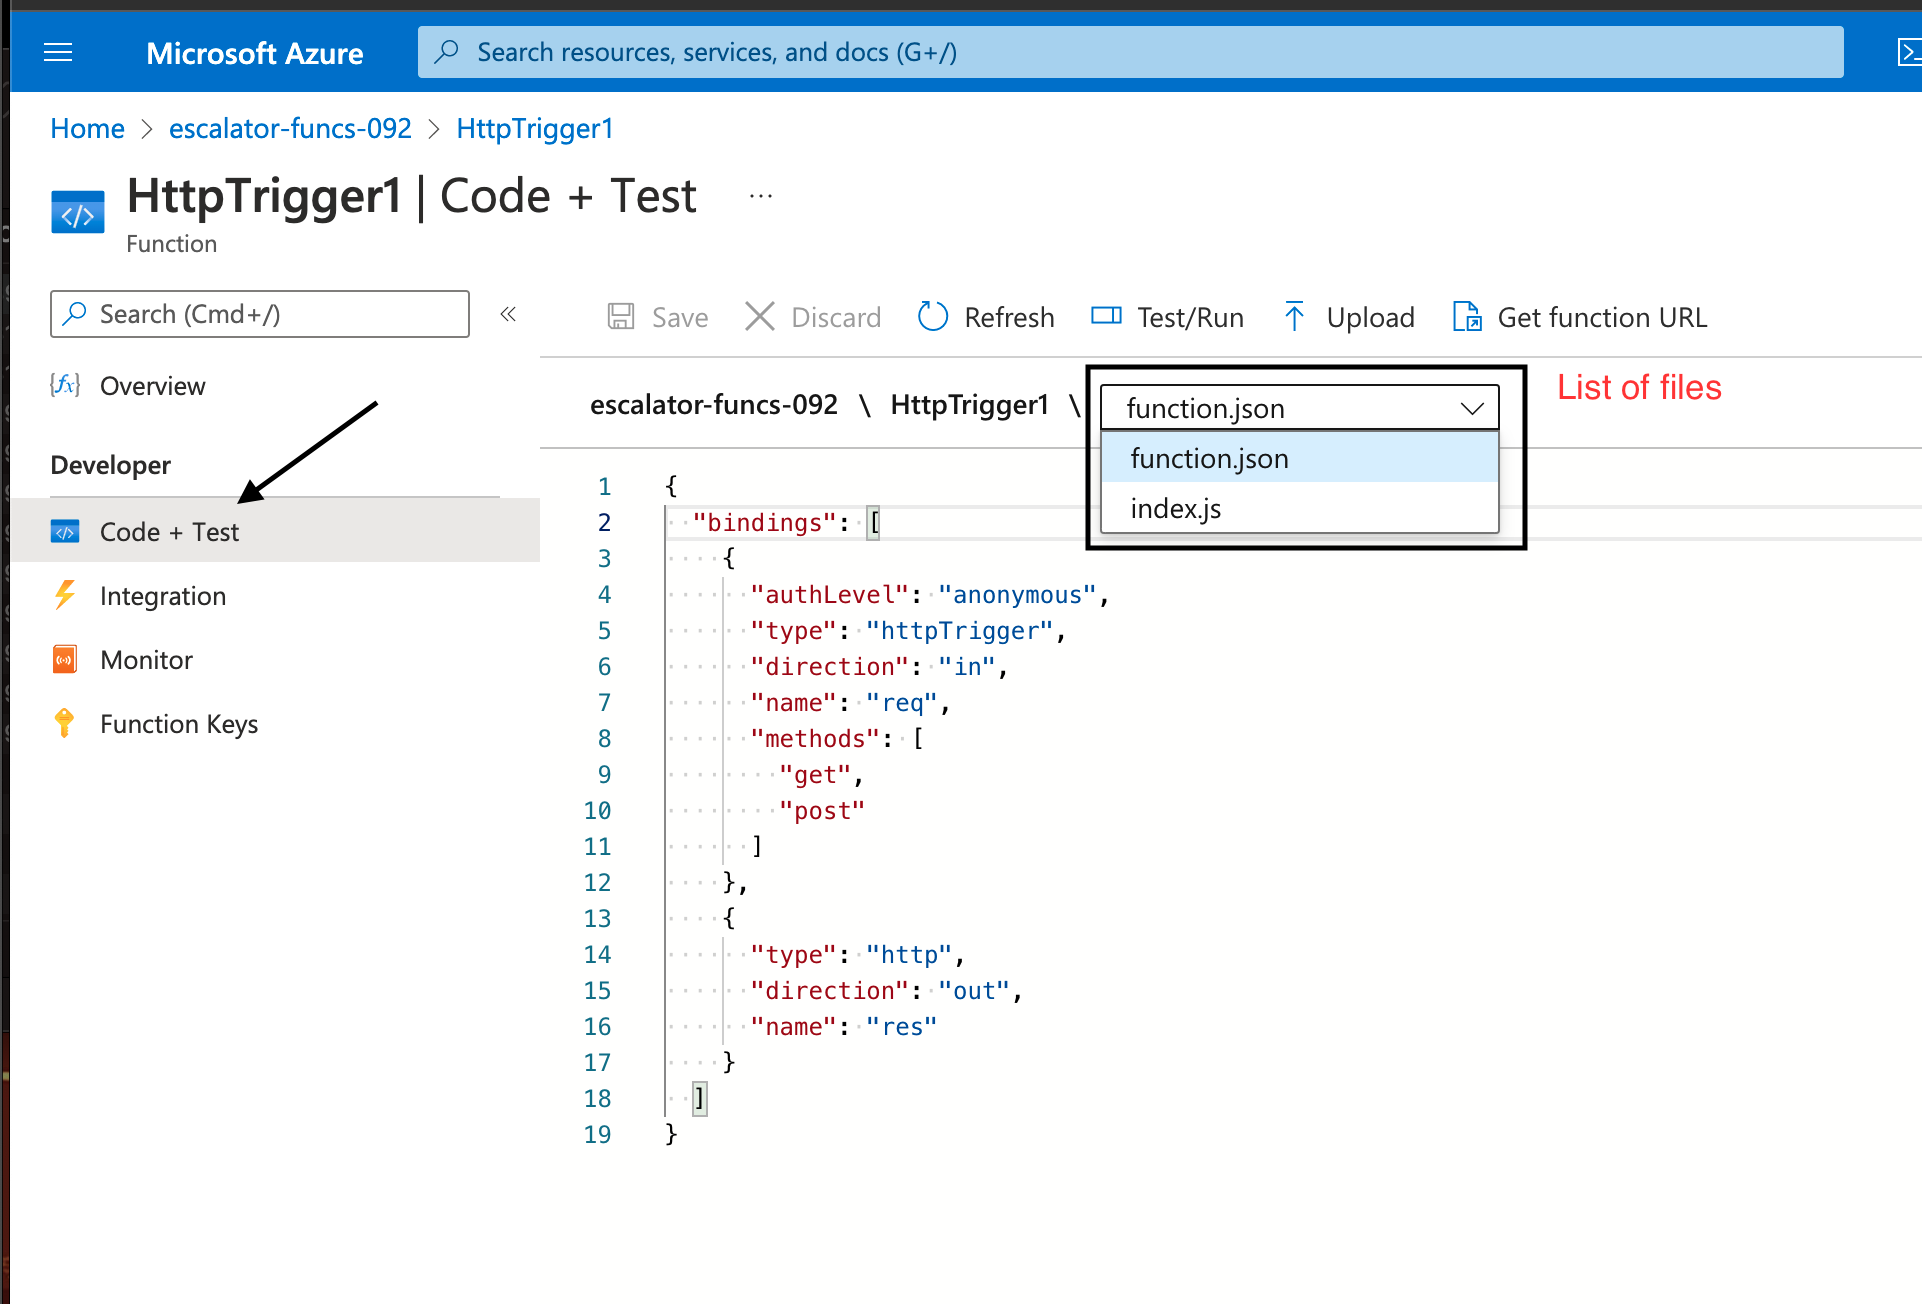
    After creating the function, by default, two files are created, the function.json configuration file and the function placeholder index.js. In the code inside the index.js file, you will receive the parameter req that is the trigger binding that you configure, and the parameter res is the output binding.

    Those parameters are defined in the function.json file. For the first binding with direction in, the variable was called req. For the second binding with direction out, the variable was called res.

    1
    2
    3
    4
    5
    6
    7
    8
    9
    10
    11
    12
    13
    14
    15
    16
    {
    "bindings": [
    {
    "authLevel": "function",
    "type": "httpTrigger",
    "direction": "in",
    "name": "req",
    "methods": ["get", "post"]
    },
    {
    "type": "http",
    "direction": "out",
    "name": "res"
    }
    ]
    }

    The Test/Run function can help you to test the function better. It’s like a postman for that function.
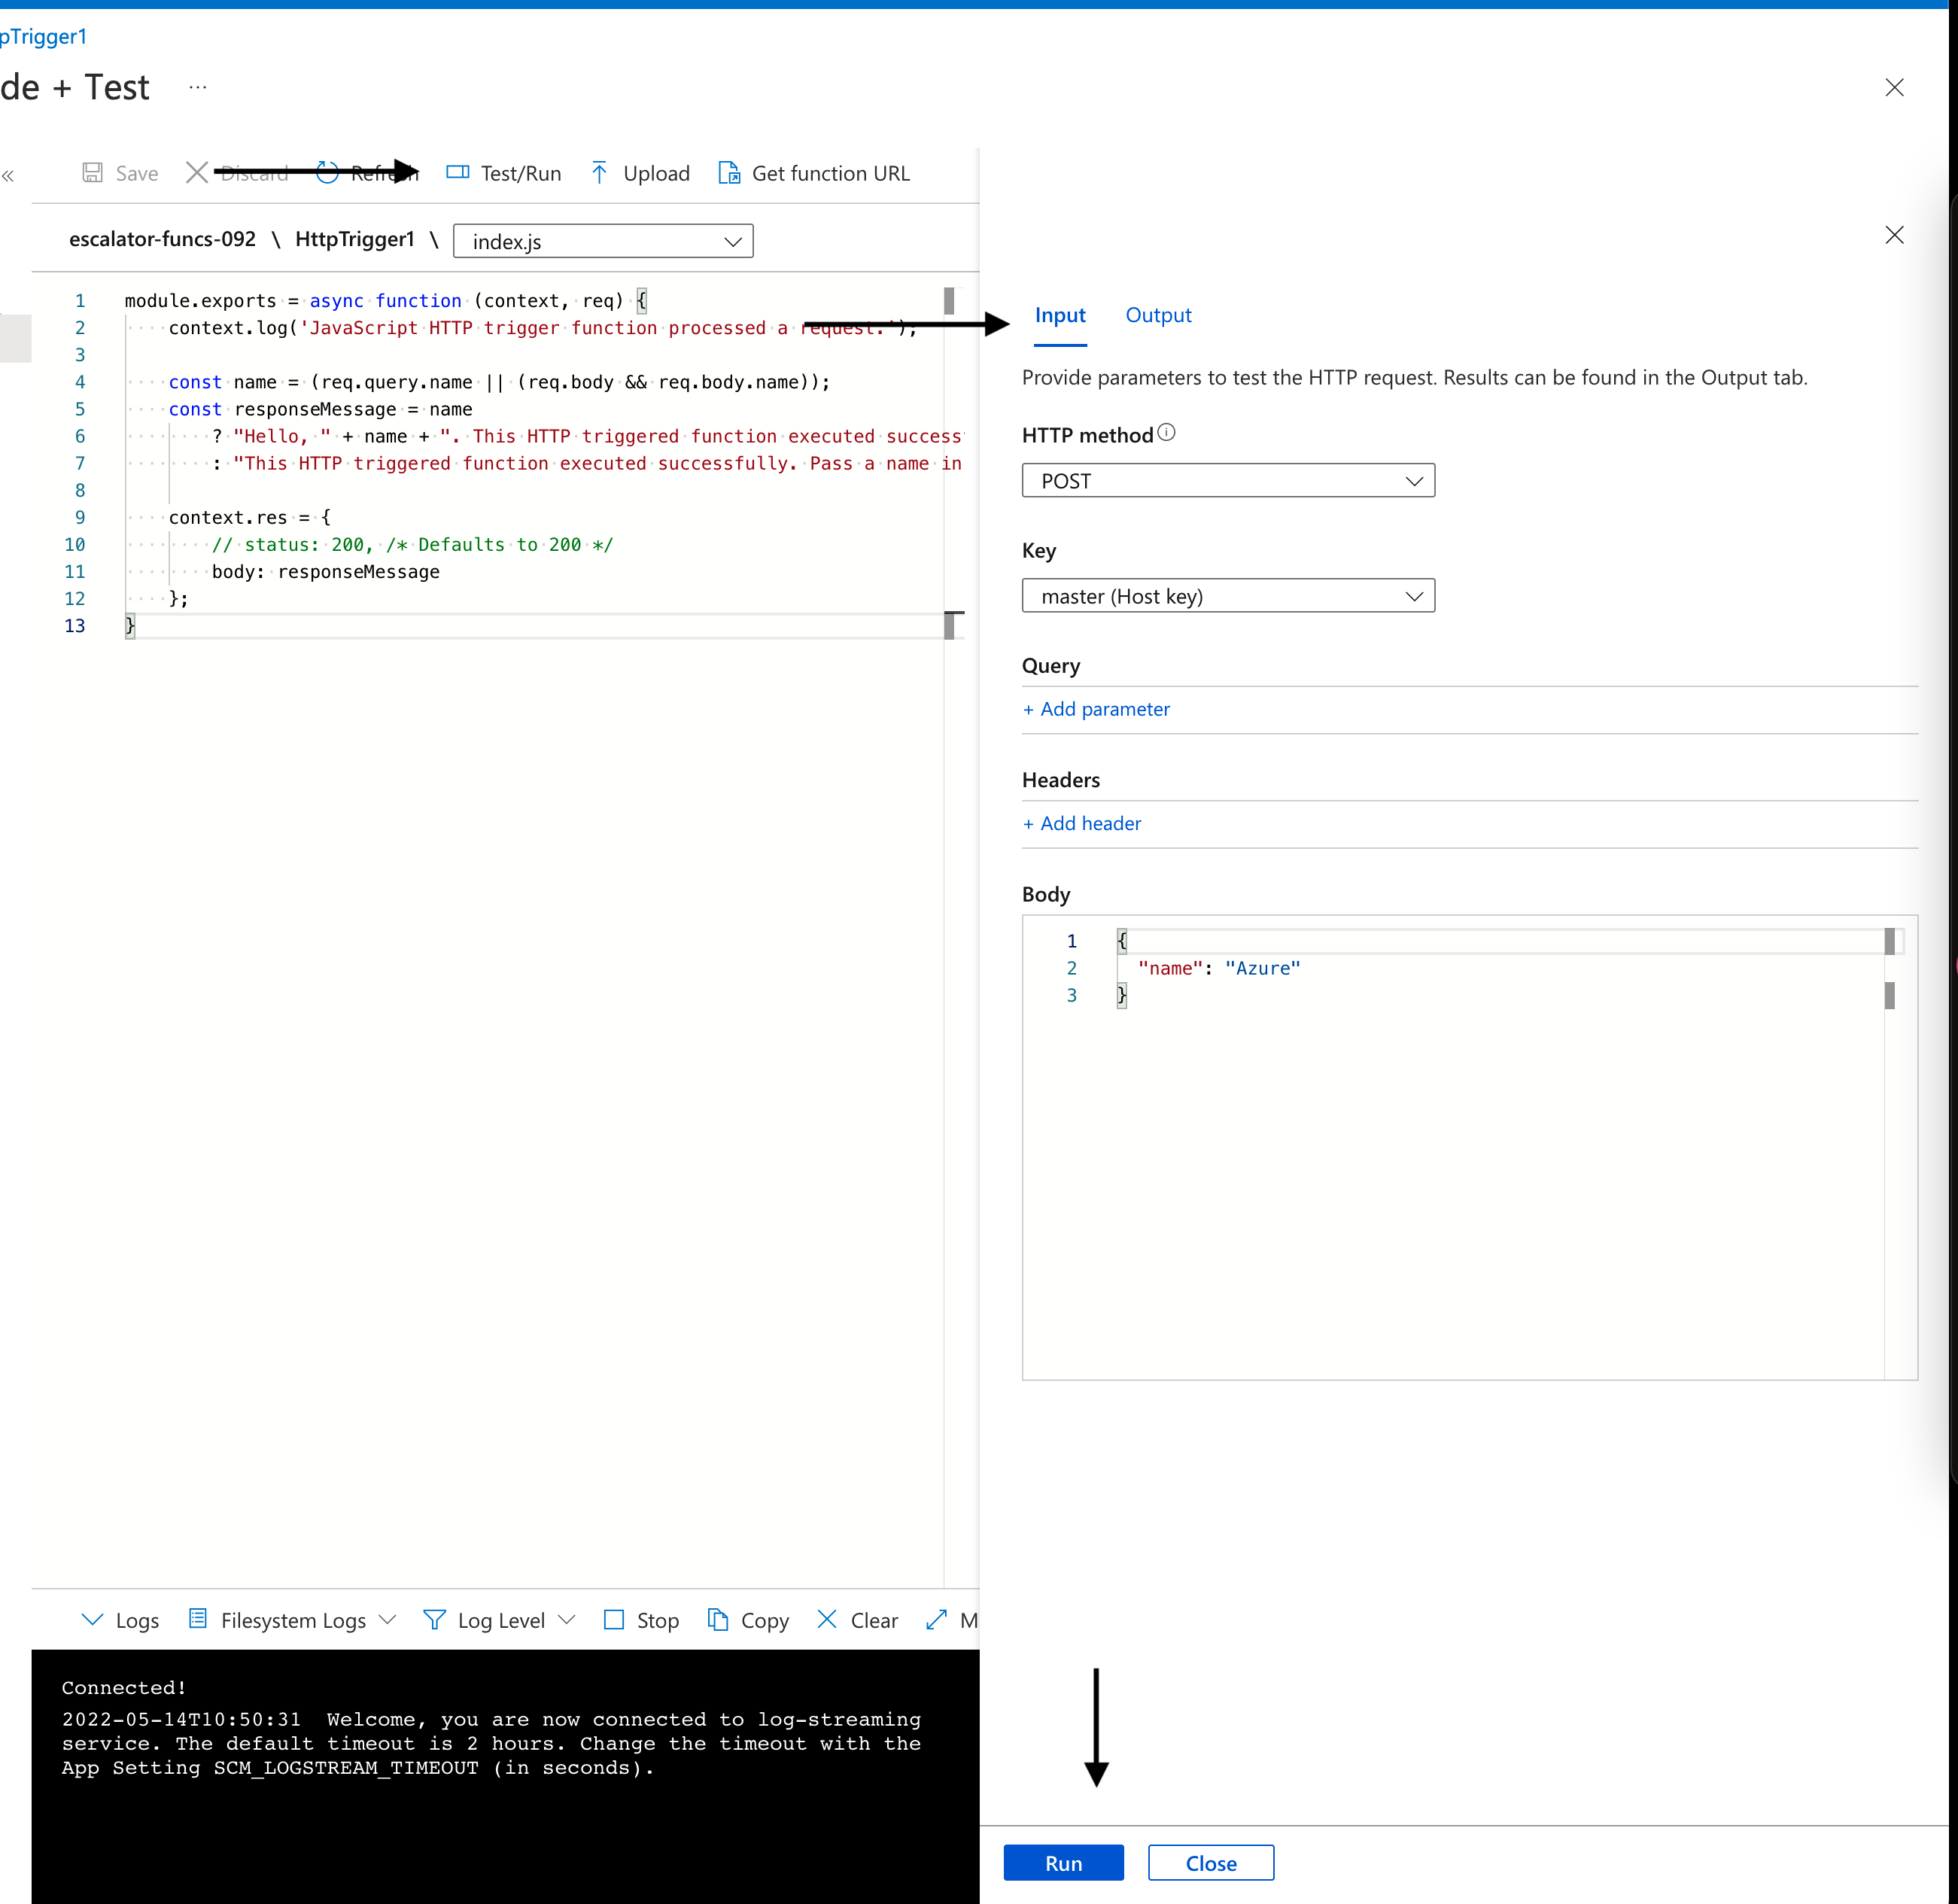
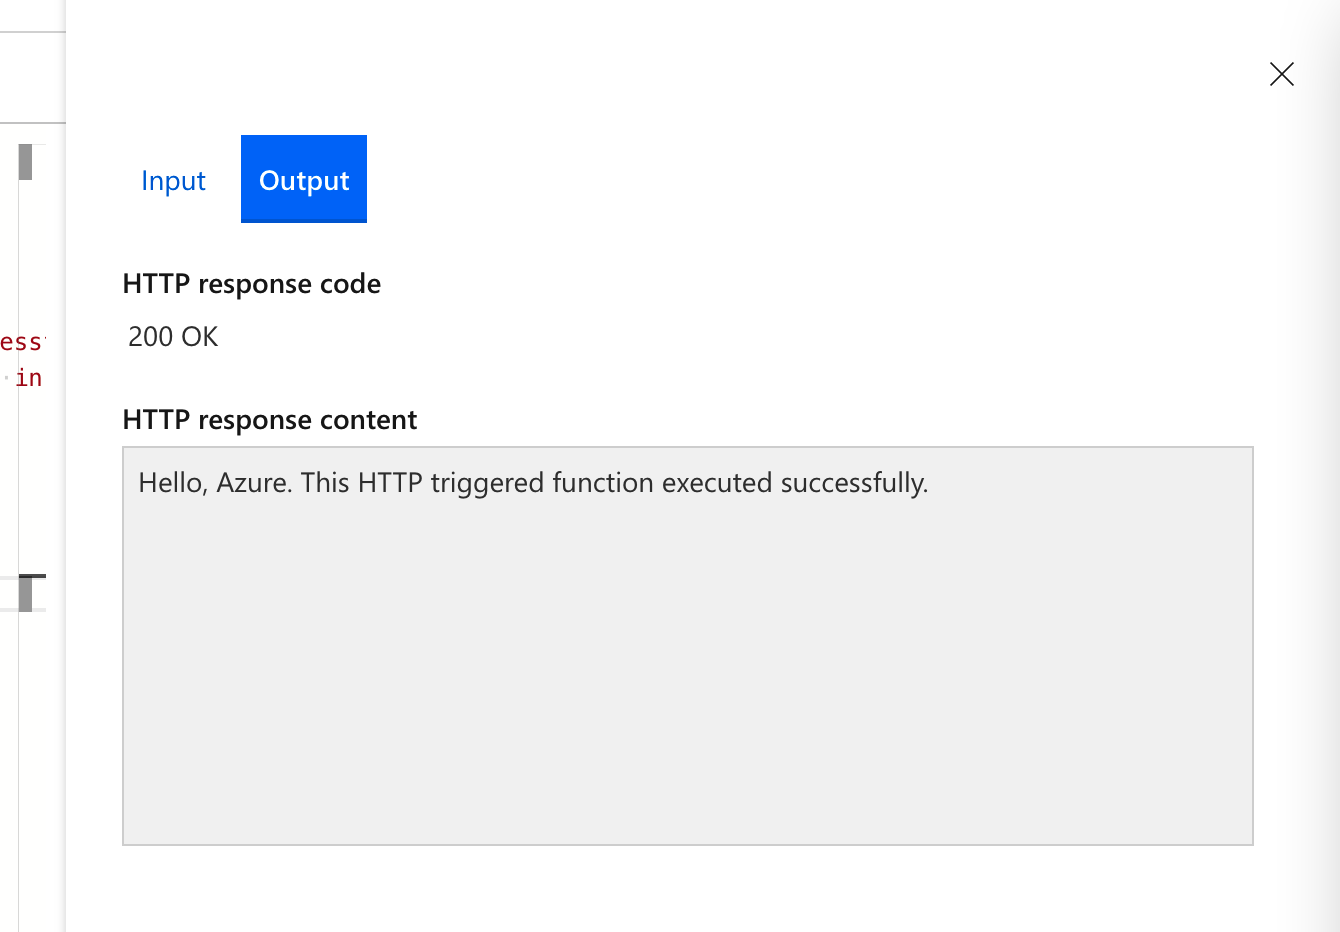
    if you want to test outside, click Get Function URL button, and you will see the URL to test the function.

    For monitoring the Azure function, in the function root page, search the option Application Insights and turn it on. It will give you all the monitoring information needed.

    For logging the function, the context already includes some functions to log the information.
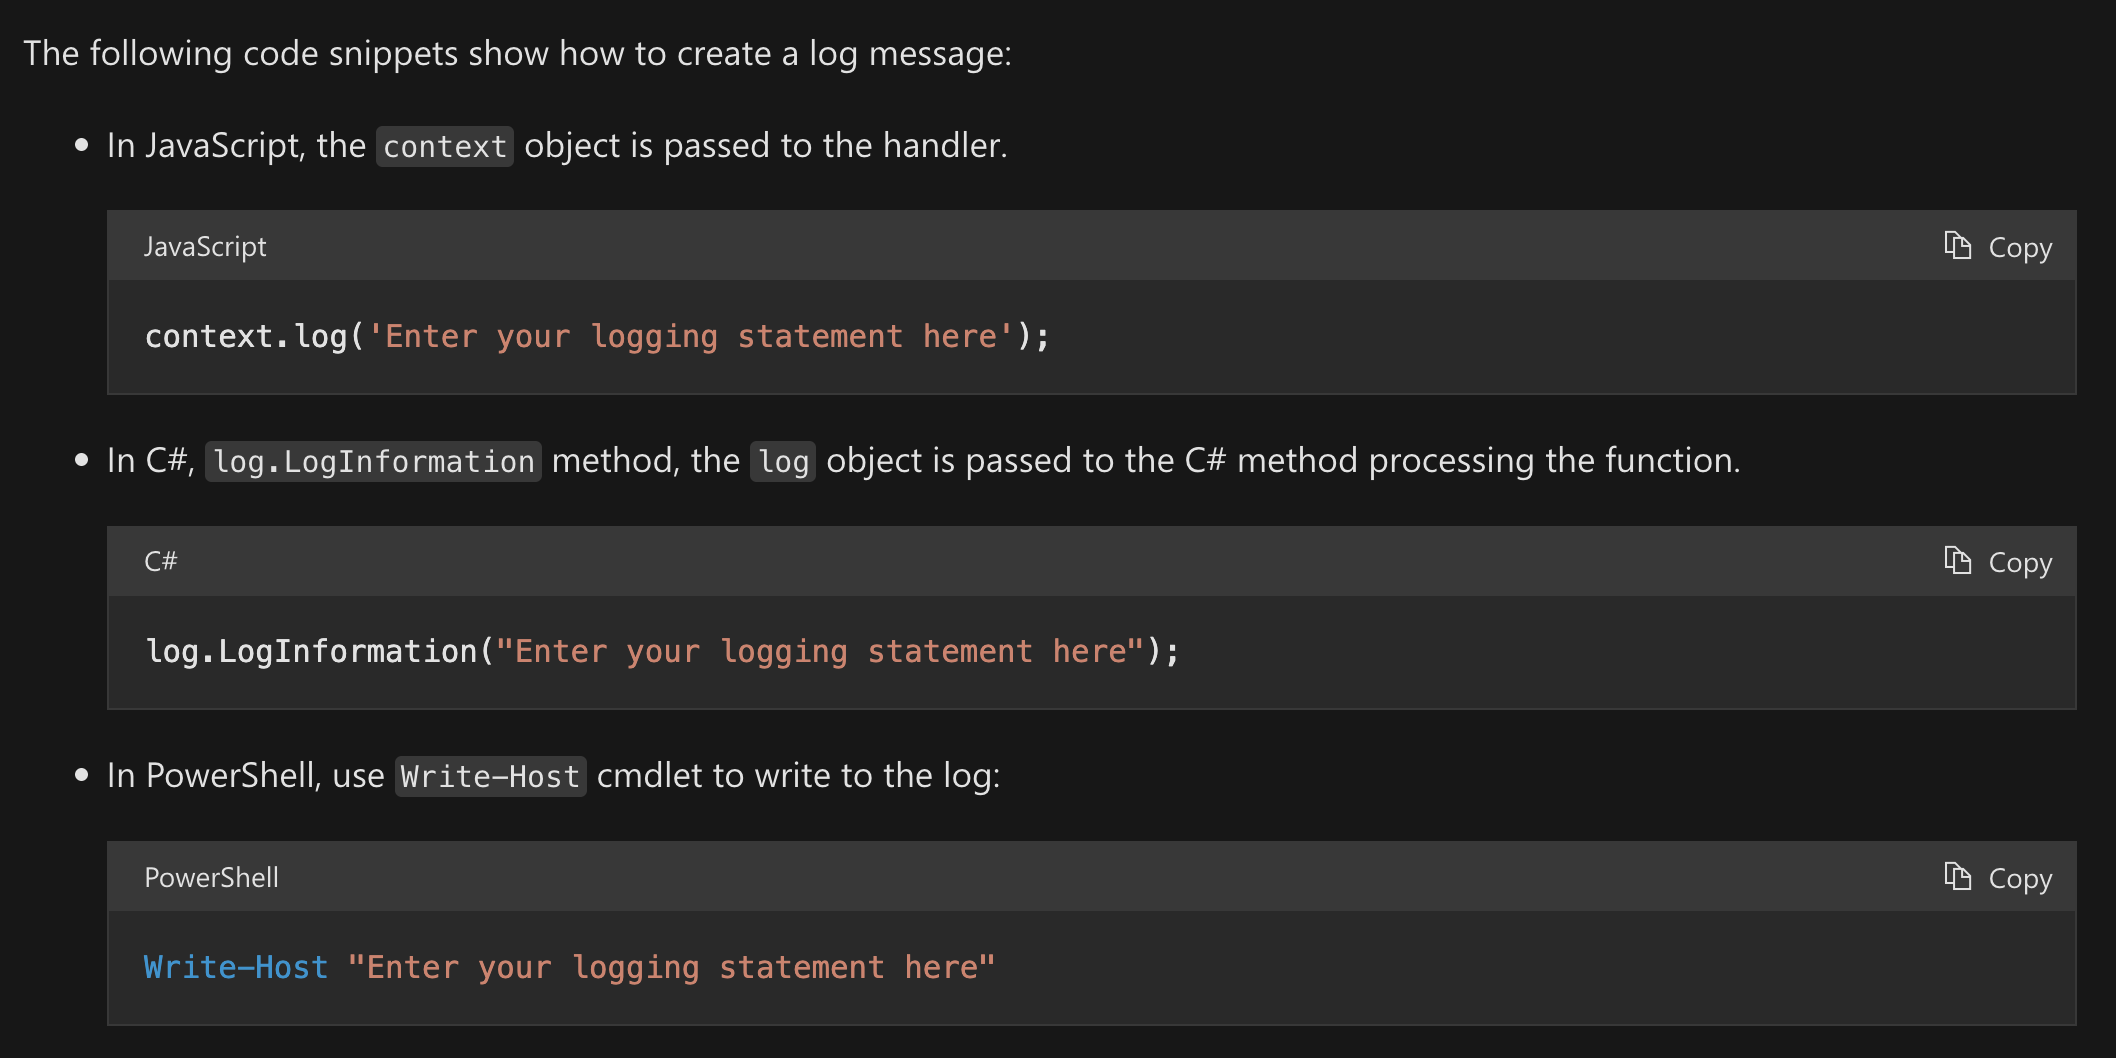
    And you can see the output in the Application Insights dashboard / Monitoring / Logs.

    Secure HTTP triggers

    There are several ways to secure the function. We already select Anonymus for the Authorization Level when we created the function.

    By default, the function set Function as the default authorization level. This level requires a specific API key to execute the function. You can set it in the Function Keys section. The Admin level also requires a specific API key.
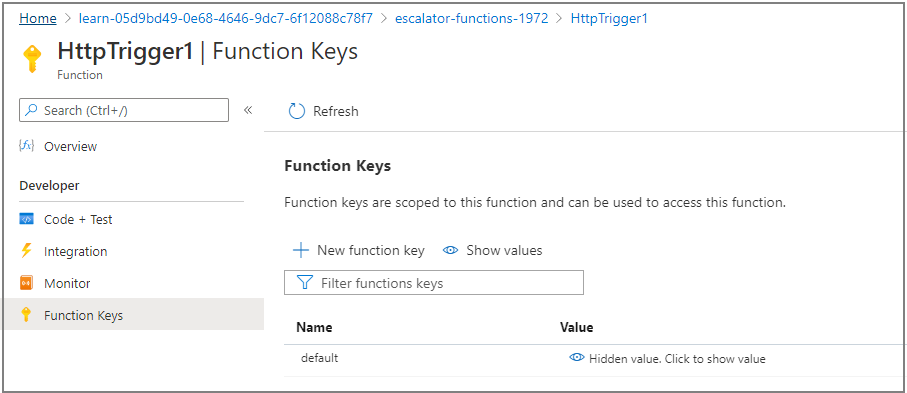
    To update this, let’s go to Code + Test area, select the file function.json and change the
    binding with authLevel to “function”.

    After you change this authorization level, you need to supply the API key to execute the function. You can send the secret token as a query string parameter named code or as a header named x-functions-key.

    The difference is their scope; the Function key is specific to a function.

    Execute an Azure Function with triggers

    As previously explained, the function is triggered by the event. The event can be an HTTP request, a message being added to a queue, a document being added to a CosmosDB, a blob being updated, a timer being scheduled, a Webhook from the Microsoft Graph, etc. Let’s see another example

    But, the trigger is not the same as a binding. A function can have multiple input and output bindings. The bindings are optional. An input binding is the data that your function receives. An output binding is the data that your function sends.

    The timer trigger

    Let’s say we need to execute a function every 5 minutes. We can create a timer trigger. For this, we need two things the parameter name and the Schedule CRON expression.

    Here is a table for a basic understanding of the CRON expression:

    {second} {minute} {hour} {day} {month} {day of the week}

    Field nameAllowed valuesAllowed special characters
    Seconds0-59, - * /
    Minutes0-59, - * /
    Hours0-23, - * /
    Day of month1-31, - * /
    Month1-12 or JAN-DEC, - * /
    Day of week0-6 or SUN-SAT, - * /

    For example, a CRON expression to create a trigger that executes every five minutes looks like: 0 */5 * * * *

    Special characterMeaningExample
    *Selects every value in a fieldAn asterisk “*“ in the day of the week field means every day.
    ,Separates items in a listA comma “1,3” in the day of the week field means just Mondays (day 1) and Wednesdays (day 3).
    -Specifies a rangeA hyphen “10-12” in the hour field means a range that includes the hours 10, 11, and 12.
    /Specifies an incrementA slash “*/10” in the minutes field means an increment of every 10 minutes.

    Special character Table

    To create the function with the trigger with the template. Select the template Timer Trigger and set the CRON expression.
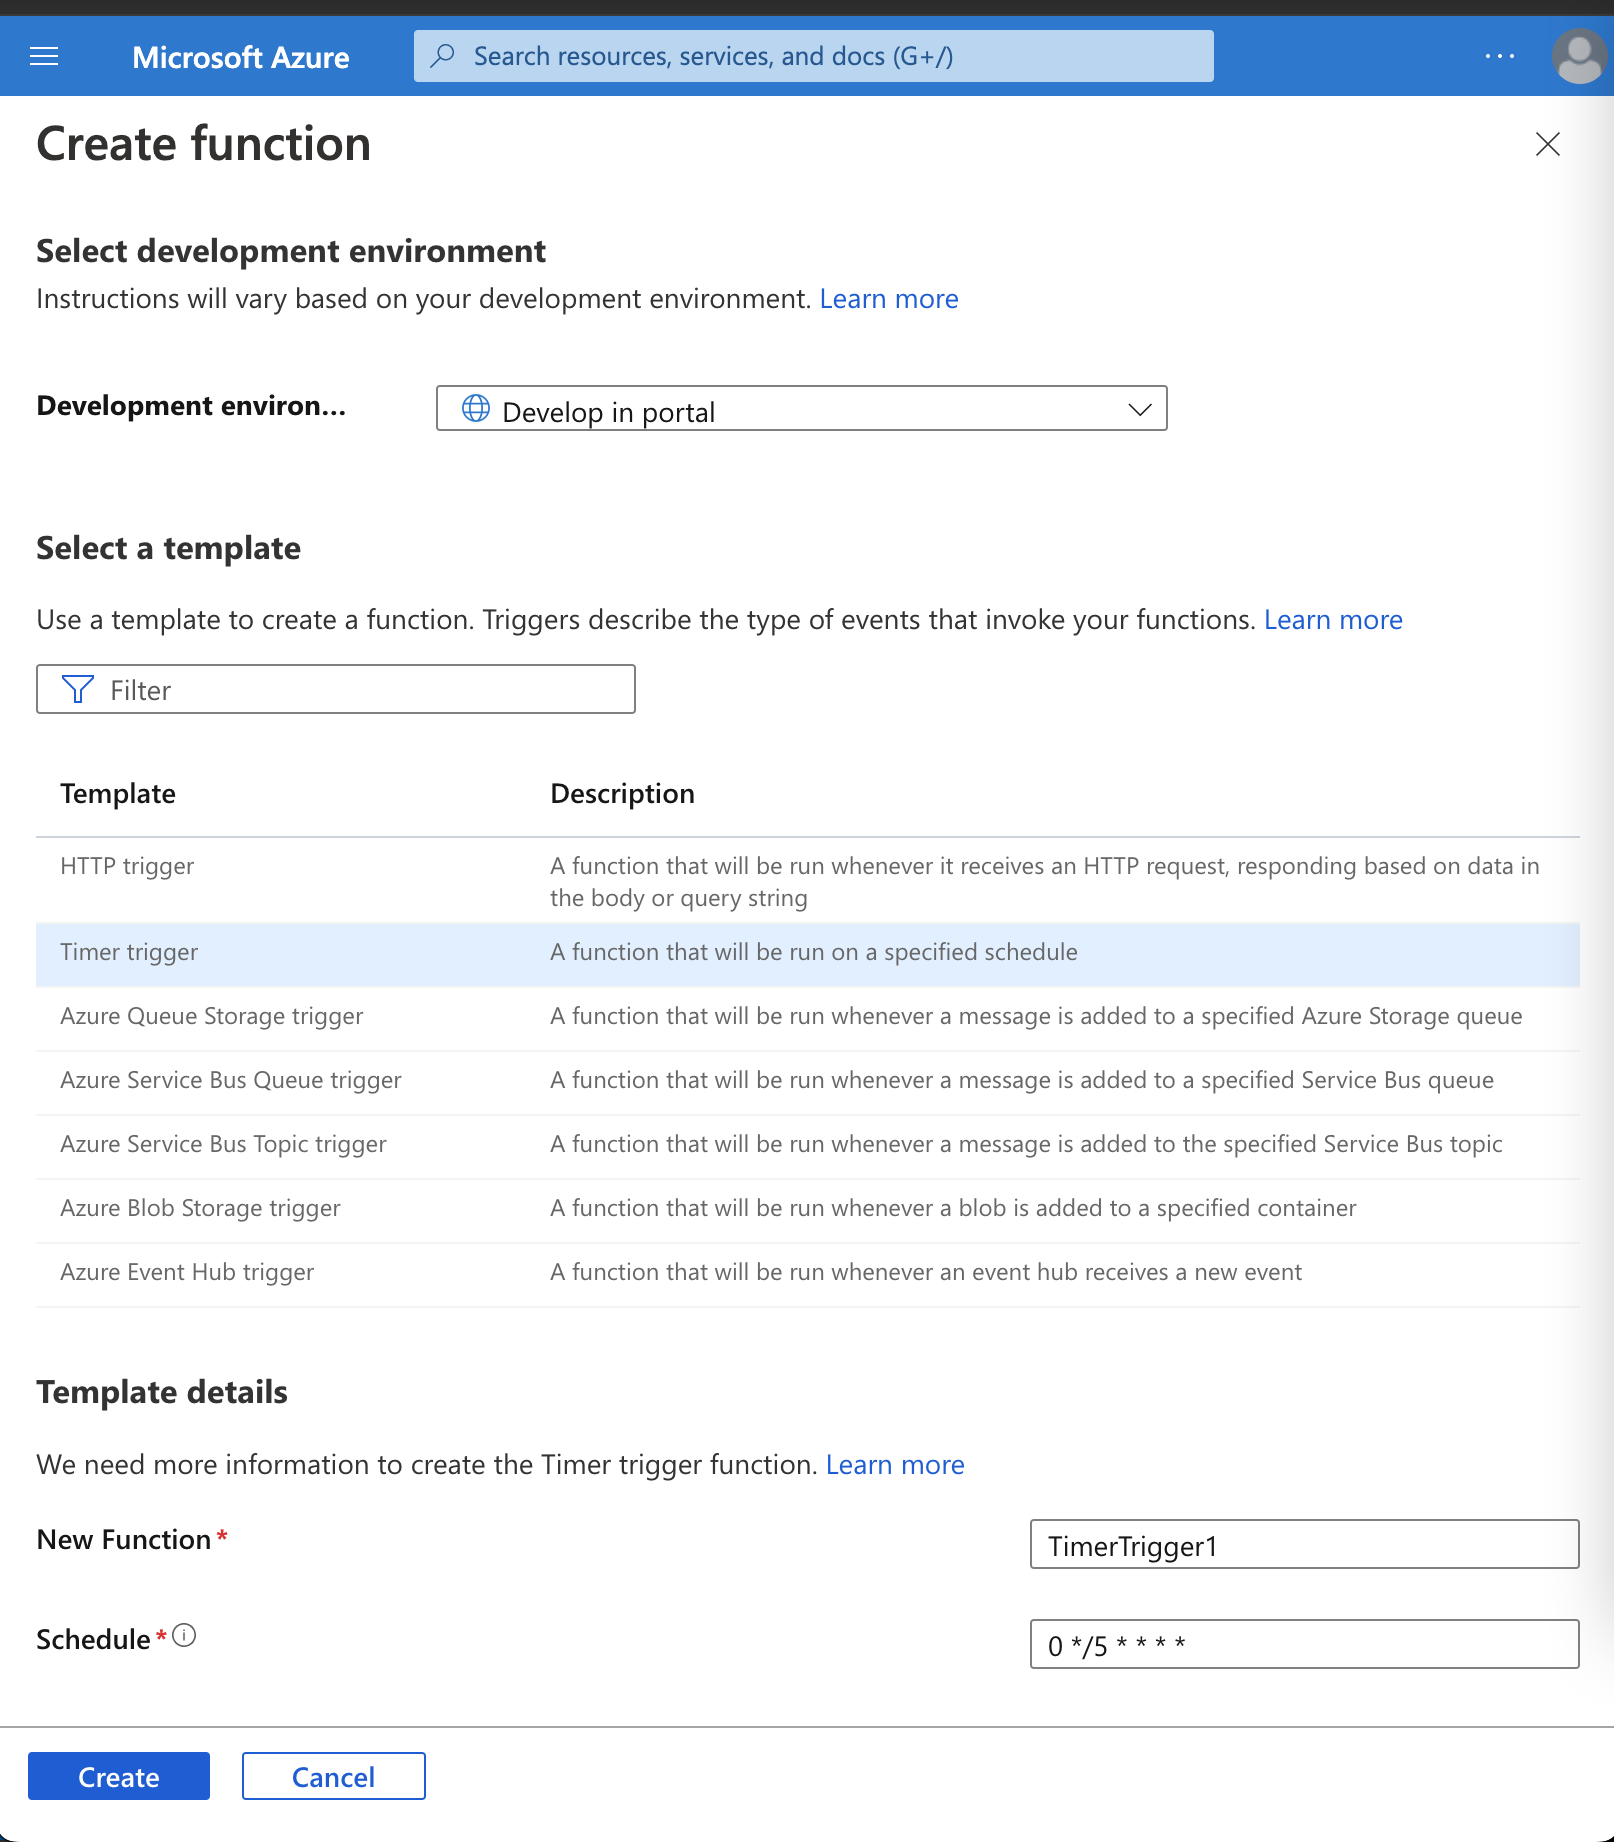
    The value in this parameter represents the CRON expression with six places for time precision: {second} {minute} {hour} {day} {month} {day-of-week}. The first place value represents every 20 seconds.

    Execute an Azure Function with Blob Storage

    If you want to execute the function when somebody uploads a new file or update, there is a trigger for that.

    But, what is the Azure Storage? It is a solution to store information that supports all data types, including Blobs, queues, and NoSQL. So, inside Azure Storage, you can have Azure Blob Storage created to store files and serve them to the users. Stream video and audio and logging data. All this with Highly available, secure, scalable, and managed in mind.

    Now, Let’s create a new blob trigger. To do that, we need to create a new function and select the Azure Blob Storage trigger template. Then, we need to select the Path to the blob, and this is important because it is the Path where to monitor and see if a blob is uploaded or updated.
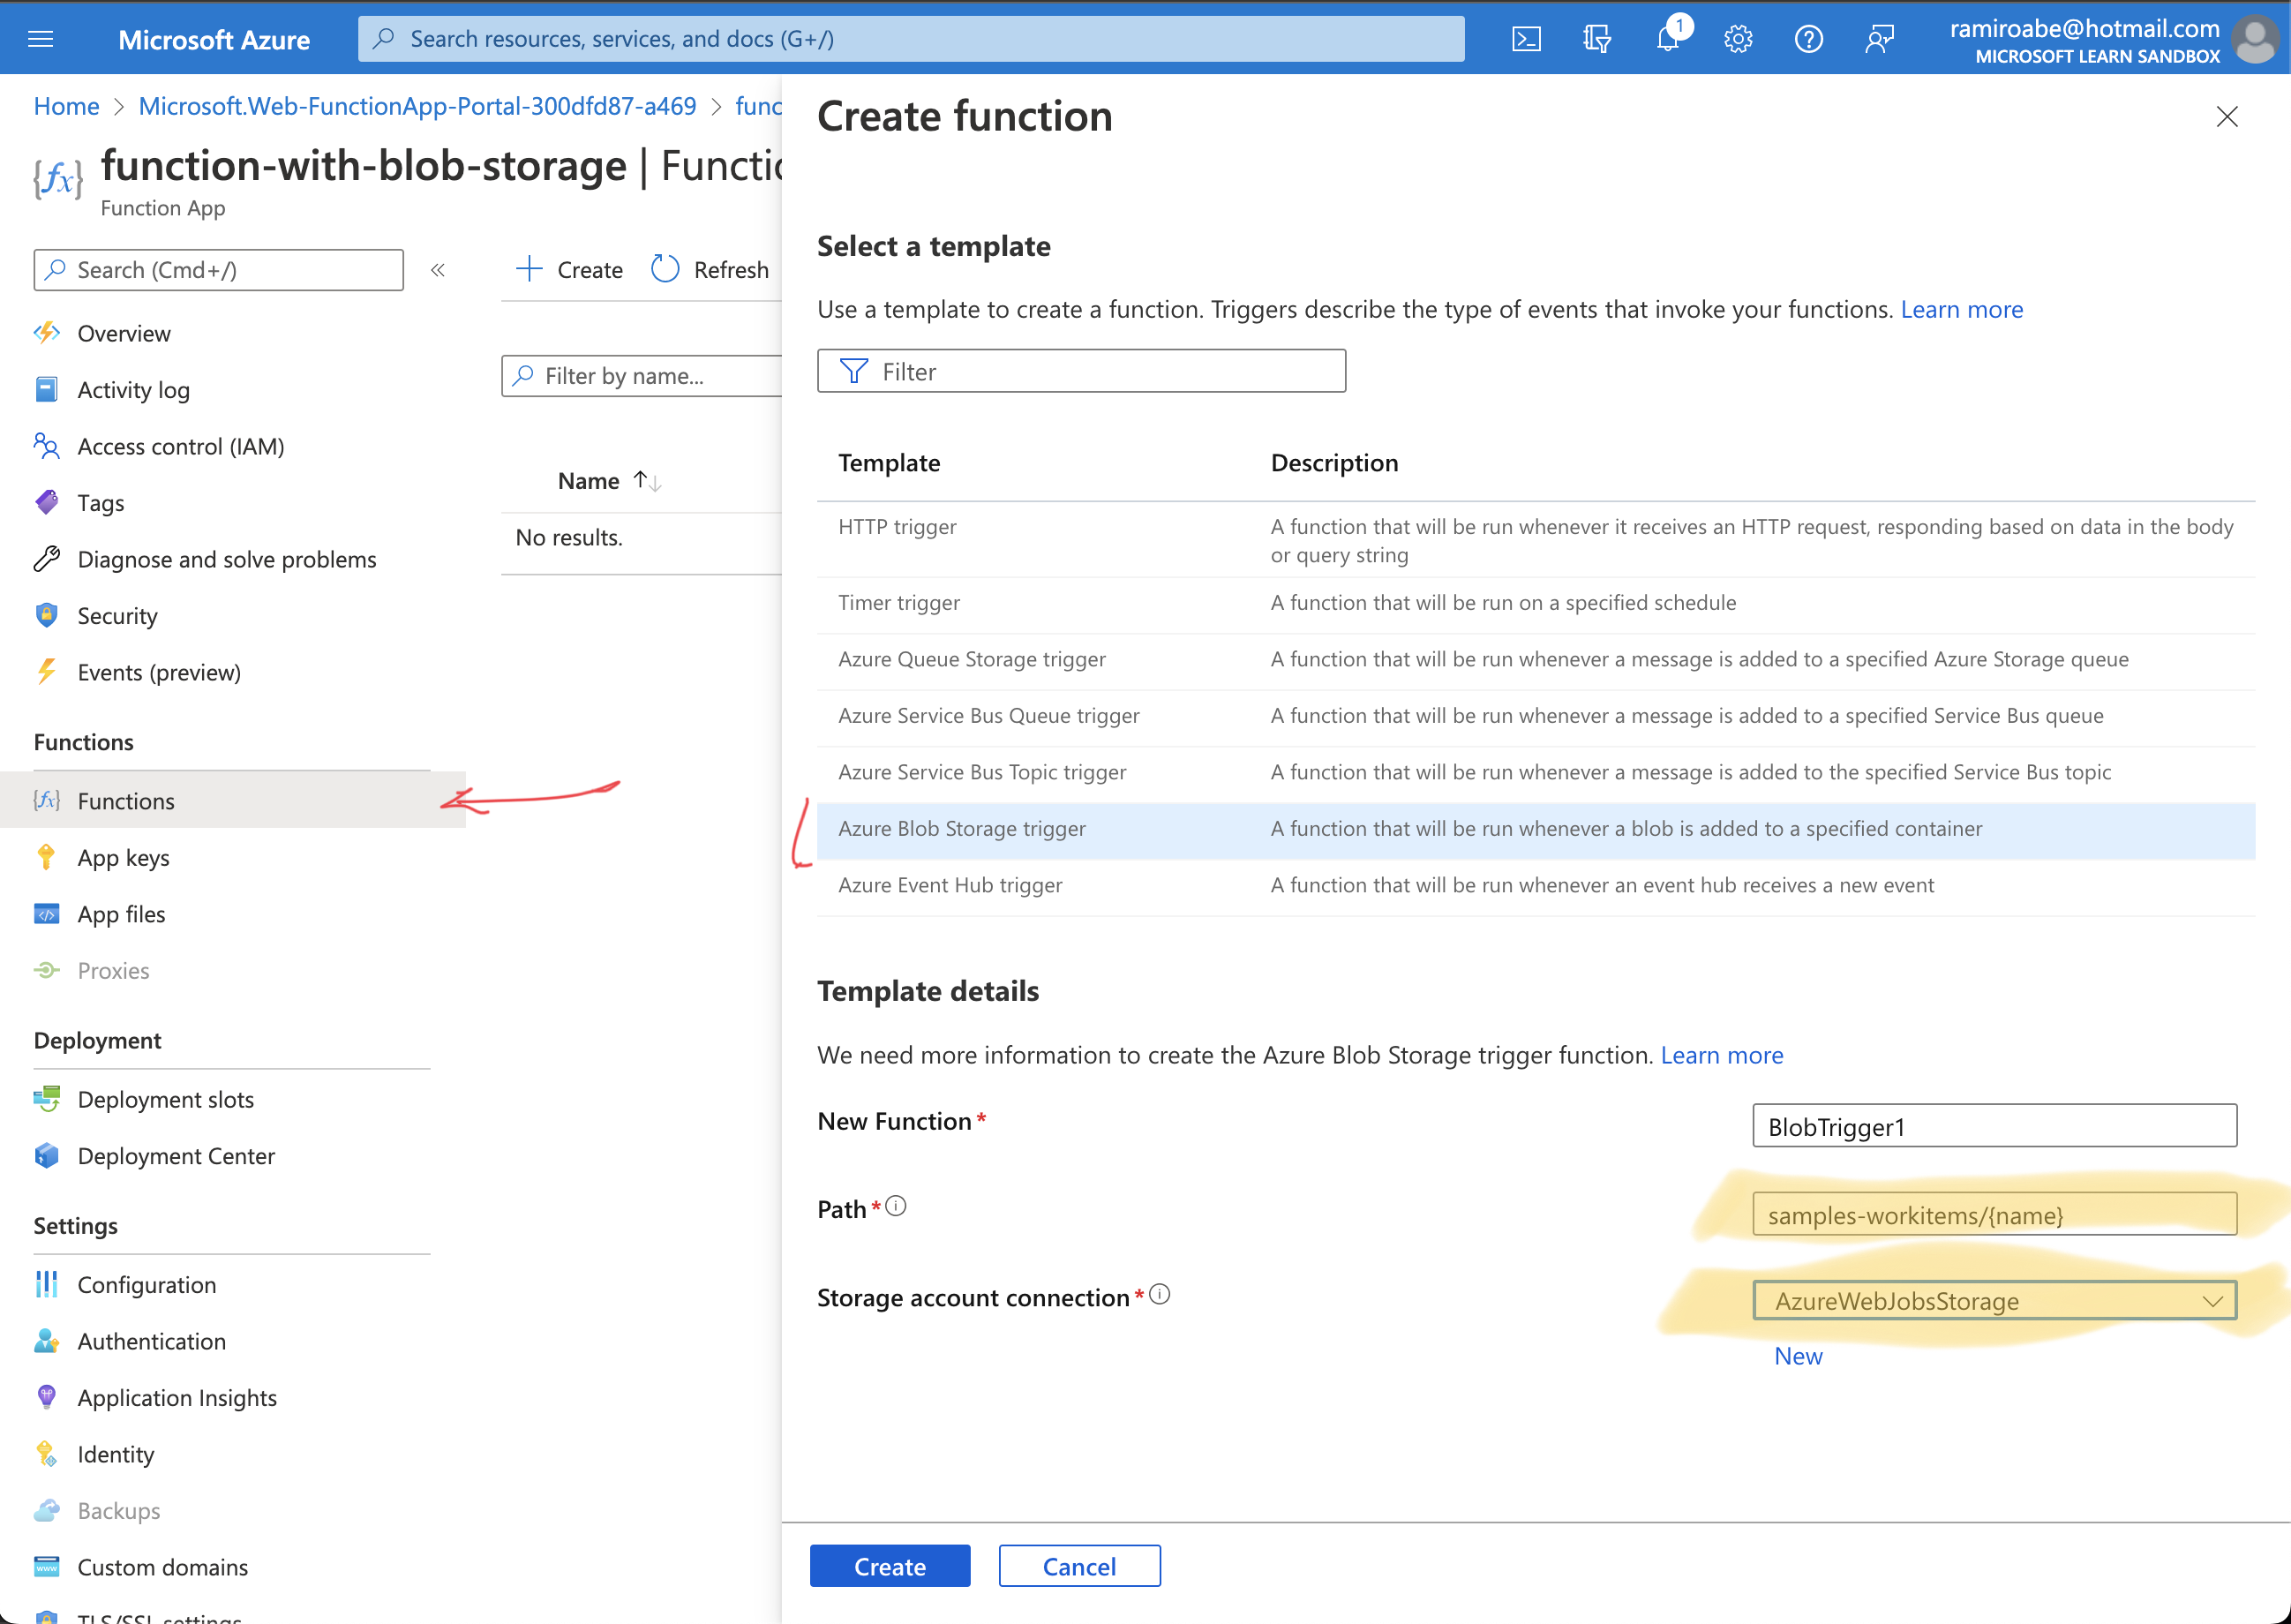
    After that, try to upload a new file to the blob storage and see if the function was executed.

    Check the binding types

    To take a look all the binding types, we can go to the Integration area, and you will see the Trigger and Outputs already created
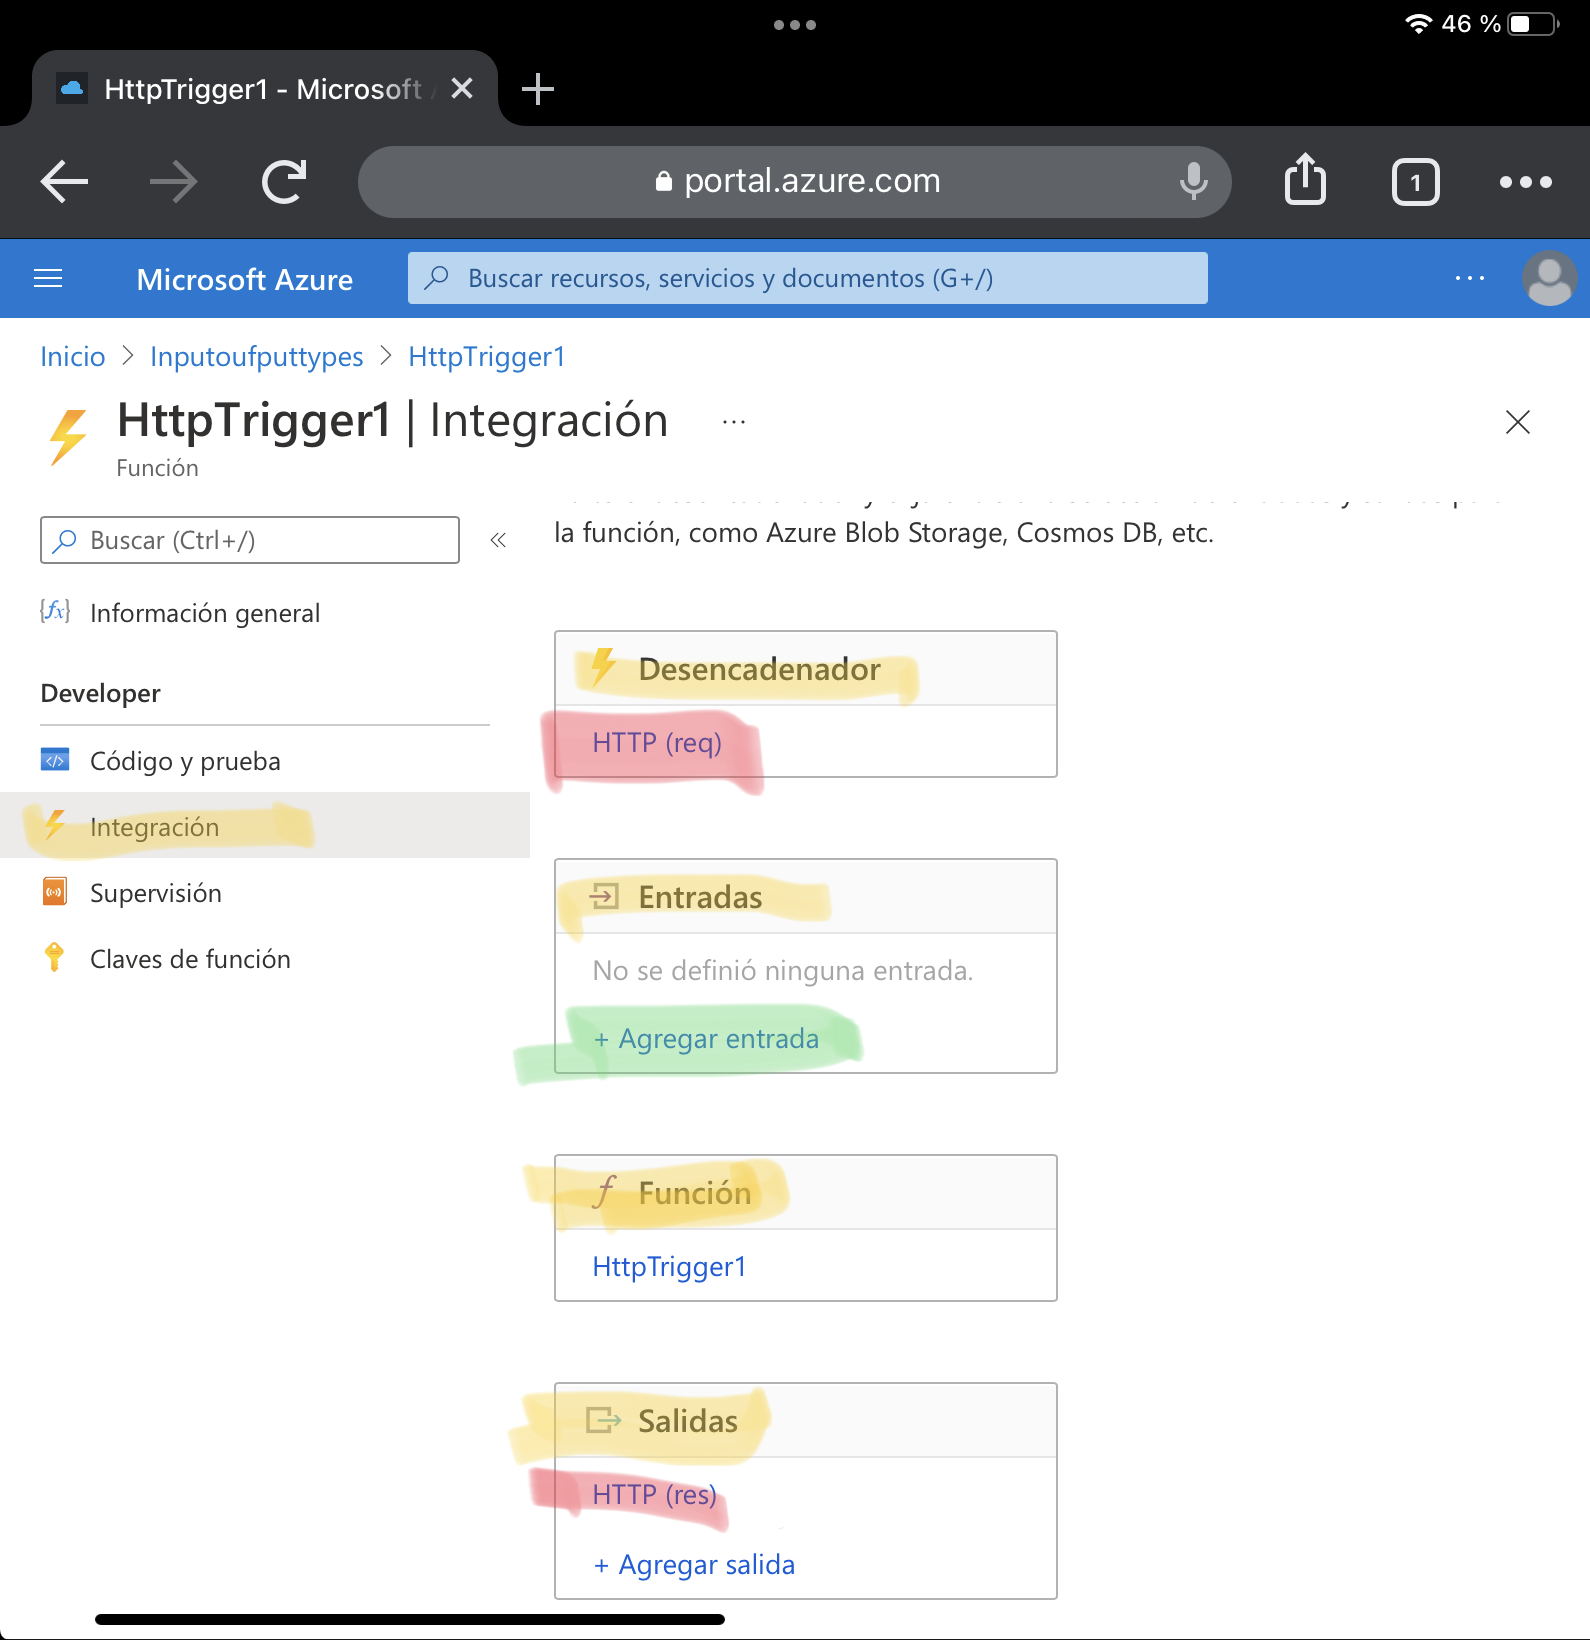
    We can not add more than one trigger to a function. So, we need to delete the trigger and create a new one if you want to change it. However, the Inputs and outputs sections are enabled to add more than one binding, so the request can accept more than one input and return more than one output value.
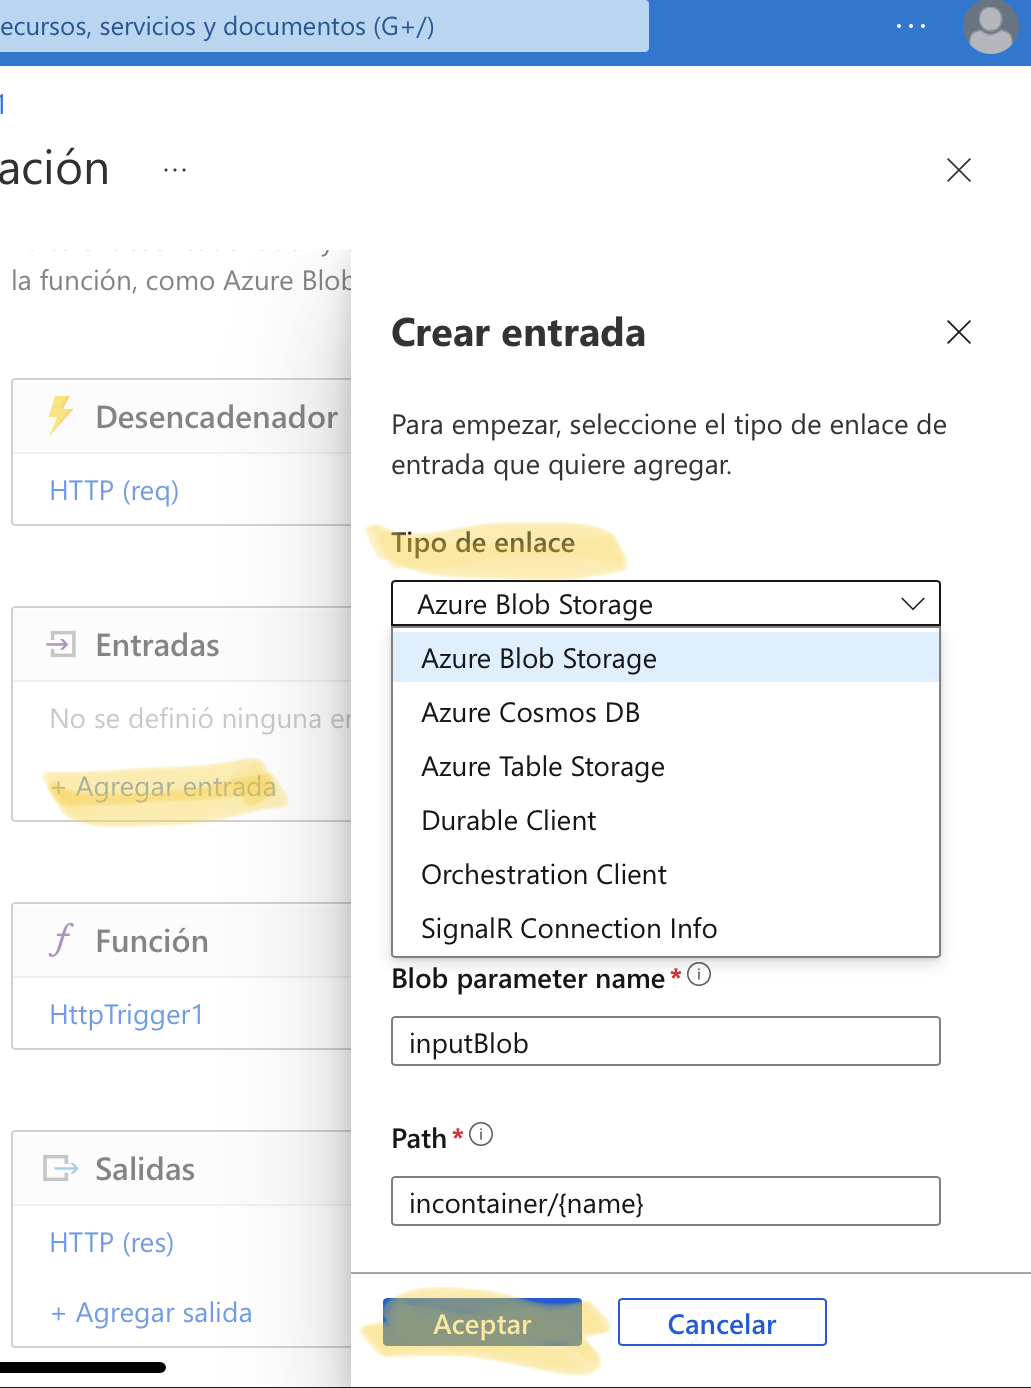
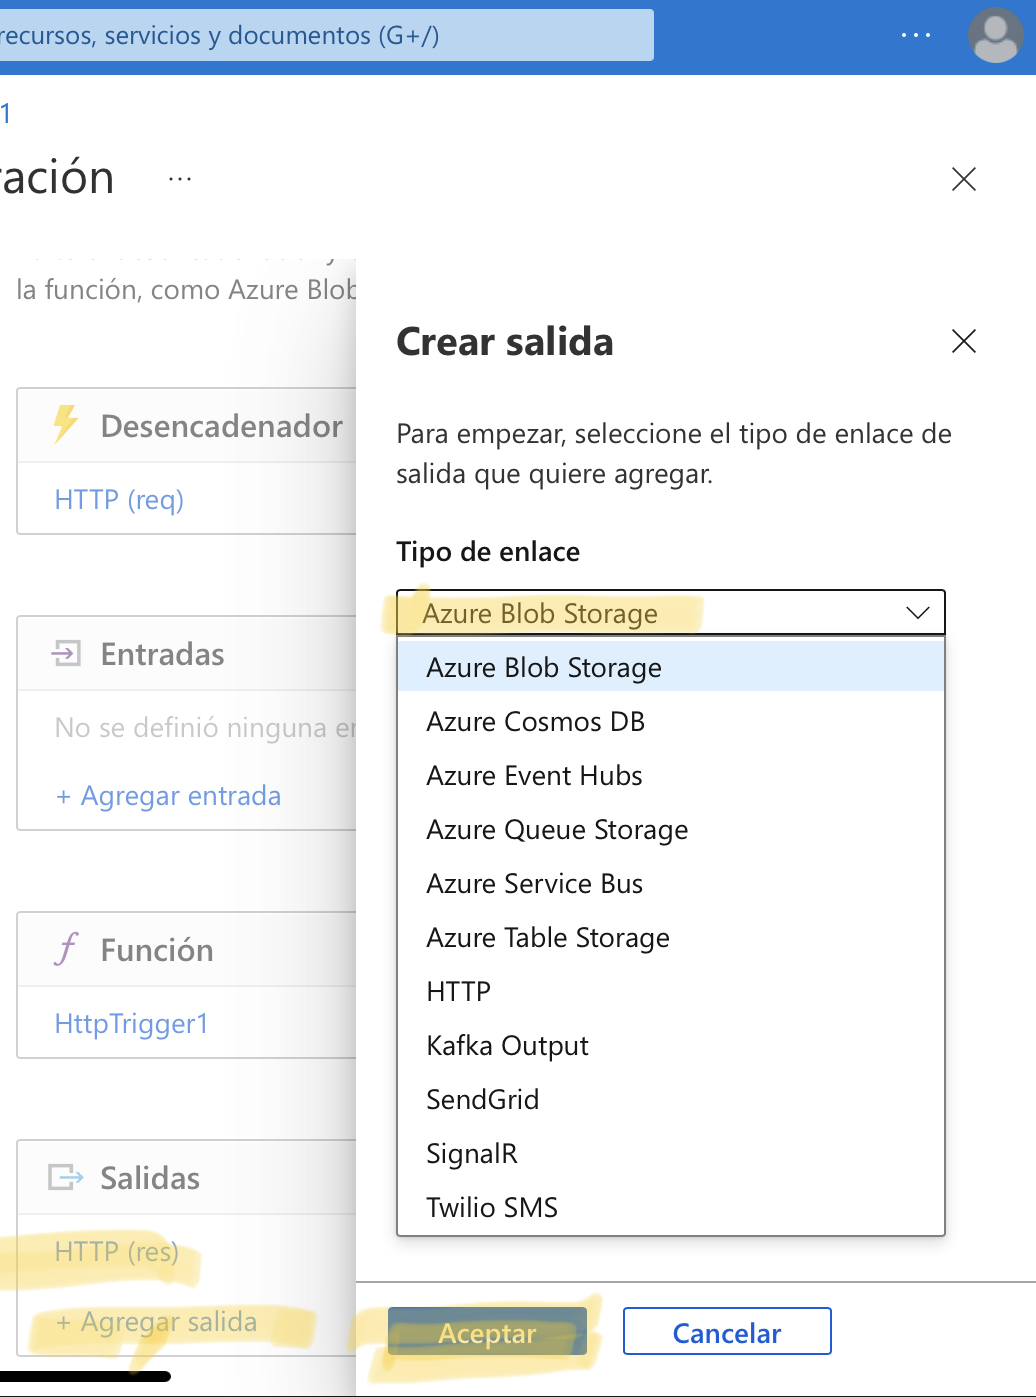
    Search information inside a database with Azure Cosmos DB Account

    Let’s see how to connect to a database from a function and read data from it.

    Assume that we have a Cosmos DB and a container called Bookmarks. Let’s add a new binding type of Azure Cosmos Db, and set up the current database to point into that database and collection.

    Let’s update the code and use that binding.

    1
    2
    3
    4
    5
    6
    7
    8
    9
    10
    11
    12
    13
    14
    15
    16
    17
    18
    19
    20
    21
    22
    module.exports = function (context, req) {
    var bookmark = context.bindings.bookmark;

    if (bookmark) {
    context.res = {
    body: { url: bookmark.url },
    headers: {
    "Content-Type": "application/json",
    },
    };
    } else {
    context.res = {
    status: 404,
    body: "No bookmarks found",
    headers: {
    "Content-Type": "application/json",
    },
    };
    }

    context.done();
    };

    After saving the script, the logs tab appears and shows us the Connected! Message. Let’s modify the function.json file in order to search by the ID

    1
    2
    3
    4
    5
    6
    7
    8
    9
    10
    11
    12
    13
    14
    15
    16
    17
    18
    19
    20
    21
    22
    23
    24
    25
    26
    27
    28
    29
    {
    "bindings": [
    {
    "authLevel": "function",
    "type": "httpTrigger",
    "direction": "in",
    "name": "req",
    "methods": [
    "get",
    "post"
    ]
    },
    {
    "type": "http",
    "direction": "out",
    "name": "res"
    },
    {
    "name": "bookmark",
    "direction": "in",
    "type": "cosmosDB",
    "connectionStringSetting": "your-database_DOCUMENTDB",
    "databaseName": "func-io-learn-db",
    "collectionName": "Bookmarks",
    "id": "{id}",
    "partitionKey": "{id}"
    }
    ]
    }

    In the last two parts, it’s necessary to update the Id and the partitionKey

    1
    2
    "id": "{id}",
    "partitionKey": "{id}"

    Id: Add the Document ID that we defined when we created the Bookmarks Azure Cosmos DB container.

    Partition key: Add the partition key that you defined when you created the Bookmarks Azure Cosmos DB collection. The key entered here (specified in input binding format) must match the one in the collection.

    So, when you test that function, you need to specify the **Id as a parameter; the code above will check if that collection exists in that resource and populate the variable context.bindings.bookmark without worrying about the connection with the DB and all the steps required to do that.

    Output binding types

    Disclaimer: Not all the outputs support both input and output bindings.

    • Blob Storage - You can use the blob output binding to write blobs.
    • Azure Cosmos DB - The Azure Cosmos DB output binding lets you write a new document to an Azure Cosmos DB database using the SQL API.
    • Event Hubs - Use the Event Hubs output binding to write events to an event stream. You must have send permission to an event hub to write events to it.
    • HTTP - Use the HTTP output binding to respond to the HTTP request sender. This binding requires an HTTP trigger and allows you to customize the response associated with the trigger’s request. This can also be used to connect to webhooks.
    • Microsoft Graph - Microsoft Graph output bindings allow you to write to files in OneDrive, modify Excel data, and send email through Outlook.
    • Mobile Apps - The Mobile Apps output binding writes a new record to a Mobile Apps table.
    • Notification Hubs - You can send push notifications with Notification Hubs output bindings.
    • Queue Storage - Use the Azure Queue Storage output binding to** write messages to a queue**.
    • Send Grid - Send emails using SendGrid bindings.
    • Service Bus - Use Azure Service Bus output binding to send queue or topic messages.
    • Table Storage - Use an Azure Table Storage output binding to write to a table in an Azure Storage account.
    • Twilio - Send text messages with Twilio.

    Let’s say we are going to connect two outputs for that function, the first output is going to create into the database the object that does not exist in the Azure Cosmos DB, and the second output is going to add a new message to the Queue of the Azure Queue Storage after a new item was created in the Cosmos DB.

    1
    2
    3
    4
    5
    6
    7
    8
    9
    10
    11
    12
    13
    14
    15
    16
    17
    18
    19
    20
    21
    22
    23
    24
    25
    26
    27
    28
    29
    30
    31
    32
    33
    34
    module.exports = async function (context, req) {
    var bookmark = context.bindings.bookmark;
    if (bookmark) {
    context.res = {
    status: 422,
    body: "Bookmark already exists.",
    headers: {
    "Content-Type": "application/json",
    },
    };
    } else {
    // Create a JSON string of our bookmark.
    var bookmarkString = JSON.stringify({
    id: req.body.id,
    url: req.body.url,
    });

    // Write this bookmark to our database.
    context.bindings.newbookmark = bookmarkString;

    // Push this bookmark onto our queue for further processing.
    context.bindings.newmessage = bookmarkString;

    // Tell the user all is well.
    context.res = {
    status: 200,
    body: "bookmark added!",
    headers: {
    "Content-Type": "application/json",
    },
    };
    }
    context.done();
    };

    Additional resources

    Although this isn’t intended to be an exhaustive list, the following are some resources related to the topics covered in this module that you might find interesting:

    Azure Functions documentation
    Azure Serverless Computing Cookbook
    How to use Queue storage from Node.js
    Introduction to Azure Cosmos DB: SQL API
    A technical overview of Azure Cosmos DB
    Azure Cosmos DB documentation

    Create a long-running serverless workflow with Durable Functions

    The durable function extends the Azure Functions that allow you to create long-lasting, stateful operations in Azure.
    It allows you to implement complex stateful functions in a serverless-environment.

    So, if the process has:

    • Multiple steps
    • Steps can have different durations.

    Sometimes, those processes are complex and costly, and coordinating those steps might take effort. Some of the benefits of using Durable functions are:

    • Can wait for Asynchronous code for one or more external events to complete. And then execute steps after those events have been completed.
    • Chain functions together. Patterns like fan-out/fan-in can be implemented here, allowing one function to invoke others in parallel and then collect all the results.
    • Orchestrate and coordinate functions in specifically designed workflows.
    • State management.

    There are three types of durable functions: Client, Orchestrator, and Activity.

    Okay, let’s create a long-running serverless. For doing that, let’s create a new Azure Function like the previous one, but let’s go to Development Tools option and select App Service Editor. Then, open the console and create the package.json file and run the following command:

    1
    npm install durable-functions

    Then, Go back to the Function App, create the function and select the Durable Functions template.

    Let’s start creating the first code in the function. By default, the function came with the following code:

    1
    2
    3
    4
    5
    6
    7
    8
    9
    10
    11
    12
    13
    14
    const df = require("durable-functions");

    module.exports = async function (context, req) {
    const client = df.getClient(context);
    const instanceId = await client.startNew(
    req.params.functionName,
    undefined,
    req.body
    );

    context.log(`Started orchestration with ID = '${instanceId}'.`);

    return client.createCheckStatusResponse(context.bindingData.req, instanceId);
    };

    TODO: Add a better example for Durable Functions. Sorry for the incomplete example D:

    You can look at the Durable Functions documentation to learn more about it.

    Durable Functions patterns and technical concepts

    Another example with .net

    The example is taken from © 2019 Scott J Duffy and SoftwareArchitect.ca, all rights reserved

    I’ll create three functions:

    First, the Activity, will be the business logic and final result of the orchestration. So, let’s create a new function called CalculateTax with template Durable Functions activity

    1
    2
    3
    4
    5
    6
    7
    8
    9
    10
    #r "Microsoft.Azure.WebJobs.Extensions.DurableTask"

    using Microsoft.Azure.WebJobs.Extensions.DurableTask;

    public static string Run(string name)
    {
    // Assuming 13% Tax
    double output = double.Parse(name) * 1.13;
    return $"{output}";
    }

    For secondary, let’s create a new function called Conductor with the template Durable Functions orchestrator. This function is going to orchestrate several calls to the CalculateTax function.

    1
    2
    3
    4
    5
    6
    7
    8
    9
    10
    11
    12
    13
    14
    15
    16
    17
    18
    19
    20
    21
    22
    23
    24
    25
    /*
    * This function is not intended to be invoked directly. Instead it will be
    * triggered by an HTTP starter function.
    *
    * Before running this sample, please:
    * - create a Durable activity function (default name is "Hello")
    * - create a Durable HTTP starter function
    */

    #r "Microsoft.Azure.WebJobs.Extensions.DurableTask"

    using Microsoft.Azure.WebJobs.Extensions.DurableTask;

    public static async Task<List<string>> Run(IDurableOrchestrationContext context)
    {
    var outputs = new List<string>();

    // Replace "Hello" with the name of your Durable Activity Function.
    outputs.Add(await context.CallActivityAsync<string>("CalculateTax", "10"));
    outputs.Add(await context.CallActivityAsync<string>("CalculateTax", "100"));
    outputs.Add(await context.CallActivityAsync<string>("CalculateTax", "1000"));

    // returns ["Hello Tokyo!", "Hello Seattle!", "Hello London!"]
    return outputs;
    }

    And finally, let’s create a new function called Starter with the template Durable Functions HTTP starter. This function is going to call the orchestrator with the parameter. The template code is good enough to execute the durable functions.

    1
    2
    3
    4
    5
    6
    7
    8
    9
    10
    11
    12
    13
    14
    15
    16
    17
    18
    19
    20
    21
    22
    #r "Microsoft.Azure.WebJobs.Extensions.DurableTask"
    #r "Newtonsoft.Json"

    using System.Net;
    using Microsoft.Azure.WebJobs.Extensions.DurableTask;

    public static async Task<HttpResponseMessage> Run(
    HttpRequestMessage req,
    IDurableOrchestrationClient starter,
    string functionName,
    ILogger log)
    {
    // Function input comes from the request content.
    dynamic eventData = await req.Content.ReadAsAsync<object>();

    // Pass the function name as part of the route
    string instanceId = await starter.StartNewAsync(functionName, eventData);

    log.LogInformation($"Started orchestration with ID = '{instanceId}'.");

    return starter.CreateCheckStatusResponse(req, instanceId);
    }

    Let’s start with the execution of the functions.

    curl --location --request GET 'https://test-funcapp-rb.azurewebsites.net/api/orchestrators/Conductor?code=R8GozXTET--aQrF4Y06-QT5yEFL7-GW-T28LTDpjmDHkAzFukmrYLQ==&functionName=Conductor'

    1
    2
    3
    4
    5
    6
    7
    8
    {
    "id": "d452e6d4a9b74d069a26b0e6292d7afd",
    "statusQueryGetUri": "https://test-funcapp-rb.azurewebsites.net/runtime/webhooks/durabletask/instances/d452e6d4a9b74d069a26b0e6292d7afd?taskHub=testfuncapprb&connection=Storage&code=VVmVMC_QEjD7EqqMgfDL_ESf0xJHL9gtIUmswPSa48-oAzFuGDJpCA==",
    "sendEventPostUri": "https://test-funcapp-rb.azurewebsites.net/runtime/webhooks/durabletask/instances/d452e6d4a9b74d069a26b0e6292d7afd/raiseEvent/{eventName}?taskHub=testfuncapprb&connection=Storage&code=VVmVMC_QEjD7EqqMgfDL_ESf0xJHL9gtIUmswPSa48-oAzFuGDJpCA==",
    "terminatePostUri": "https://test-funcapp-rb.azurewebsites.net/runtime/webhooks/durabletask/instances/d452e6d4a9b74d069a26b0e6292d7afd/terminate?reason={text}&taskHub=testfuncapprb&connection=Storage&code=VVmVMC_QEjD7EqqMgfDL_ESf0xJHL9gtIUmswPSa48-oAzFuGDJpCA==",
    "purgeHistoryDeleteUri": "https://test-funcapp-rb.azurewebsites.net/runtime/webhooks/durabletask/instances/d452e6d4a9b74d069a26b0e6292d7afd?taskHub=testfuncapprb&connection=Storage&code=VVmVMC_QEjD7EqqMgfDL_ESf0xJHL9gtIUmswPSa48-oAzFuGDJpCA==",
    "restartPostUri": "https://test-funcapp-rb.azurewebsites.net/runtime/webhooks/durabletask/instances/d452e6d4a9b74d069a26b0e6292d7afd/restart?taskHub=testfuncapprb&connection=Storage&code=VVmVMC_QEjD7EqqMgfDL_ESf0xJHL9gtIUmswPSa48-oAzFuGDJpCA=="
    }

    Right now, the check the result of the execution hit the statusQueryGetUri API

    1
    2
    3
    4
    5
    6
    7
    8
    9
    10
    {
    "name": "Conductor",
    "instanceId": "d452e6d4a9b74d069a26b0e6292d7afd",
    "runtimeStatus": "Completed",
    "input": null,
    "customStatus": null,
    "output": ["11.299999999999999", "112.99999999999999", "1130"],
    "createdTime": "2022-06-23T03:43:39Z",
    "lastUpdatedTime": "2022-06-23T03:43:39Z"
    }

    The runtimeStatus property return Completed, and inside the output property, we have the execution result.

    Develop, test, and publish Azure Functions by using Azure Functions Core Tools

    All the previous steps are done through the Azure Platform.

    Some useful commands:

    Azure Storage account.

    1
    2
    3
    4
    5
    6
    7
    8
    9
    export STORAGE_ACCOUNT_NAME=mslsigrstorage$(openssl rand -hex 5)
    echo "Storage Account Name: $STORAGE_ACCOUNT_NAME"

    az storage account create \
    --name $STORAGE_ACCOUNT_NAME \
    --resource-group learn-490bdbda-b42c-4d09-81d4-5fca24baff18 \
    --kind StorageV2 \
    --sku Standard_LRS

    Azure Cosmos DB

    1
    2
    3
    az cosmosdb create  \
    --name msl-sigr-cosmos-$(openssl rand -hex 5) \
    --resource-group learn-490bdbda-b42c-4d09-81d4-5fca24baff18

    Create Azure SignalR

    1
    2
    3
    4
    5
    6
    SIGNALR_SERVICE_NAME=msl-sigr-signalr$(openssl rand -hex 5)
    az signalr create \
    --name $SIGNALR_SERVICE_NAME \
    --resource-group learn-490bdbda-b42c-4d09-81d4-5fca24baff18 \
    --sku Free_DS2 \
    --unit-count 1

    And Update an azure function with SignalR

    1
    2
    3
    4
    5
    az resource update \
    --resource-type Microsoft.SignalRService/SignalR \
    --name $SIGNALR_SERVICE_NAME \
    --resource-group learn-163b5921-7149-4ca7-b278-36366315f66f \
    --set properties.features[flag=ServiceMode].value=Serverless

    Get the Connection string for all resources created

    1
    2
    3
    4
    5
    6
    7
    8
    9
    10
    11
    12
    13
    14
    15
    16
    17
    18
    19
    20
    21
    22
    23
    24
    25
    26
    27
    28
    29
    30
    31
    32

    STORAGE_CONNECTION_STRING=$(az storage account show-connection-string \
    --name $(az storage account list \
    --resource-group learn-490bdbda-b42c-4d09-81d4-5fca24baff18 \
    --query [0].name -o tsv) \
    --resource-group learn-490bdbda-b42c-4d09-81d4-5fca24baff18 \
    --query "connectionString" -o tsv)

    COSMOSDB_ACCOUNT_NAME=$(az cosmosdb list \
    --resource-group learn-490bdbda-b42c-4d09-81d4-5fca24baff18 \
    --query [0].name -o tsv)

    COSMOSDB_CONNECTION_STRING=$(az cosmosdb list-connection-strings \
    --name $COSMOSDB_ACCOUNT_NAME \
    --resource-group learn-490bdbda-b42c-4d09-81d4-5fca24baff18 \
    --query "connectionStrings[?description=='Primary SQL Connection String'].connectionString" -o tsv)

    COSMOSDB_MASTER_KEY=$(az cosmosdb list-keys \
    --name $COSMOSDB_ACCOUNT_NAME \
    --resource-group learn-490bdbda-b42c-4d09-81d4-5fca24baff18 \
    --query primaryMasterKey -o tsv)

    SIGNALR_CONNECTION_STRING=$(az signalr key list \
    --name $(az signalr list \
    --resource-group learn-490bdbda-b42c-4d09-81d4-5fca24baff18 \
    --query [0].name -o tsv) \
    --resource-group learn-490bdbda-b42c-4d09-81d4-5fca24baff18 \
    --query primaryConnectionString -o tsv)

    printf "\n\nReplace <STORAGE_CONNECTION_STRING> with:\n$STORAGE_CONNECTION_STRING\n\nReplace <COSMOSDB_CONNECTION_STRING> with:\n$COSMOSDB_CONNECTION_STRING\n\nReplace <COSMOSDB_MASTER_KEY> with:\n$COSMOSDB_MASTER_KEY\n\n"

    printf "\n\nReplace <SIGNALR_CONNECTION_STRING> with:\n$SIGNALR_CONNECTION_STRING\n\n"

    Use a storage account to host a static website

    When you copy files to a storage container named $web, those files are available to web browsers via a secure server using the https://<ACCOUNT_NAME>.<ZONE_NAME>.web.core.windows.net/<FILE_NAME> URI scheme.

    https://docs.microsoft.com/en-us/learn/modules/automatic-update-of-a-webapp-using-azure-functions-and-signalr/7-exercise-host-a-static-website-using-a-storage-account

    Azure API Management

    You can use Azure Functions and Azure API Management to build complete APIs with a microservices architecture.

    Microservices focused on creating many small services, separated by domain responsibility. Each service is independent of others, developed, deployed, and scaled independently.

    As a complementary is the serverless architecture, a model that allows to develop and deploy applications in a cloud environment. This architecture only costs when the service receives traffic.

    The Azure API management it’s an easy way to assemble several functions into a single API, used in a serverless architecture. Provides tools to publish, secure, transform, manage, and monitor APIs.

    Enables you to create and manage modern API gateways for existing backend services no matter where they’re hosted.

    In the following steps, you’ll add an Azure Function app to Azure API Management. Later, you’ll add a second function app to the same API Management instance to create a single serverless API from multiple functions. Let’s start by using a script to create the functions:

    1
    2
    3
    4
    git clone https://github.com/MicrosoftDocs/mslearn-apim-and-functions.git ~/OnlineStoreFuncs

    cd ~/OnlineStoreFuncs
    bash setup.sh

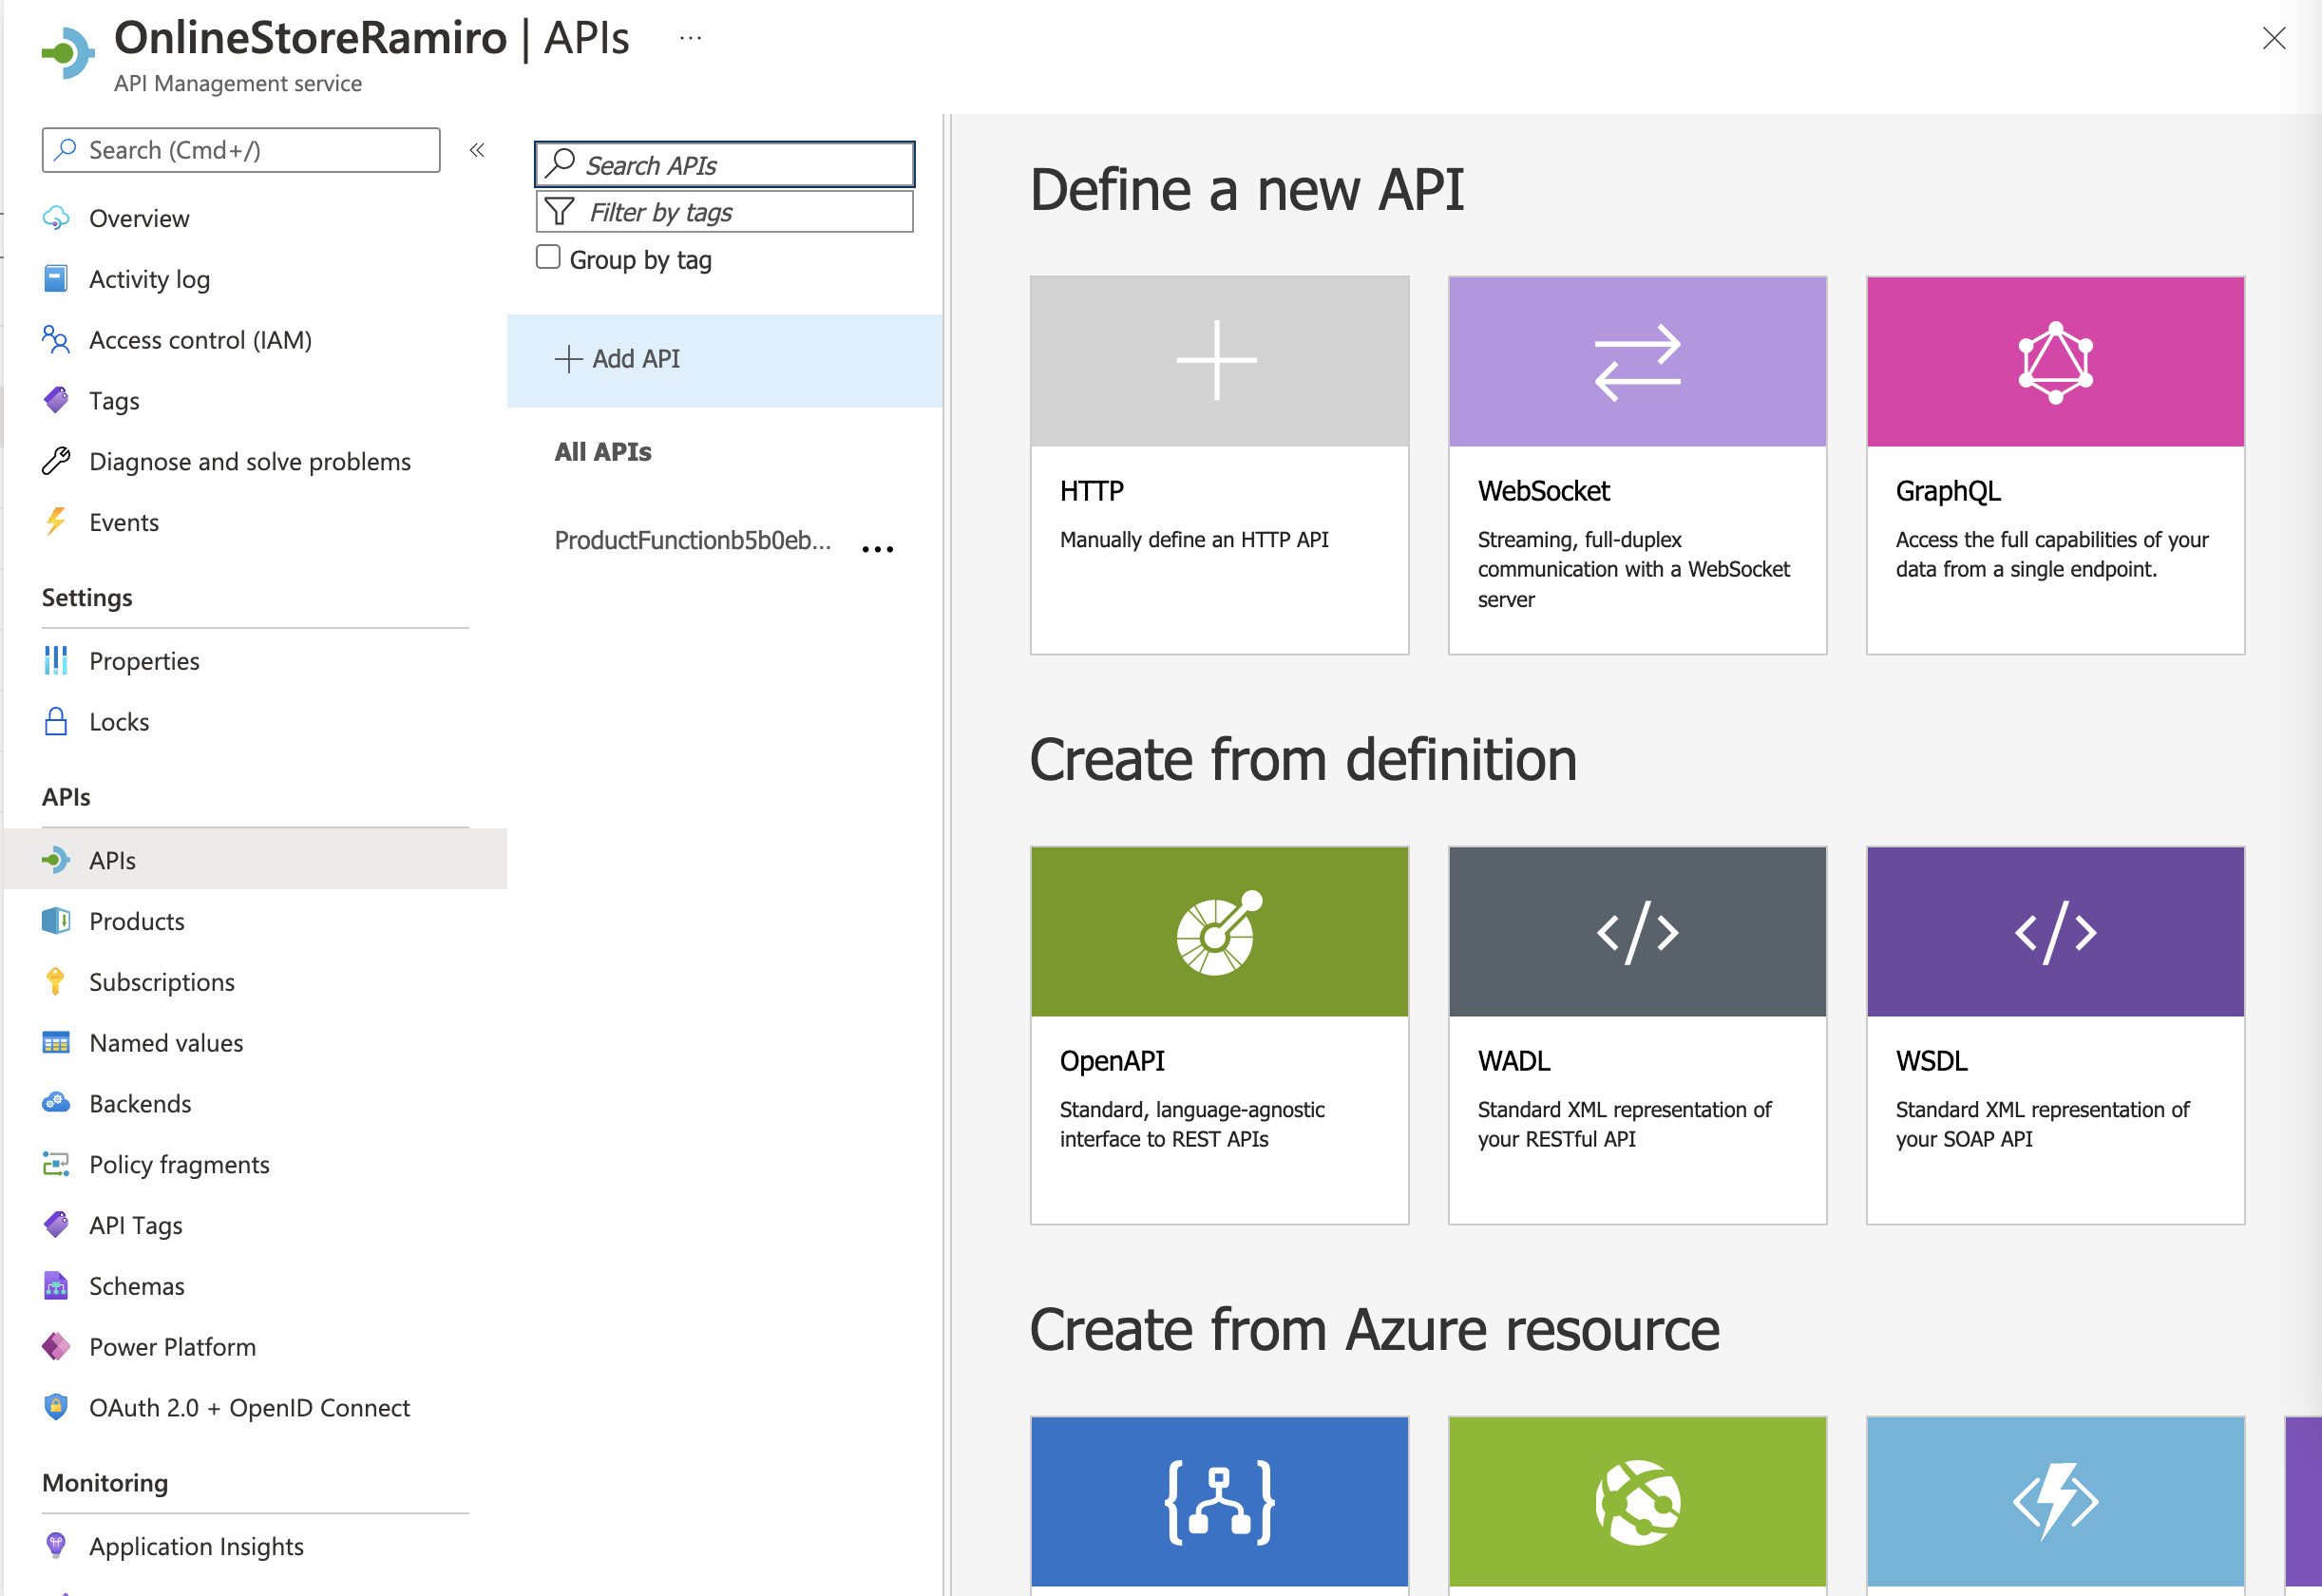
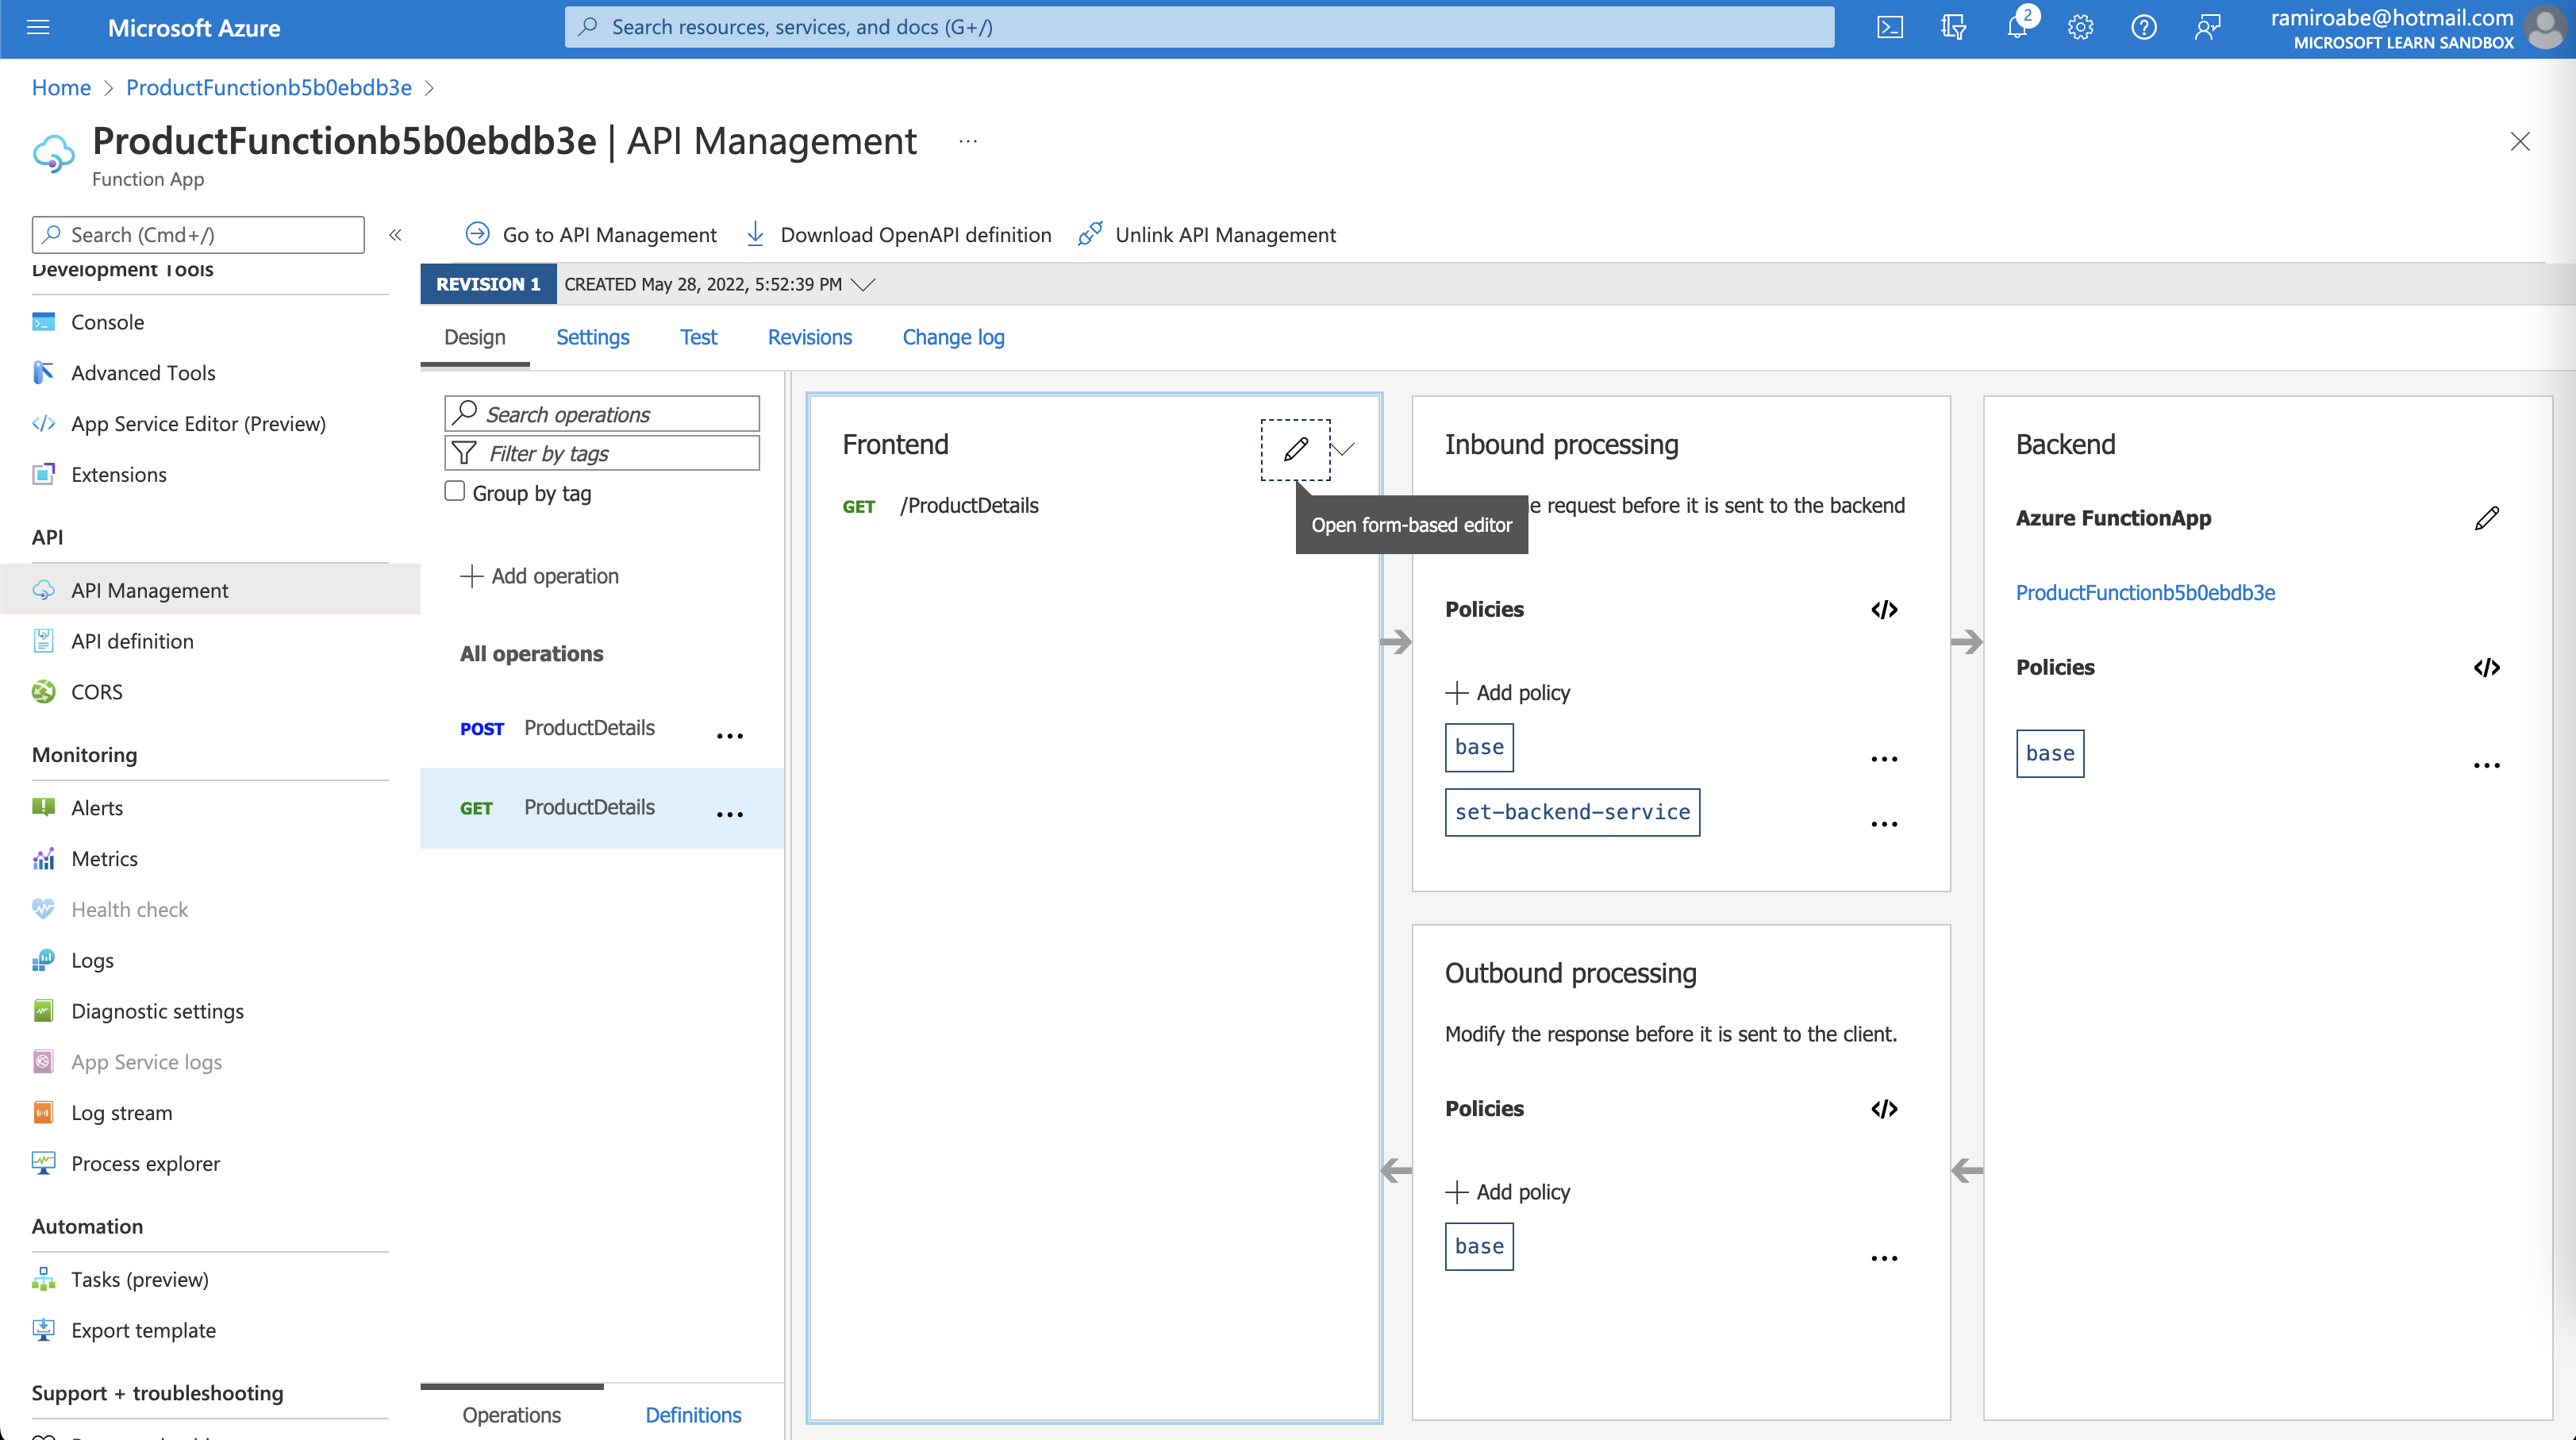
    OrderDetails and ProductDetails are the functions created. Inside each function, there is an option called API Management; hit Create new and set the required values.

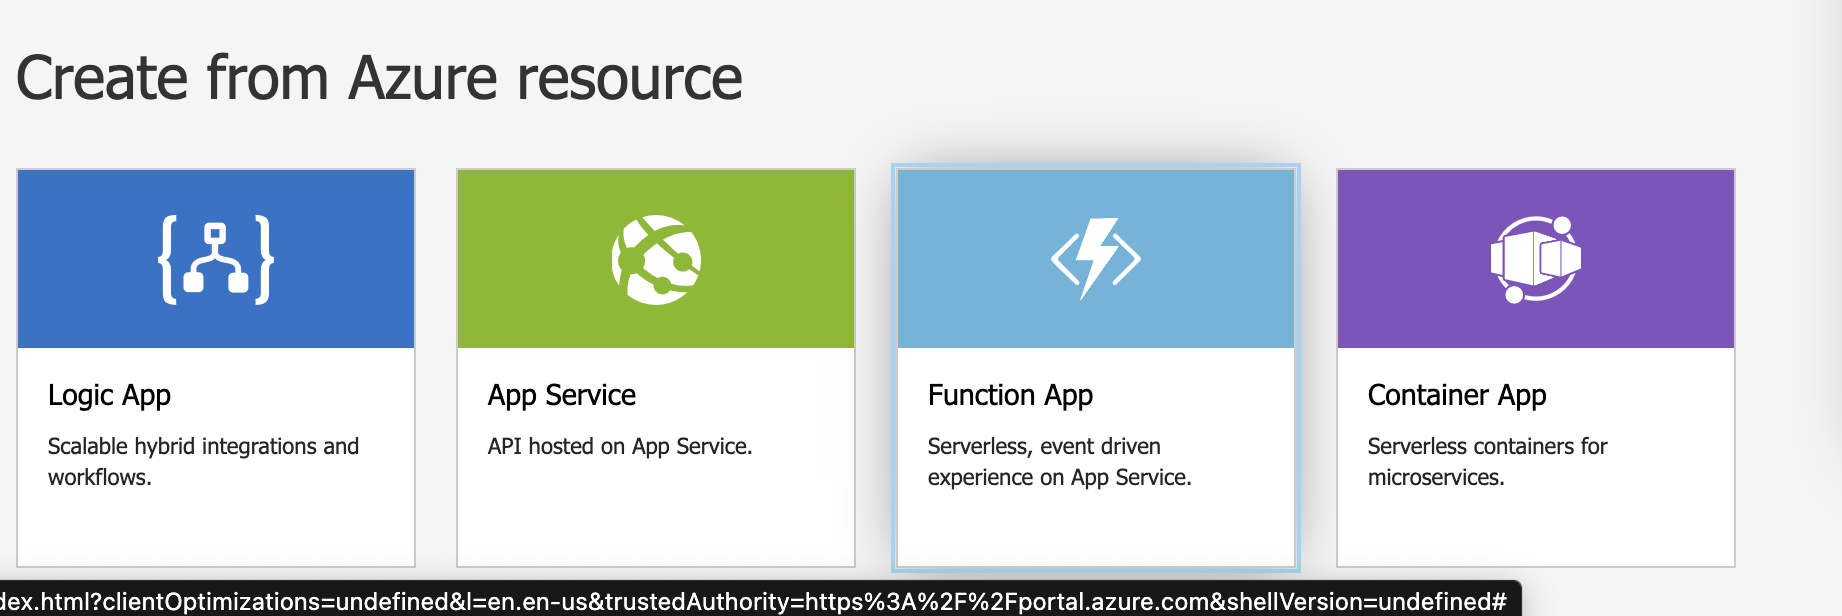
    After the resource is created, inside the function/API Management section, you can see the message “Your App is linked to the API management instance ‘OnlineStore’”. So, select Link API, select the functions highlighted in the list, and then Azure will show you the Create from function App, where you can set the API URL suffix and create it.
    1
    2
    3
    curl --location --request GET 'https://onlinestoreramiro.azure-api.net/products/ProductDetails?id=1' \
    --header 'Ocp-Apim-Subscription-Key: ef93edb5b9fa4f64b3023febb083832d' \
    --header 'Ocp-Apim-Trace: True'

    Extract from Original Post

    • Client apps are coupled to the API expressing business logic, not the underlying technical implementation with individual microservices. You can change the location and definition of the services without necessarily reconfiguring or updating the client apps.
    • API Management acts as an intermediary. It forwards requests to the right microservice, wherever it’s located, and returns responses to users. Users never see the different URIs where microservices are hosted.
    • You can use API Management policies to enforce consistent rules on all microservices in the product. For example, you can transform all XML responses into JSON, if that is your preferred format.
    • Policies also enable you to enforce consistent security requirements.

    API Management tools:

    • Test each microservice.
    • Monitor the behavior and performance of deployed services.
    • Importing Azure Function Apps as new APIs or appending them to existing APIs.
    • Etc…

    You can add several types of functions to API Management
    .

    The Custom Handlers in Azure Functions

    When you build a new Azure Function and use one of the language runtimes not supported by default in your code, you can implement a custom handler.

    The customer handler is a web server that receives events from the Functions host. It supports all the programming languages that can support HTTP primitives.

    The Azure functions contain three central concepts:

    • Triggers: It is an event that runs the function. It can be an HTTP request, timer, or other.
    • Bindings: It is the helper that connects the function to another service. The bindings can be input and output.
    • Functions Host: It controls the application event flow. As the host captures events, it invokes the handler and is responsible for returning a function’s response.
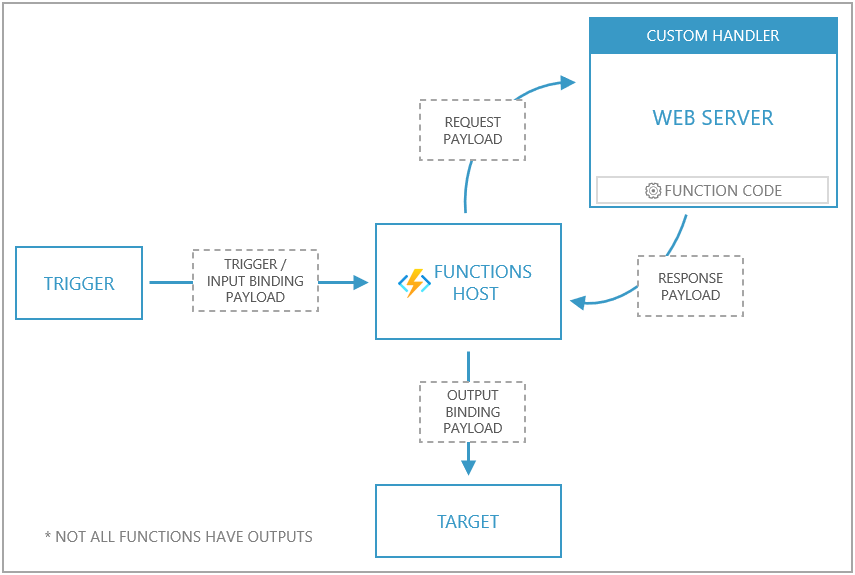
    The following actions describe how a request is processed through the Functions host and a custom handler:

    1. When an event occurs that matches a trigger (for example, an HTTP request),** a request is sent to the Functions host**.
    2. The Functions host creates a request payload and sends that to the web server (custom handler). The payload contains information on the trigger, input binding data, and other metadata.
    3. The function executes your logic, and a response is sent back to the Functions host.
    4. The Functions host passes outgoing data to a function’s output binding for processing.

    So, let’s take a look at the steps. In VSCode, under Command Palette select Azure Functions: Create new project; in language select Custom Handler, then select the template, in this case HttpTrigger and name the app. The AZ Scaffold app will create several files and folders. Let’s go with the custom app, generate the code that exposes an HTTP server, and after you build the app, update the host.json file with the following configuration:

    1
    2
    3
    4
    5
    6
    7
    8
    "customHandler": {
    "description": {
    "defaultExecutablePath": "./server",
    "workingDirectory": "",
    "arguments": []
    },
    "enableForwardingHttpRequest" : true
    }

    and run func start to check everything.

    Resources

    Custom Handlers
    Learn go

    Choose a messaging model in Azure to loosely connect your services

    Having distributed applications can refer to having several applications running on different computers or devices. To connect them, you can use a messaging model.

    The first thing to understand about a communication is whether it sends messages or events.

    • Messages are sent by one application to another.
      • Contains raw data not just a reference to that data
      • Produced by sender
      • Consumed by receiver
    • Events are sent by one application to many other applications. The components sending the event are known as publishers, and receivers are known as subscribers.
      • Lightweight notification
      • Does not contain raw data
      • May reference where the data lives
      • Sender has no expectations

    Azure provides several services for that purpose:

    • Azure Queue Storage: It is a service to store messages in a securely managed queue. It can access with a REST API.
    • Azure Service Bus: This one is more enterprise-oriented. It’s a message broker system that allows multiple communications protocols and security layers. It can use under a cloud or on-premises environment.
    • Azure Event Hubs
    • Azure Event Grid: It’s a easy to configure provider to connect Azure Services from different event sources to several event handlers.

    Well, how to choose messages or events?

    Events are more likely to be used for broadcasts and are often ephemeral, meaning a communication might not be handled by any receiver

    Messages are more likely to be used where the distributed application requires a guarantee the communication will be processed.

    Azure Queue Storage and Azure Service Bus are based on the same idea of a queue. Holds a message until the receiver processes it. But queue storage is less sophisticated than service bus; let’s check some benefits of the Service Bus**:

    • Service Bus supports messages up to 256KB in size or 100MB under the premium tier versus the 64KB for Storage Queue.
    • Can group multiple messages into one transaction.
    • Role-based security.
    • Receive messages without polling the queue.

    Otherwise, the Queue Storage can handle:

    • Supports unlimited queue size (versus 80GB limit for Service Bus queues).
    • Maintains a log of all messages.

    The Azure Service Bus

    With Azure Service Bus, you can exchange messages in two ways: Topics and queues.

    With Topics: The difference between a topic and a queue is that a topic is a publisher and a queue is a subscriber. So, multiple receivers can subscribe to specific topics, and each topic can have multiple subscribers.

    Internally, topics use queues. When you post to a topic, the message is copied and dropped into the queue for each subscription. The queue means that the message copy will stay around to be processed by each subscription branch even if the component processing that subscription is too busy to keep up.

    With Queues, you will have a simple, temporary storage location for messages sent between the components of a distributed application. Each message is received by only one receiver. Destination components will remove messages from the queue as they are able to handle them.

    Using Service Bus Queues, it can support many advanced features like:

    • Increase reliability
    • Message delivery guarantees
      • At-least-once Delivery
      • At-Most-Once Delivery
      • First-in-First-Out (FIFO)
    • Transactional Support

    Use Service Bus queues if you:

    • Need an At-Most-Once delivery guarantee.
    • Need a FIFO guarantee.
    • Need to group messages into transactions.
    • Want to receive messages without polling the queue.
    • Need to provide a role-based access model to the queues.
    • Need to handle messages larger than 64 KB but less than 100 MB. The maximum message size supported by the standard tier is 256 KB, and the * premium tier is 100 MB.
    • Queue size will not grow larger than 1 TB. The maximum queue size for the standard tier is 80 GB, and for the premium tier, it’s 1 TB.
    • Want to publish and consume batches of messages.
    • Be able to respond to high demand without needing to add resources to the system.

    Likewise, the Queue Storage it’s a simple and easy-to-code queue system. It can be used when you need to audit all the messages passed through the queue, big queue size (> 1TB), and track progress inside the queue. For more advanced needs, use Service Bus queues. Here a diagram of Azure Queue Storage:

    Workflow:

    Note: Notice that get and delete are separate operations. This arrangement handles potential failures in the receiver and implements a concept called at-least-once delivery. After the receiver gets a message, that message remains in the queue but is invisible for 30 seconds. If the receiver crashes or experiences a power failure during processing, then it will never delete the message from the queue. After 30 seconds, the message will reappear in the queue and another instance of the receiver can process it to completion.

    CLI commands for Azure Queue Storage

    1
    2
    3
    4
    5
    6
    7
    8
    9
    10
    11
    12
    13
    14
    15
    16
    az storage account create

    az storage account create --name [unique-name] -g learn-b8b3bede-032b-4c9d-90e7-873af3d4d4ff --kind StorageV2 --sku Standard_LRS

    az storage account show-connection-string -g <resource group name> -n <storage account name> --output tsv


    export STORAGE_CONNECTION_STRING=`az storage account show-connection-string -g learn-b8b3bede-032b-4c9d-90e7-873af3d4d4ff -n <storage account name> --output tsv`
    echo $STORAGE_CONNECTION_STRING


    DefaultEndpointsProtocol=https;EndpointSuffix=core.windows.net;AccountName=imramiroqueues;AccountKey=BNTA4hVmzgYfOvZy2vhZGTmW2R/I9BeyvZLl7m2zgbMmG/6h67hgHuO4hPeqn/Mn6cuGyEWcXRX1+ASthtJWXg==;BlobEndpoint=https://imramiroqueues.blob.core.windows.net/;FileEndpoint=https://imramiroqueues.file.core.windows.net/;QueueEndpoint=https://imramiroqueues.queue.core.windows.net/;TableEndpoint=https://imramiroqueues.table.core.windows.net/


    az storage message peek --queue-name newsqueue --connection-string $STORAGE_CONNECTION_STRING

    export STORAGE_CONNECTION_STRING=az storage account show-connection-string -g learn-b8b3bede-032b-4c9d-90e7-873af3d4d4ff -n imramiroqueues --output tsv
    echo $STORAGE_CONNECTION_STRING

    Nuget package for Azure Queue Storage

    Azure.Storage.Queues

    Example
    cd ~
    git clone https://github.com/MicrosoftDocs/mslearn-communicate-with-storage-queues.git

    1
    2
    3
    4
    5
    6
    7
    8
    9
    10
    11
    12
    13
    14
    15
    16
    17
    18
    19
    20
    21
    22
    QueueClient queueClient = new QueueClient(connectionString, queueName);

    //How to send a message
    Response<SendReceipt> response = await queueClient.SendMessageAsync("This is a message");

    string messageJson = JsonSerializer.Serialize(objectData);
    Response<SendReceipt> response = await queueClient.SendMessageAsync(messageJson);

    //How to peek at messages
    Response<PeekedMessage> response = await queueClient.PeekMessageAsync();
    PeekedMessage message = response.Value;

    Console.WriteLine($"Message id : {message.MessageId}");
    Console.WriteLine($"Inserted on : {message.InsertedOn}");


    //How to receive and delete a message
    Response<QueueMessage> response = await queueClient.ReceiveMessageAsync();
    QueueMessage message = response.Value;
    NewsArticle article = message.Body.ToObjectFromJson<NewsArticle>();

    await queueClient.DeleteMessageAsync(message.MessageId, message.PopReceipt);

    NuGet package for Azure Service Bus

    Azure.Messaging.ServiceBus

    Microsoft provides a library of .NET classes that you can use in any .NET language to interact with a Service Bus queue or topic. The library is available in the Microsoft Nuget package.

    When you send a message to a queue, for example, use the SendMessageAsync method with the await keyword.

    To send a message to a queue

    1
    2
    3
    4
    5
    6
    7
    8
    9
    10
    11
    12
    13
    // Create a ServiceBusClient object using the connection string to the namespace.
    await using var client = new ServiceBusClient(connectionString);

    // Create a ServiceBusSender object by invoking the CreateSender method on the ServiceBusClient object, and specifying the queue name.
    ServiceBusSender sender = client.CreateSender(queueName);


    // Create a new message to send to the queue.
    string messageContent = "Order new crankshaft for eBike.";
    var message = new ServiceBusMessage(messageContent);

    // Send the message to the queue.
    await sender.SendMessageAsync(message);

    To receive messages from a queue

    1
    2
    3
    4
    5
    6
    7
    // Create a ServiceBusProcessor for the queue.
    await using ServiceBusProcessor processor = client.CreateProcessor(queueName, options);

    // Specify handler methods for messages and errors.
    processor.ProcessMessageAsync += MessageHandler;
    processor.ProcessErrorAsync += ErrorHandler;

    1
    2
    3
    // After you complete the processing of the message, invoke the following method to remove the message from the queue.

    await args.CompleteMessageAsync(args.Message);

    Useful commands

    Example: git clone https://github.com/MicrosoftDocs/mslearn-connect-services-together.git

    1
    2
    3
    4
    5
    6
    7
    8
    9
    10
    11
    12
    13
    14
    15
    16
    17
    18
    19

    //Check connectionString
    > az servicebus namespace authorization-rule keys list \
    --resource-group learn-2daa3010-d4d1-4f91-9f17-4199ce607f5b \
    --name RootManageSharedAccessKey \
    --query primaryConnectionString \
    --output tsv \
    --namespace-name <namespace-name>

    Endpoint=sb://imramiro.servicebus.windows.net/;SharedAccessKeyName=RootManageSharedAccessKey;SharedAccessKey=+vDhML/Yj2FHsuAR5tD3qXpp2aRucJ4yrOa58wdwweE=

    //Check the message count

    > az servicebus queue show \
    --resource-group learn-2daa3010-d4d1-4f91-9f17-4199ce607f5b \
    --name salesmessages \
    --query messageCount \
    --namespace-name <namespace-name>

    Implementation details
    https://docs.microsoft.com/en-us/learn/modules/implement-message-workflows-with-service-bus/5-exercise-write-code-that-uses-service-bus-queues

    The Azure Event Grid

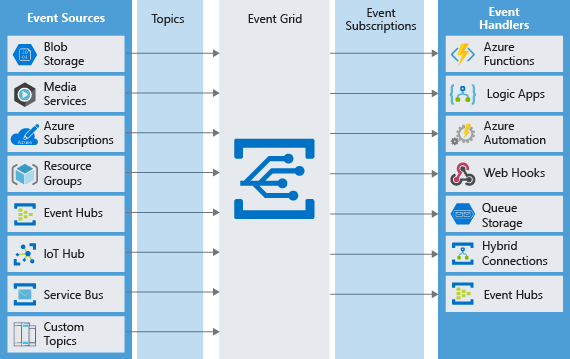
    It’s an event routing service running on top of Azure Service Fabric. It’s distributed events from different sources like:

    • Azure Blob Storage
    • Azure Media Services
    • IoT Hubs
    • Azure Service Bus
    • Etc

    To:

    • Azure Functions
    • Webhooks
    • Queue Storage
    • Etc

    Azure Event Grid can be used when you need, Simplicity (Easy to connect), Advanced filtering (Close Control over events they receive from a topic), Fan-out (Unlimited number of subscribers), Reliability (Retry for each subscription), and Pay-per-event (Only pay for events delivered).

    Azure Event Grid has been composed of several parts:

    • Events: What happened. The events are the data messages passing through Event Grid. Up to 64 KB in size.
    1
    2
    3
    4
    5
    6
    7
    8
    9
    10
    11
    12
    13
    14
    [
    {
    "topic": string,
    "subject": string,
    "id": string,
    "eventType": string (e.g. CustomerCreated, BlobDeleted, HttpRequestReceived, etc.),
    "eventTime": string,
    "data":{
    object-unique-to-each-publisher
    },
    "dataVersion": string,
    "metadataVersion": string
    }
    ]
    • Event sources: Where the event took place. Those are responsible for sending events to Event Grid. The event source is the specific service generating the event for that publisher. For Example, Azure Storage is the event source for blob-created events. IoT Hub is the event source for device-created events.
    • Topics: The endpoint where publishers send events.
    • Event subscriptions: The endpoint or built-in mechanism to route events, sometimes to multiple handlers. Subscriptions are also used by handlers to filter incoming events intelligently.
    • Event handlers: The app or service reacting to the event. Sometimes called the subscriber. It’s pretty much every application that supports Event Grid can receive events. No polling is required.
    Azure Event Hubs

    Event Hubs is an intermediary for the publish-subscribe communication pattern. Unlike Event Grid, however, it is optimized for extremely high throughput, a large number of publishers, security, and resiliency. You can pipeline events streams to other Azure services, like Azure Stream Analytics which allows you to process complex data streams.

    For example, if you had networked sensors in your manufacturing warehouses, you could use Event Hubs coupled with Azure Stream Analytics to watch for patterns in temperature changes that might indicate an unwanted fire or component wear.

    In the previous diagram, you can see several players. The Publisher is the entity that sends the event; this can be any app or device that can send out events using HTTPS, AMQP or Apache Kafka. The Subscriber is the entity that receives the event. The event needs to be small, < 1 MB.

    There are three main components in Event Hubs:

    Partitions: A partition is a buffer for events. Each partition has a separate set of subscribers The number of partitions required in an event hub (between 2 and 32 for the standard tier). The partition count should be directly related to the expected number of concurrent consumers and can’t be changed after the hub has been created. The partition separates the message stream so that consumer or receiver apps only need to read a specific subset of the data stream. If not defined, the value defaults to 4.

    Capture: Event Hubs can send all your events immediately to Azure Data Lake or Azure Blob storage for inexpensive, permanent persistence.

    Authentication: All publishers are authenticated and issued a token.

    Create and Configure an event Hub

    There are two main steps to creating a new event hub. The first step is to define the Event Hubs namespace. The second step is to create an event hub in that namespace.

    Choose Event Hubs if:

    • You need to support authenticating a large number of publishers.
    • You need to save a stream of events to Data Lake or Blob storage.
    • You need aggregation or analytics on your event stream.
    • You need reliable messaging or resiliency.

    Commands

    Git Repo
    git clone https://github.com/Azure/azure-event-hubs.git

    1
    2
    3
    4
    5
    6
    7
    8
    9
    10
    11
    12
    13
    14
    15
    16
    17
    18
    19
    20
    21
    22
    23
    24
    25
    26
    27
    28
    29
    30
    31
    32
    33
    34
    35
    36
    37
    38
    39
    40
    41
    42
    43
    44
    45
    46
    47
    48
    49
    50
    51
    52
    53
    54
    55
    56
    57
    58
    59
    60
    61
    62
    63
    64
    > NS_NAME=ehubns-$RANDOM
    > az eventhubs namespace create --name $NS_NAME

    {
    "createdAt": "2022-06-05T05:46:17.303000+00:00",
    "disableLocalAuth": false,
    "id": "/subscriptions/a67eb823-344a-4ddd-8346-ebe028190ccc/resourceGroups/learn-2e618c3b-e26f-473c-a22c-5a18ffdaade0/providers/Microsoft.EventHub/namespaces/ehubns-21383",
    "isAutoInflateEnabled": false,
    "kafkaEnabled": true,
    "location": "West US 2",
    "maximumThroughputUnits": 0,
    "metricId": "a67eb823-344a-4ddd-8346-ebe028190ccc:ehubns-21383",
    "name": "ehubns-21383",
    "provisioningState": "Succeeded",
    "resourceGroup": "learn-2e618c3b-e26f-473c-a22c-5a18ffdaade0",
    "serviceBusEndpoint": "https://ehubns-21383.servicebus.windows.net:443/",
    "sku": {
    "capacity": 1,
    "name": "Standard",
    "tier": "Standard"
    },
    "status": "Active",
    "tags": {},
    "type": "Microsoft.EventHub/Namespaces",
    "updatedAt": "2022-06-05T05:47:09.450000+00:00",
    "zoneRedundant": false
    }

    > az eventhubs namespace authorization-rule keys list \
    --name RootManageSharedAccessKey \
    --namespace-name $NS_NAME

    {
    "keyName": "RootManageSharedAccessKey",
    "primaryConnectionString": "Endpoint=sb://ehubns-21383.servicebus.windows.net/;SharedAccessKeyName=RootManageSharedAccessKey;SharedAccessKey=ueJzwgkPNDNob3ZiYihyzU8wmlz5FucWCKVAdcTiF7A=",
    "primaryKey": "ueJzwgkPNDNob3ZiYihyzU8wmlz5FucWCKVAdcTiF7A=",
    "secondaryConnectionString": "Endpoint=sb://ehubns-21383.servicebus.windows.net/;SharedAccessKeyName=RootManageSharedAccessKey;SharedAccessKey=KmaTygFIWie5UASkIjTZgwYwgFDsi+bjIGAsfpbcDOo=",
    "secondaryKey": "KmaTygFIWie5UASkIjTZgwYwgFDsi+bjIGAsfpbcDOo="
    }


    > HUB_NAME=hubname-$RANDOM
    > az eventhubs eventhub create --name $HUB_NAME --namespace-name $NS_NAME

    {
    "createdAt": "2022-06-05T05:49:45+00:00",
    "id": "/subscriptions/a67eb823-344a-4ddd-8346-ebe028190ccc/resourceGroups/learn-2e618c3b-e26f-473c-a22c-5a18ffdaade0/providers/Microsoft.EventHub/namespaces/ehubns-21383/eventhubs/hubname-21645",
    "location": "West US 2",
    "messageRetentionInDays": 7,
    "name": "hubname-21645",
    "partitionCount": 4,
    "partitionIds": [
    "0",
    "1",
    "2",
    "3"
    ],
    "resourceGroup": "learn-2e618c3b-e26f-473c-a22c-5a18ffdaade0",
    "status": "Active",
    "type": "Microsoft.EventHub/Namespaces/EventHubs",
    "updatedAt": "2022-06-05T05:49:45.257000+00:00"
    }

    > az eventhubs eventhub show --namespace-name $NS_NAME --name $HUB_NAME

    Create a storage account

    CommandDescription
    storage account createCreate a general-purpose V2 Storage account.
    storage account key listRetrieve the storage account key.
    storage account show-connection-stringRetrieve the connection string for an Azure Storage account.
    storage container createCreates a new container in a storage account.
    1
    2
    3
    4
    5
    6
    7
    8
    9
    10
    11
    12
    13
    14
    15
    16
    17
    18
    19
    20
    21
    22
    23
    24
    25
    26
    27
    28
    29
    30
    31
    32
    33
    34
    35
    36
    37
    38
    39
    40
    41
    42
    43
    > STORAGE_NAME=storagename$RANDOM

    > az storage account create --name $STORAGE_NAME --sku Standard_RAGRS --encryption-service blob

    {
    "id": "/subscriptions/a67eb823-344a-4ddd-8346-ebe028190ccc/resourceGroups/learn-2e618c3b-e26f-473c-a22c-5a18ffdaade0/providers/Microsoft.Storage/storageAccounts/storagename12220",
    "name": "storagename12220",
    "sku": {
    "name": "Standard_RAGRS",
    "tier": "Standard"
    },
    "statusOfPrimary": "available",
    "statusOfSecondary": "available",
    "tags": {},
    "type": "Microsoft.Storage/storageAccounts"
    }

    > az storage account keys list --account-name $STORAGE_NAME
    [
    {
    "creationTime": "2022-06-05T06:00:08.722158+00:00",
    "keyName": "key1",
    "permissions": "FULL",
    "value": "E8LXB9XIe/vo3heCCkm/DbBAHNSj8+1JeAIrWD8GGoYi3Jg6SIlioSloxcc6CK2h98lqKPke3t+E+AStcCsUMA=="
    },
    {
    "creationTime": "2022-06-05T06:00:08.722158+00:00",
    "keyName": "key2",
    "permissions": "FULL",
    "value": "mPkNiWAoOidzCkTs8hD34mHx7o8gNFX3qKe/LqPkpEk55XZwDJnTj0328uFkJoauQJRduBV2KFtr+AStNnSqzw=="
    }
    ]

    > az storage account show-connection-string -n $STORAGE_NAME
    {
    "connectionString": "DefaultEndpointsProtocol=https;EndpointSuffix=core.windows.net;AccountName=storagename12220;AccountKey=E8LXB9XIe/vo3heCCkm/DbBAHNSj8+1JeAIrWD8GGoYi3Jg6SIlioSloxcc6CK2h98lqKPke3t+E+AStcCsUMA==;BlobEndpoint=https://storagename12220.blob.core.windows.net/;FileEndpoint=https://storagename12220.file.core.windows.net/;QueueEndpoint=https://storagename12220.queue.core.windows.net/;TableEndpoint=https://storagename12220.table.core.windows.net/"
    }

    > az storage container create --name messages --connection-string "<connection string here>"

    {
    "created": true
    }

    Implement message-based communication workflows with Azure Service Bus

    • Choose whether to use Service Bus queues or topics to communicate in a distributed application.
    • Configure an Azure Service Bus namespace in an Azure subscription.
    • Create a Service Bus topic and use it to send and receive messages.
    • Create a Service Bus queue and use it to send and receive messages.

    Decide between messages and events

    Both messages and events are datagrams: data packages sent from one component to another. They’re different in ways that initially seem subtle, but the differences can make significant differences in how you architect your application.

    Messages: The message contains the actual data and not the data reference like an ID or a URL. It’s important to avoid sending too much data. The messaging architecture guarantees delivery of the message, and because no additional lookups are required, the message is reliably handled. Sometimes data contract is required between sender and receiver.

    Events: An event triggers a notification that something has occurred. Events are “lighter” than messages and are most often used for broadcast communications.

    Events have the following characteristics:

    • The event may be sent to multiple receivers, or to none at all.
    • Events are often intended to “fan out,” or have a large number of subscribers for each publisher.
    • The publisher of the event has no expectation about the action a receiving component takes.

    Service Bus is designed to handle messages. If you want to send events, you would likely choose Event Grid.

    Conclusions

    If your requirements are simple, if you want to send each message to only one destination, or if you want to write code as quickly as possible, a storage queue may be the best option. Otherwise, Service Bus queues provide many more options and flexibility.

    If you want to send messages to multiple subscribers, use a Service Bus topic.

    Data Storage

    There is no silver bullet in terms of storage. You can have several data types like product catalog data, media files like photos and videos, and financial business data. You need to determine the goal of your data, what you want to use it, and how you can get the best performance for your application.

    Data can be classified in one of the following ways:

    • structured
    • semi-structured
    • unstructured

    Structured Data

    Structured data refers to relational data that is organized in a table-like structure with schemas. You can search, enter and analyze data quickly with query languages such as SQL (Structured Query Language).

    Semi-Structured Data

    Semi-structured data refers to data non-relational or NoSQL data. Data contains tags that make the organization and hierarchy of the data apparent; for example - key-value pairs. It’s importante the serialization of data to store. Common formats are XML, JSON and Yaml.

    Unstructured Data

    Unstructured data refers to files such as photos or videos.

    Storage accounts let you create a group of data management rules and apply them all at once to the data stored in the account: blobs, files, tables, and queues.

    A single Azure subscription can host up to 250 storage accounts per region, each of which has a maximum storage account capacity of 5 PiB.

    Data types in Azure storage services

    • Blobs: A massively scalable object store for text and binary data. Can include support for Azure Data Lake Storage Gen2.
    • Files: Managed file shares for cloud or on-premises deployments. So, you can have a Server Message Block (SMB) under a highly available file share network.
    • Queues: A messaging store for reliable messaging between application components.
    • Table Storage: A NoSQL store for schema-less storage of structured data. Table Storage is not covered in this module.

    Kinds of blobs

    Blob TypeDescription
    Block blobsBlock blobs are used to hold text or binary files up to ~5 TB. The primary use case for block blobs is the storage of files that are read from beginning to end, such as media files or image files for websites.
    Page blobsPage blobs are used to hold random-access files up to 8TB. The primary use as the backing storage for the VHDs in the Azure Virtual Machines
    Append blobsAppend blobs are made up of blocks like block blobs, but they are optimized for append operations. Like Logging information

    The storage account has the following options: Premium_LRS, Standard_GRS, Standard_LRS, Standard_RAGRS, and Standard_ZRS.

    Useful commands for Azure storage services

    1
    2
    3
    4
    5
    6
    7
    8
    9
    10
    11
    12
    13
    14
    15
    16
    17
    18
    19
    20
    21
    22
    23
    24
    25
    26
    27
    28
    29
    30
    31
    32
    33
    34
    35
    36
    37
    38
    39
    40
    41
    42
    43
    44
    45
    46
    47
    48
    49
    50
    51
    52
    53
    54
    55
    56
    57
    58
    59
    60
    61
    62
    63
    64
    65
    66
    67
    68
    69
    70
    71
    72
    73
    74
    75
    76
    77
    78
    79
    80
    81
    82
    83
    84
    85
    86
    87
    88
    89
    90
    91
    92
    93
    94
    95
    96
    97
    98
    99
    100
    101
    102
    103
    104
    105
    106
    107
    108
    109
    110
    111
    112
    113
    114
    115
    116
    117
    118
    119
    120
    121
    122
    123
    124
    125
    126
    127
    128
    129
    130
    131
    132
    133
    134
    135
    136
    137
    138
    139
    140
    141
    142
    143
    144
    145
    146
    147
    148
    149
    150
    151
    152
    153
    > dotnet new console --name PhotoSharingApp

    > az storage account create \
    --resource-group learn-4b1879bf-2e6f-432f-97ae-518a211a1cb8 \
    --location westus \
    --sku Standard_LRS \
    --name <name>


    {
    "accessTier": "Hot",
    "allowBlobPublicAccess": true,
    "creationTime": "2022-06-06T12:59:45.410835+00:00",
    "enableHttpsTrafficOnly": true,
    "encryption": {
    "keySource": "Microsoft.Storage",
    "services": {
    "blob": {
    "enabled": true,
    "keyType": "Account",
    "lastEnabledTime": "2022-06-06T12:59:45.504556+00:00"
    },
    "file": {
    "enabled": true,
    "keyType": "Account",
    "lastEnabledTime": "2022-06-06T12:59:45.504556+00:00"
    },
    }
    },
    "id": "/subscriptions/5b7c0498-c93f-462b-a8ef-f50eda7b2b84/resourceGroups/learn-4b1879bf-2e6f-432f-97ae-518a211a1cb8/providers/Microsoft.Storage/storageAccounts/photostore1234",
    "keyCreationTime": {
    "key1": "2022-06-06T12:59:45.504556+00:00",
    "key2": "2022-06-06T12:59:45.504556+00:00"
    },
    "kind": "StorageV2",
    "location": "westus",
    "minimumTlsVersion": "TLS1_0",
    "name": "photostore1234",
    "networkRuleSet": {
    "bypass": "AzureServices",
    "defaultAction": "Allow",
    "ipRules": [],
    "virtualNetworkRules": []
    },
    "primaryEndpoints": {
    "blob": "https://photostore1234.blob.core.windows.net/",
    "dfs": "https://photostore1234.dfs.core.windows.net/",
    "file": "https://photostore1234.file.core.windows.net/",
    "queue": "https://photostore1234.queue.core.windows.net/",
    "table": "https://photostore1234.table.core.windows.net/",
    "web": "https://photostore1234.z22.web.core.windows.net/"
    },
    "primaryLocation": "westus",
    "privateEndpointConnections": [],
    "provisioningState": "Succeeded",
    "resourceGroup": "learn-4b1879bf-2e6f-432f-97ae-518a211a1cb8",
    "sku": {
    "name": "Standard_LRS",
    "tier": "Standard"
    },
    "statusOfPrimary": "available",
    "tags": {},
    "type": "Microsoft.Storage/storageAccounts"
    }

    > cd PhotoSharingApp
    > dotnet add package Azure.Storage.Blobs
    > dotnet run
    > touch appsettings.json
    {
    "ConnectionStrings": {
    "StorageAccount": "<value>"
    }
    }

    > az storage account show-connection-string \
    --resource-group learn-4b1879bf-2e6f-432f-97ae-518a211a1cb8 \
    --query connectionString \
    --name <name>

    "DefaultEndpointsProtocol=https;EndpointSuffix=core.windows.net;AccountName=photostore1234;AccountKey=+sQt4rOWd70Oghq/VlBfha/mY6gROj6KJ8pMqZjH1Lues5G9J2+Kjmay3JjbmQGLhrCVsItYZAf5+AStNaiYCg==;BlobEndpoint=https://photostore1234.blob.core.windows.net/;FileEndpoint=https://photostore1234.file.core.windows.net/;QueueEndpoint=https://photostore1234.queue.core.windows.net/;TableEndpoint=https://photostore1234.table.core.windows.net/"

    // Update the connectionString for StorageAccount
    // Update PhotoSharingApp.csproj
    <ItemGroup>
    <None Update="appsettings.json">
    <CopyToOutputDirectory>PreserveNewest</CopyToOutputDirectory>
    </None>
    </ItemGroup>

    > > az storage container list \
    --account-name <name>
    [ ]

    > dotnet add package Microsoft.Extensions.Configuration.Json
    > vim Program.cs


    using Microsoft.Extensions.Configuration;
    using System.IO;
    using Azure.Storage.Blobs;

    var builder = new ConfigurationBuilder()
    .SetBasePath(Directory.GetCurrentDirectory())
    .AddJsonFile("appsettings.json");

    var configuration = builder.Build();

    var connectionString = configuration.GetConnectionString("StorageAccount");
    string containerName = "photos";

    BlobContainerClient container = new BlobContainerClient(connectionString, containerName);
    container.CreateIfNotExists();

    > dotnet run
    > az storage container list \
    --account-name <name>

    [
    {
    "encryptionScope": {
    "defaultEncryptionScope": "$account-encryption-key",
    "preventEncryptionScopeOverride": false
    },
    "immutableStorageWithVersioningEnabled": false,
    "name": "photos",
    "properties": {
    "etag": "\"0x8DA47BF9557C2BA\"",
    "hasImmutabilityPolicy": false,
    "hasLegalHold": false,
    "lastModified": "2022-06-06T13:22:19+00:00",
    "lease": {
    "state": "available",
    "status": "unlocked"
    },
    },
    }
    ]

    > vim Program.cs
    // Prev code

    string blobName = "docs-and-friends-selfie-stick";
    string fileName = "docs-and-friends-selfie-stick.png";
    BlobClient blobClient = container.GetBlobClient(blobName);
    blobClient.Upload(fileName, true);

    var blobs = container.GetBlobs();
    foreach (var blob in blobs)
    {
    Console.WriteLine($"{blob.Name} --> Created On: {blob.Properties.CreatedOn:yyyy-MM-dd HH:mm:ss} Size: {blob.Properties.ContentLength}");
    }

    Connect and create container

    1
    2
    BlobContainerClient container = new BlobContainerClient(connectionString, containerName);
    container.CreateIfNotExists();

    Upload a file into blob storage

    1
    2
    3
    4
    5
    string blobName = "docs-and-friends-selfie-stick";
    string fileName = "docs-and-friends-selfie-stick.png";
    BlobClient blobClient = container.GetBlobClient(blobName);
    blobClient.Upload(fileName, true);

    Get list of blobs in a storage account

    1
    2
    3
    4
    5
    6
    7
    8
    string containerName = "...";
    BlobContainerClient container = new BlobContainerClient(connectionString, containerName);

    var blobs = container.GetBlobs();
    foreach (var blob in blobs)
    {
    Console.WriteLine($"{blob.Name} --> Created On: {blob.Properties.CreatedOn:YYYY-MM-dd HH:mm:ss} Size: {blob.Properties.ContentLength}");
    }

    Security inside Azure Storage

    All data inside is automatically encrypted by the Storage Service Encryption (SSE) with a 256-bit AES cipher. When you read Azure Storage data, it decrypts the data before returning it.

    For VHDs, Azure uses Azure Disk Encryption. This encryption uses BitLocker for Windows images and dm-crypt for Linux images.

    When you enable transport-level security, it will always use HTTPS to secure communication with the internet. Also, enabling cross-domain allows GET requests down to specific domains.

    Every request to a secure resource must be authorized. Azure Storage supports Azure Active Directory and role-based access control (RBAC) for both resource management and data operations. Also, you can use a Shared key; it supports blobs, files, queues, and tables. The client embeds the shared key in the HTTP Authorization header of every request, and the Storage account validates the key.

    You can get the Access keys under the following page:
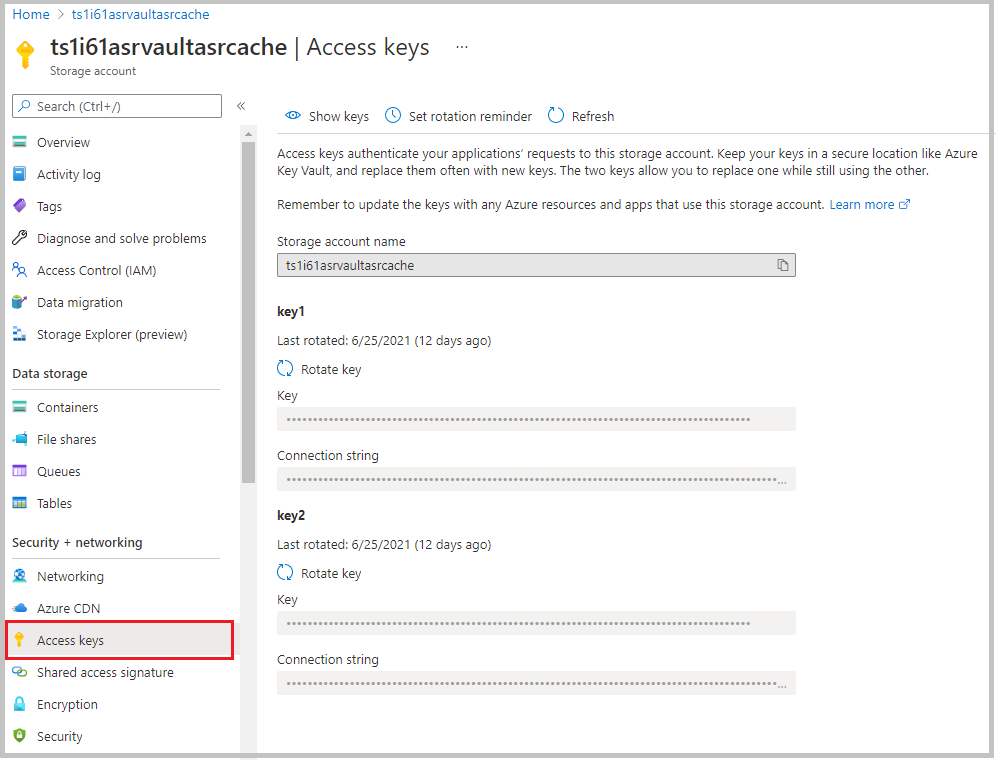
    The storage account has only two keys, and they provide full access to the account. Because these keys are powerful, use them only with trusted in-house applications that you control completely.

    For untrusted clients, use a shared access signature (SAS). A SAS is a string that contains a security token that can be attached to a URI. Use a SAS to delegate access to storage objects and specify constraints, such as the permissions and the time range of access.

    Also, you can audit the data that is being accessed by using the built-in Storage Analytics service.

    There are several types of shared access signatures:

    • Service-level SAS: To allow access to specific resources in a storage account. For example, to allow an app to retrieve a list of files in a file system, or to download a file.
    • Account-level SAS: All the service-level SAS can allow, plus additional resources and abilities. For example, you can use an account-level SAS to allow the ability to create file systems.

    Microsoft Defender for Storage is currently available for Blob storage, Azure Files, and Azure Data Lake Storage Gen2. You can turn on Microsoft Defender for Storage in the Azure portal through the configuration page of the Azure Storage account or in the advanced security section of the Azure portal. Follow these steps. Navigate to your storage account. Under Security + Networking, select Security. Select Enable Microsoft Defender for Storage.

    Let’s check some security anomalies

    • Nature of the anomaly
    • Storage account name
    • Event time
    • Storage type
    • Potential causes
    • Investigation steps
    • Remediation steps
    • Email also includes details about possible causes and recommended actions to investigate and mitigate the potential threat

    Additional resources

    Store application data with Azure Blob storage

    The storage accounts are used to separate costs and control access to data. If you want to add additional separation, you should use containers and blobs to organize your data.

    By default, blobs require authentication to access. But you can configure an individual container to allow public download of their blobs without authentication. This can be useful for storing static files, such as images, videos, and other files that are not sensitive to the user.

    Containers are “flat”, but inside the containers, you can create your files with names that look like a file path finance/budgets/2017/q1.xls, but in the end, that is the filename. Those file namings are called virtual directories and many tools, and client libraries use them to visualize the files as a file system. Very useful for navigating complex blob data.

    There are three types of blobs:

    • Block blobs are composed of blocks of different sizes that can be uploaded independently and in parallel. Writing to a block blob involves uploading data to blocks and committing them to the blob.
    • Append blobs are specialized block blobs that support only appending new data (not updating or deleting existing data), but they’re very efficient at it. Append blobs are great for scenarios like storing logs or writing streamed data.
    • Page blobs are designed for scenarios that involve random-access reads and writes. Page blobs are used to store the virtual hard disk (VHD) files used by Azure Virtual Machines, but they’re great for any scenario that involves random access.
    1
    2
    3
    4
    5
    6
    7
    8
    9
    10
    11
    12
    13
    14
    15
    16
    17
    18
    19
    20
    21
    22
    23
    24
    25
    26
    27
    28
    29
    30
    31
    32
    33
    34
    35
    36
    37
    38
    39
    40
    41
    42
    43
    44
    45
    46
    47
    48
    49
    50
    51
    52
    53
    54
    55
    56
    57
    58
    59
    60
    61
    62
    63
    64
    65
    66
    67
    68
    69
    70
    71
    72
    73
    74
    75
    76
    77
    78
    79
    80
    81
    82
    83
    84
    85
    86
    87
    88
    89
    90
    91
    92
    93
    94
    95
    96
    97
    98
    99
    100
    101
    102
    103
    104
    105
    106
    107
    108
    109
    110
    111
    112
    113
    114
    115
    116
    117
    118
    119
    120
    121
    122
    123
    124
    125
    126
    127
    128
    129
    130
    131
    132
    133
    134
    135
    136
    137
    138
    139
    140
    141
    142
    143
    144
    145
    146
    147
    148
    149
    150
    151
    152
    153
    154
    155
    > az storage account create \
    --kind StorageV2 \
    --resource-group learn-9ca19d9d-bd57-4262-9e2e-a937f94c12f4 \
    --location centralus \
    --name [your-unique-storage-account-name]

    {
    "accessTier": "Hot",
    "allowBlobPublicAccess": true,
    "creationTime": "2022-06-07T19:36:07.539161+00:00",
    "enableHttpsTrafficOnly": true,
    "id": "/subscriptions/01383f7e-b3be-4607-a9f3-b77a8c998aa5/resourceGroups/learn-9ca19d9d-bd57-4262-9e2e-a937f94c12f4/providers/Microsoft.Storage/storageAccounts/iamramirostorage",
    "kind": "StorageV2",
    "location": "centralus",
    "minimumTlsVersion": "TLS1_0",
    "name": "iamramirostorage",
    "primaryEndpoints": {
    "blob": "https://iamramirostorage.blob.core.windows.net/",
    "dfs": "https://iamramirostorage.dfs.core.windows.net/",
    "file": "https://iamramirostorage.file.core.windows.net/",
    "queue": "https://iamramirostorage.queue.core.windows.net/",
    "table": "https://iamramirostorage.table.core.windows.net/",
    "web": "https://iamramirostorage.z19.web.core.windows.net/"
    },
    "primaryLocation": "centralus",
    "privateEndpointConnections": [],
    "provisioningState": "Succeeded",
    "resourceGroup": "learn-9ca19d9d-bd57-4262-9e2e-a937f94c12f4",
    "secondaryEndpoints": {
    "blob": "https://iamramirostorage-secondary.blob.core.windows.net/",
    "dfs": "https://iamramirostorage-secondary.dfs.core.windows.net/",
    "queue": "https://iamramirostorage-secondary.queue.core.windows.net/",
    "table": "https://iamramirostorage-secondary.table.core.windows.net/",
    "web": "https://iamramirostorage-secondary.z19.web.core.windows.net/"
    },
    "secondaryLocation": "eastus2",
    "sku": {
    "name": "Standard_RAGRS",
    "tier": "Standard"
    },
    "statusOfPrimary": "available",
    "statusOfSecondary": "available",
    "tags": {},
    "type": "Microsoft.Storage/storageAccounts"
    }

    > az storage container create -h

    Command
    az storage container create : Create a container in a storage account.
    By default, container data is private ("off") to the account owner. Use "blob" to allow
    public read access for blobs. Use "container" to allow public read and list access to the
    entire container. You can configure the --public-access using `az storage container set-
    permission -n CONTAINER_NAME --public-access blob/container/off`.

    Arguments
    --name -n [Required] : The container name.
    --auth-mode : The mode in which to run the command. "login"
    mode will directly use your login credentials
    for the authentication. The legacy "key" mode
    will attempt to query for an account key if
    no authentication parameters for the account
    are provided. Environment variable:
    AZURE_STORAGE_AUTH_MODE. Allowed values:
    key, login.
    --fail-on-exist : Throw an exception if the container already
    exists.
    --metadata : Metadata in space-separated key=value pairs.
    This overwrites any existing metadata.
    --public-access : Specifies whether data in the container may
    be accessed publicly. Allowed values: blob,
    container, off.
    --resource-group -g [Deprecated] : Name of resource group. You can
    configure the default group using `az
    configure --defaults group=<name>`.
    Argument 'resource_group_name' has been deprecated and will be removed in a future
    release.
    --timeout : Request timeout in seconds. Applies to each
    call to the service.

    Encryption Policy Arguments
    --default-encryption-scope -d [Preview] : Default the container to use
    specified encryption scope for all writes.
    Argument '--default-encryption-scope' is in preview and under development. Reference
    and support levels: https://aka.ms/CLI_refstatus
    --prevent-encryption-scope-override -p [Preview] : Block override of encryption scope
    from the container default. Allowed values:
    false, true.
    Argument '--prevent-encryption-scope-override' is in preview and under development.
    Reference and support levels: https://aka.ms/CLI_refstatus

    Storage Account Arguments
    --account-key : Storage account key. Must be used in
    conjunction with storage account name or
    service endpoint. Environment variable:
    AZURE_STORAGE_KEY.
    --account-name : Storage account name. Related environment
    variable: AZURE_STORAGE_ACCOUNT.
    --blob-endpoint : Storage data service endpoint. Must be used
    in conjunction with either storage account
    key or a SAS token. You can find each service
    primary endpoint with `az storage account
    show`. Environment variable:
    AZURE_STORAGE_SERVICE_ENDPOINT.
    --connection-string : Storage account connection string.
    Environment variable:
    AZURE_STORAGE_CONNECTION_STRING.
    --sas-token : A Shared Access Signature (SAS). Must be used
    in conjunction with storage account name or
    service endpoint. Environment variable:
    AZURE_STORAGE_SAS_TOKEN.

    Global Arguments
    --debug : Increase logging verbosity to show all debug
    logs.
    --help -h : Show this help message and exit.
    --only-show-errors : Only show errors, suppressing warnings.
    --output -o : Output format. Allowed values: json, jsonc,
    none, table, tsv, yaml, yamlc. Default:
    json.
    --query : JMESPath query string. See
    http://jmespath.org/ for more information and
    examples.
    --subscription : Name or ID of subscription. You can configure
    the default subscription using `az account
    set -s NAME_OR_ID`.
    --verbose : Increase logging verbosity. Use --debug for
    full debug logs.

    Examples
    Create a storage container in a storage account.
    az storage container create -n mystoragecontainer

    Create a storage container in a storage account and return an error if the container already
    exists.
    az storage container create -n mystoragecontainer --fail-on-exist

    Create a storage container in a storage account and allow public read access for blobs.
    az storage container create -n mystoragecontainer --public-access blob

    To search AI knowledge base for examples, use: az find "az storage container create"

    Please let us know how we are doing: https://aka.ms/azureclihats

    > az storage account \
    show-connection-string \
    -g learn-9ca19d9d-bd57-4262-9e2e-a937f94c12f4 \
    -n [your-unique-storage-account-name] \
    --output tsv
    DefaultEndpointsProtocol=https;EndpointSuffix=core.windows.net;AccountName=iamramirostorage;AccountKey=5UQynJfviJgKOb9lsXbuYrjtI6KvzIfpq9Ka/Vf2gxzl5DIDTOM6rM5hulnUsejMuJHpvV45e6xk+AStE1wwzw==;BlobEndpoint=https://iamramirostorage.blob.core.windows.net/;FileEndpoint=https://iamramirostorage.file.core.windows.net/;QueueEndpoint=https://iamramirostorage.queue.core.windows.net/;TableEndpoint=https://iamramirostorage.table.core.windows.net/
    ramiroabe@Azure:~$

    > az storage container create -n mystoragecontainer


    Add into dotnet core application

    1
    2
    > dotnet add package Azure.Storage.Blobs
    > dotnet restore

    git clone https://github.com/MicrosoftDocs/mslearn-store-data-in-azure.git

    1
    2
    3
    4
    5
    6
    7
    8
    9
    10
    11
    12
    13
    14
    15
    16
    17
    18
    19
    20
    21
    22
    23
    24
    25
    26
    27
    28
    29
    30

    using Azure;
    using Azure.Storage.Blobs;
    using Azure.Storage.Blobs.Models;

    BlobServiceClient blobServiceClient = new BlobServiceClient(storageConfig.ConnectionString);
    BlobContainerClient containerClient = blobServiceClient.GetBlobContainerClient(storageConfig.FileContainerName);
    containerClient.CreateIfNotExistsAsync();


    // listing
    AsyncPageable<BlobItem> blobs = containerClient.GetBlobsAsync();

    List<string> names = new List<string>();

    await foreach (var blob in blobs)
    {
    names.Add(blob.Name);
    }

    // Upload File
    BlobClient blobClient = containerClient.GetBlobClient(name);
    var response = blobClient.UploadAsync(fileStream);


    // Download File

    // Get a client to operate on the blob so we can read it.
    BlobClient blobClient = containerClient.GetBlobClient(name);
    return blobClient.OpenReadAsync();

    The stream-based upload code shown here is more efficient than reading the file into a byte array before sending it to Blob Storage. However, the ASP.NET Core IFormFile technique you use to get the file from the client is not a true end-to-end streaming implementation, and is only appropriate for handling uploads of small files.

    CLI for deploy and run code in azure

    1
    2
    3
    4
    5
    6
    7
    8
    9
    10
    11
    12
    13
    14
    15
    16
    17
    18
    19
    20
    21
    22
    23
    24
    25
    26
    27
    28
    29
    30
    31
    32
    33
    34
    35
    36
    37
    38
    39
    40
    41
    42
    43
    44
    45
    46
    47
    48
    49
    50
    51
    52
    53
    54
    55
    56
    57
    58
    59
    60
    61
    62
    63
    64
    65
    66
    67
    68
    69
    70
    71
    72
    73
    74
    75
    76
    77
    78
    79
    80
    81
    82
    83
    84
    85
    86
    87
    88
    89
    90
    91
    92
    93
    94
    95
    96
    97
    98
    99
    100
    101
    102
    103
    104
    105
    106
    107
    108
    109
    110
    111
    112
    > az appservice plan create \
    --name blob-exercise-plan \
    --resource-group learn-9ca19d9d-bd57-4262-9e2e-a937f94c12f4 \
    --sku FREE --location centralus
    {
    "geoRegion": "Central US",
    "id": "/subscriptions/01383f7e-b3be-4607-a9f3-b77a8c998aa5/resourceGroups/learn-9ca19d9d-bd57-4262-9e2e-a937f94c12f4/providers/Microsoft.Web/serverfarms/blob-exercise-plan",
    "name": "blob-exercise-plan",
    }

    > az webapp create \
    --name <your-unique-app-name> \
    --plan blob-exercise-plan \
    --resource-group learn-9ca19d9d-bd57-4262-9e2e-a937f94c12f4

    {
    "defaultHostName": "hola-app-iamramiro.azurewebsites.net",
    "hostNames": [
    "hola-app-iamramiro.azurewebsites.net"
    ],
    "id": "/subscriptions/01383f7e-b3be-4607-a9f3-b77a8c998aa5/resourceGroups/learn-9ca19d9d-bd57-4262-9e2e-a937f94c12f4/providers/Microsoft.Web/sites/hola-app-iamramiro",
    "location": "Central US",
    "name": "hola-app-iamramiro",
    }

    > CONNECTIONSTRING=$(az storage account show-connection-string \
    --name <your-unique-storage-account-name> \
    --output tsv)

    > az webapp config appsettings set \
    --name <your-unique-app-name> --resource-group learn-9ca19d9d-bd57-4262-9e2e-a937f94c12f4 \
    --settings AzureStorageConfig:ConnectionString=$CONNECTIONSTRING AzureStorageConfig:FileContainerName=files

    [
    {
    "name": "WEBSITE_NODE_DEFAULT_VERSION",
    "slotSetting": false,
    "value": "~14"
    },
    {
    "name": "AzureStorageConfig:ConnectionString",
    "slotSetting": false,
    "value": "DefaultEndpointsProtocol=https;EndpointSuffix=core.windows.net;AccountName=iamramirostorage;AccountKey=5UQynJfviJgKOb9lsXbuYrjtI6KvzIfpq9Ka/Vf2gxzl5DIDTOM6rM5hulnUsejMuJHpvV45e6xk+AStE1wwzw==;BlobEndpoint=https://iamramirostorage.blob.core.windows.net/;FileEndpoint=https://iamramirostorage.file.core.windows.net/;QueueEndpoint=https://iamramirostorage.queue.core.windows.net/;TableEndpoint=https://iamramirostorage.table.core.windows.net/"
    },
    {
    "name": "AzureStorageConfig:FileContainerName",
    "slotSetting": false,
    "value": "files"
    }
    ]

    > dotnet publish -o pub
    > cd pub
    > zip -r ../site.zip *

    adding: appsettings.Development.json (deflated 32%)
    adding: appsettings.json (deflated 23%)
    adding: Azure.Core.dll (deflated 56%)
    adding: Azure.Storage.Blobs.dll (deflated 69%)
    adding: Azure.Storage.Common.dll (deflated 55%)
    adding: FileUploader (deflated 61%)
    adding: FileUploader.deps.json (deflated 91%)
    adding: FileUploader.dll (deflated 55%)
    adding: FileUploader.pdb (deflated 47%)
    adding: FileUploader.runtimeconfig.json (deflated 36%)
    adding: FileUploader.Views.dll (deflated 65%)
    adding: FileUploader.Views.pdb (deflated 48%)
    adding: Microsoft.Bcl.AsyncInterfaces.dll (deflated 45%)
    adding: System.Memory.Data.dll (deflated 43%)
    adding: System.Text.Encodings.Web.dll (deflated 58%)
    adding: web.config (deflated 40%)
    adding: wwwroot/ (stored 0%)
    adding: wwwroot/favicon.ico (deflated 71%)

    > az webapp deployment source config-zip \
    --src ../site.zip \
    --name <your-unique-app-name> \
    --resource-group learn-9ca19d9d-bd57-4262-9e2e-a937f94c12f4

    Getting scm site credentials for zip deployment
    Starting zip deployment. This operation can take a while to complete ...
    Deployment endpoint responded with status code 202
    {
    "active": true,
    "author": "N/A",
    "author_email": "N/A",
    "complete": true,
    "deployer": "ZipDeploy",
    "end_time": "2022-06-07T20:07:10.5182693Z",
    "id": "36da20a94b6544fd806cf2a6e72feefc",
    "is_readonly": true,
    "is_temp": false,
    "last_success_end_time": "2022-06-07T20:07:10.5182693Z",
    "log_url": "https://hola-app-iamramiro.scm.azurewebsites.net/api/deployments/latest/log",
    "message": "Created via a push deployment",
    "progress": "",
    "provisioningState": "Succeeded",
    "received_time": "2022-06-07T20:07:05.6745876Z",
    "site_name": "hola-app-iamramiro",
    "start_time": "2022-06-07T20:07:05.783944Z",
    "status": 4,
    "status_text": "",
    "url": "https://hola-app-iamramiro.scm.azurewebsites.net/api/deployments/latest"
    }
    > az storage blob list \
    --account-name iamramirostorage \
    --container-name files --query [].{Name:name} --output table

    Name
    ----------------
    3storagekeys.png

    In the following image, the web app shows the blobs in the storage account.
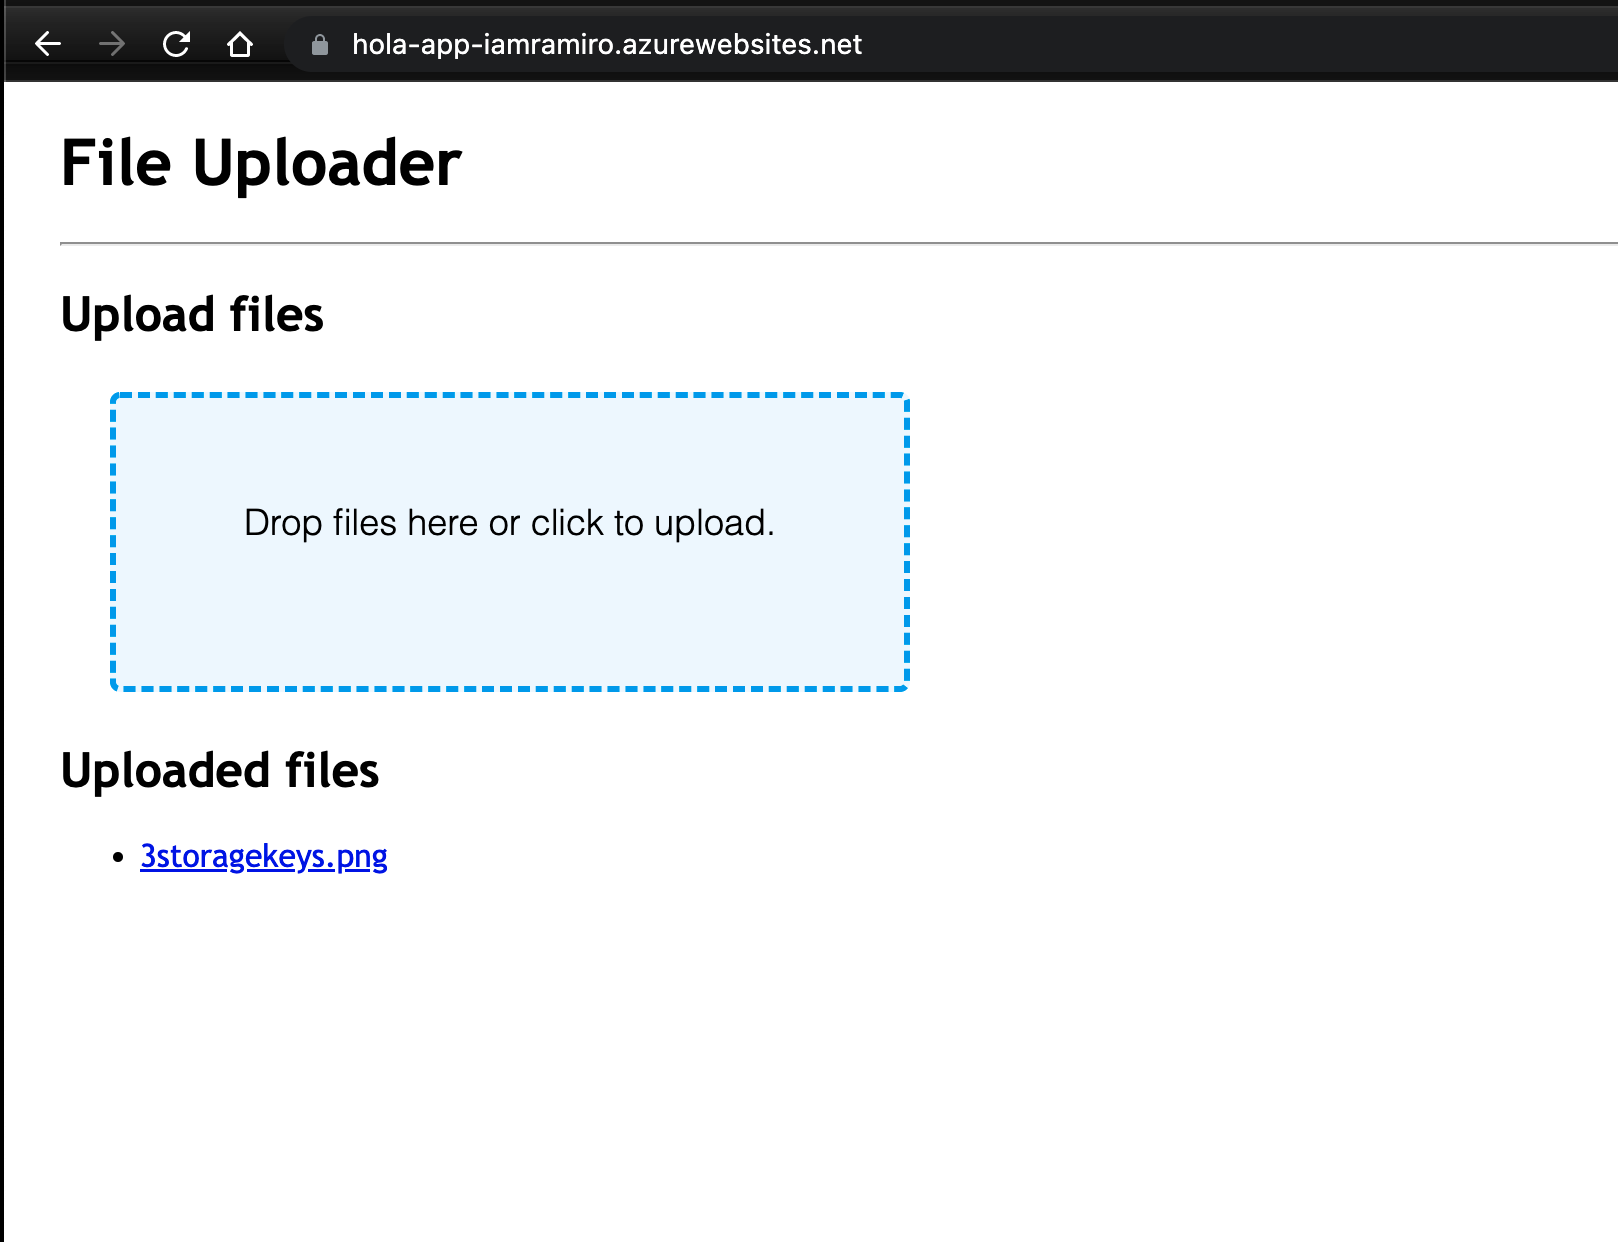
    Further Reading

    Index data from Azure Blob Storage using Azure Cognitive Search
    Naming and Referencing Containers, Blobs, and Metadata
    Security recommendations for Blob storage
    Configure an ASP.NET Core app for Azure App Service

    Azure Virtual Machines [IaaS]

    Before the cloud arrives, exist the on-premise servers. Those servers inside the company run all the company infrastructure, from databases to web servers. But, having those severs in the physical location can be a problem. One problem can be the scalability and heavy load under peaks of usage. For that reason, companies have started to explore cloud computing as a solution for many problems related to having a server in a physical location.

    With Azure VMs, you have total control over the configuration, and you can install whatever you need. You don’t need to install physical hardware when you need to scale your application, and you can have additional services like monitoring and security.

    You still need to maintain the VMs, like manage updates and patches on the OS, Performance, and Disk Space Usage. Just like if you were using a physical server. Each VM contains a collection of components such as Network Interfaces, Disks, IP Addresses, and Network Security Groups, and all those components do the same job as the Physical component but with Software.

    You can size your VMs based on the amount of CPU, RAM, and Disk Space you need. All VMs contain two disks (Temporal Data and OS), and you can add more disks if required.

    When creating VMs, you need to attach a Virtual Network Interface. This network connection will be used to communicate with the VMs inside your private network or with the Internet with Public IP.

    When you going to create a new VM, you need to know what Ports do you need to open, what OS you want to use, and what is the size of the disk or disks, and the size of the VM in terms of CPU , memory and disk performance.

    Networking

    Before we create the VM, we need to create a Virtual Network. So, it’s like a private LAN network. By default, services outside the virtual network cannot connect to services within the virtual network. You can, however, configure the network to allow access to the external service, including your on-premises servers.

    When you set up a virtual network, you specify the available address spaces, subnets, and security. If the VNet will be connected to other VNets, you must select address ranges that are not overlapping.

    In terms of security, you can set yo the Network Secrity Group to allow control the trafic to the VMs. It’s like a firewall and you can apply custom rules for inbound or outbound requests.

    Let’s create the VM

    One important fact after create the VM is that you need to select an appropiate name for the VM. The name must be unique and it must be a valid DNS name, but more important, have a useful meaning to you. Let’s check the following table.

    ElementExampleNotes
    Environmentdev, prod, QAIdentifies the environment for the resource
    Locationuw (US West), ue (US East)Identifies the region into which the resource is deployed
    Instance01, 02For resources that have more than one named instance (web servers, etc.)
    Product or ServiceserviceIdentifies the product, application, or service that the resource supports
    Rolesql, web, messagingIdentifies the role of the associated resource

    For example, devusc-webvm01 might represent the first development web server hosted in the US South Central location.

    So, when you create the VM, there are several resources around it:

    • The VM itself
    • Storage account for the disks
    • Virtual network (shared with other VMs and services)
    • Network interface to communicate on the network
    • Network Security Group(s) to secure the network traffic
    • Public Internet address (optional)

    You can create the VM in the Closest location for you, to avoid latency. Somethings it’s regarding legal compliance or tax requirements.

    There are several size of VMs, you can find it group by his purpose. Let’s take a look:

    OptionDescriptionSizes
    General purposeGeneral-purpose VMs are designed to have a balanced CPU-to-memory ratio. Ideal for testing and development, small to medium databases, and low to medium traffic web servers.B, Dsv3, Dv3, DSv2, Dv2
    Compute optimizedCompute optimized VMs are designed to have a high CPU-to-memory ratio. Suitable for medium traffic web servers, network appliances, batch processes, and application servers.Fsv2, Fs, F
    Memory optimizedMemory optimized VMs are designed to have a high memory-to-CPU ratio. Great for relational database servers, medium to large caches, and in-memory analytics.Esv3, Ev3, M, GS, G, DSv2, Dv2
    Storage optimizedStorage optimized VMs are designed to have high disk throughput and IO. Ideal for VMs running databases.Ls
    GPUGPU VMs are specialized virtual machines targeted for heavy graphics rendering and video editing. These VMs are ideal options for model training and inferencing with deep learning.NV, NC, NCv2, NCv3, ND
    High performance computesHigh performance compute is the fastest and most powerful CPU virtual machines with optional high-throughput network interfaces.H

    You can resize your VM as long as you need it. The price is computed per minute of usage. If the VM is stopped/deallocated and you aren’t billed for the running VM, you will be charged for the storage used by the disks.

    The VM will have at least two virtual hard disks (VHDs). The first disk stores the operating system, and the second is used as temporary storage, so, after reboot, all data will be lost. The data for each VHD is held in Azure Storage as page blobs, which allows Azure to allocate space only for the storage you use. It’s also how your storage cost is measured; you pay for the storage you are consuming. You can select Standard or Premium storage for your VM.

    In Linux, those hard disks (VHDs) will be mounted in the following paths:

    • The operating system disk: This is your primary drive, and it has a maximum capacity of 2048 GB. It will be labeled as /dev/sda by default.

    • A temporary disk: This provides temporary storage for the OS or any apps. On Linux virtual machines, the disk is /dev/sdb and is formatted and mounted to /mnt by the Azure Linux Agent. It is sized based on the VM size and is used to store the swap file.

    NOTE: The temporary disk is not persistent. You should only write data to this disk that is not critical to the system.

    And finally, choose the OS you want to use. You can choose between Windows, Linux, Ubuntu, CentOS, Debian, and Custom. Yes, Custom. You can search in the Azure Marketplace for more sophisticated install images or create your disk image with your need and upload it to Azure Storage and use it to create a Virtual VM. Only 64-bit operating systems are supported.

    You can create VMs with Azure CLI. So, you can create automated scripts and run them on your VMs. Infrastructure as a Code [IaC] is the way to simply define, preview and deploy cloud infrastructure by using a template language. Some of the tools available for IaC are:

    • ARM templates
    • Terraform
    • Ansible
    • Jenkins
    • Cloud-init

    Creating the VMs with the Azure Portal is okay for maybe one or two VMs. But what if you want to create a copy of a VM? It’s time-consuming. So, The Resource Manager template came into action. You can create a resource template for your VM from the VM menu, under **Automation and click Export Template.

    Let’s create a VM with Azure CLI.

    1
    2
    3
    4
    5
    6
    az vm create \
    --resource-group learn-5968f19f-9b39-406f-97c2-cc7a422924ed \
    --name [VM-unique-name] \
    --image win2016datacenter \
    --admin-username jonc \
    --admin-password aReallyGoodPasswordHere

    You can event create a VM using the SDK Microsoft.Azure.Management.Fluent in the NuGet package.

    1
    2
    3
    4
    5
    6
    7
    8
    9
    10
    11
    12
    13
    14
    15
    16
    17
    18
    19

    var azure = Azure
    .Configure()
    .WithLogLevel(HttpLoggingDelegatingHandler.Level.Basic)
    .Authenticate(credentials)
    .WithDefaultSubscription();
    // ...
    var vmName = "test-wp1-eus-vm";

    azure.VirtualMachines.Define(vmName)
    .WithRegion(Region.USEast)
    .WithExistingResourceGroup("TestResourceGroup")
    .WithExistingPrimaryNetworkInterface(networkInterface)
    .WithLatestWindowsImage("MicrosoftWindowsServer", "WindowsServer", "2012-R2-Datacenter")
    .WithAdminUsername("jonc")
    .WithAdminPassword("aReallyGoodPasswordHere")
    .WithComputerName(vmName)
    .WithSize(VirtualMachineSizeTypes.StandardDS1)
    .Create();

    After you create the VM, you can use the Azure VM Extensions you install additional software on the VM after the initial deployment. You want this task to use a specific configuration, monitored, and executed automatically.

    Azure Automation services

    If the infrastructure is big enough, you can use Azure Automation services to automate the tasks like Process automation, configuration management, and update management. Let’s take a look at the following table:

    ServiceDescription
    Process Automation.Let’s assume you have a VM that is monitored for a specific error event. You want to take action, and fix the problem as soon as it’s reported. Process automation enables you to set up watcher tasks that can respond to events that may occur in your datacenter.
    Configuration Management.Perhaps you want to track software updates that become available for the operating system that runs on your VM. There are specific updates you may want to include or exclude. Configuration management enables you to track these updates, and take action as required. You use Microsoft Endpoint Configuration Manager to manage your company’s PC, servers, and mobile devices. You can extend this support to your Azure VMs with Configuration Manager.
    Update Management.This is used to manage updates and patches for your VMs. With this service, you’re able to assess the status of available updates, schedule installation, and review deployment results to verify updates applied successfully. Update management incorporates services that provide process and configuration management. You enable update management for a VM directly from your Azure Automation account. You can also enable update management for a single virtual machine from the virtual machine pane in the portal.

    Availability sets

    Microsoft offers a 99.95% external connectivity service level agreement (SLA) for multiple-instance VMs deployed in an availability set. That means that for the SLA to apply, there must be at least two instances of the VM deployed within an availability set.

    Manage the availability of your Azure VMs

    Backup the VM

    Azure Backup is a backup as a service offering that protects physical or virtual machines no matter where they reside: on-premises or in the cloud.

    Azure Backup can be used for a wide range of data backup scenarios, such as:

    • Files and folders on Windows OS machines (physical or virtual, local or cloud)
    • Application-aware snapshots (Volume Shadow Copy Service)
    • Popular Microsoft server workloads such as Microsoft SQL Server, Microsoft SharePoint, and Microsoft Exchange
    • Native support for Azure Virtual Machines, both Windows, and Linux
    • Linux and Windows 10 client machines

    Create Linux VM

    For Linux VMs, if you want remote access to the VM, you need to connect through SSH. It’s an encrypted connection protocol that allows secure sign-ins over unsecured connections. SSH allows you to connect to a terminal shell from a remote location using a network connection.

    There are two ways to authenticate in an SSH connection: username and password or SSH key pair. Although SSH provides an encrypted connection, using passwords with SSH connections leaves the VM vulnerable to brute-force attacks of passwords. A more secure and preferred method of connecting to a Linux VM with SSH is a public-private key pair, also known as SSH keys.

    So, let’s create an SSH key pair:

    1
    2
    3
    4
    5
    6
    7
    8
    9
    10
    11
    12
    13
    14
    15
    16
    17
    18
    19
    20
    21
    22
    23
    24
    25
    26
    27
    28
    29
    30
    31
    32
    33
    34
    35
    36
    37
    38
    39
    40
    41
    42
    43
    44
    45
    46
    47
    48
    49
    50
    > ssh-keygen \
    -m PEM \
    -t rsa \
    -b 4096 \
    -C "azureuser@myserver" \
    -N mypassphrase

    Generating public/private rsa key pair.
    Enter file in which to save the key (/Users/ramiroandres/.ssh/id_rsa):
    Enter passphrase (empty for no passphrase):
    Enter same passphrase again:
    Your identification has been saved in /Users/ramiroandres/.ssh/id_rsa
    Your public key has been saved in /Users/ramiroandres/.ssh/id_rsa.pub
    The key fingerprint is:
    SHA256:/35mCgHbjKPwvu3K97YBhDf8BPGaiYVmt5tvSMvgTLM ramiroandres@Ramiros-MacBook-Pro.local
    The key is randomart image is:
    +---[RSA 4096]----+
    | o. |
    | + o |
    | = O o |
    | o * # |
    | . . S = |
    | o+..* . |
    | +o*oo+ |
    | oE.=.o+ + |
    | ==o++o+= |
    +----[SHA256]-----+

    > cat ~/.ssh/id_rsa.pub
    ssh-rsa XXXXXXXXXXc2EAAAADAXABAAABAXC5Am7+fGZ+5zXBGgXS6GUvmsXCLGc7tX7/rViXk3+eShZzaXnt75gUmT1I2f75zFn2hlAIDGKWf4g12KWcZxy81TniUOTjUsVlwPymXUXxESL/UfJKfbdstBhTOdy5EG9rYWA0K43SJmwPhH28BpoLfXXXXXGX/ilsXXXXXKgRLiJ2W19MzXHp8z3Lxw7r9wx3HaVlP4XiFv9U4hGcp8RMI1MP1nNesFlOBpG4pV2bJRBTXNXeY4l6F8WZ3C4kuf8XxOo08mXaTpvZ3T1841altmNTZCcPkXuMrBjYSJbA8npoXAXNwiivyoe3X2KMXXXXXdXXXXXXXXXXCXXXXX/ azureuser@myserver

    > ssh-keygen \
    -f ~/.ssh/id_rsa.pub \
    -e \
    -m RFC4716 > ~/.ssh/id_ssh2.pem

    ---- BEGIN SSH2 PUBLIC KEY ----
    Comment: "4096-bit RSA, converted by ramiroandres@Ramiros-MacBook-Pro."
    AAAAB3NzaC1yc2EAAAADAQABAAACAQCdAgbZ7k+wshWGYsFB30H2Tu5TdxYOkWsfcMFiM6
    imnvRdT7H2Q5s9zskSRFbO5Qr+YrAyZzetPFpVGD3130kH13OI23cQIVp+/lJhgEnSrGEw
    FeiGRzvMs+dsMRqQKVM2drlIBdGsv6Hwc22hqOg81w0zUtBTw50SJWhxjMjrHNPqhTScUj
    PIRTvuAx92waXHWvWBgzfHUbvOt2AthsfnKFrklQXQ7gkdOF+oyv5NZ3T+dV2l4vd9WSOd
    uLE496tA0y78+0+k6yVkpeuCDubtACnnqSO5b7PGmpOsM35HKcpzfO4fog5aVUbeCwtMTy
    irBqmsN3sSDFIHyaeCmHY/LsrHZbmNasdA03i/zdGLU0FtOGkh+Bln9OlBS/UAZCCBao0qi
    s3uxYhPylZmluG4FEjR0mpFLRH9lZNvcJq+s+9asTO0LEtpG6KlmdcJFq4q+/o7k5r4vCs
    /k8jWwvppkJBKxHQ9SPS9bDA1sznZ7n1K1iFrp4YM45bvQWz/ltjnJdddPtwa488afCRiU
    WUCt8Y2R0+sNrT1pQ5jtwhXo2hpUbG/gsPIRB/RSgsRbyQTyy3DObIcRunNkmJrcljxNBn
    IGdUZDk2AJ+y1Q==
    ---- END SSH2 PUBLIC KEY ----

    Use the SSH key when creating a Linux VM. To apply the SSH key while creating a new Linux VM, you will need to copy the contents of the public key and supply it to the Azure Portal, or supply the public key file to the Azure CLI or Azure PowerShell command.

    If you have already created the Linux VM, you can install the public key onto your Linux VM with the ssh-copy-id command.

    1
    > ssh-copy-id -i ~/.ssh/id_rsa.pub azureuser@myserver

    Connect to the VM with SSH

    To connect to the VM via SSH, you need the following items:

    • Public IP address of the VM
    • Username of the local account on the VM
    • Public key configured in that account
    • Access to the corresponding private key
    • Port 22 open on the VM

    Perform the following steps to connect to the VM:
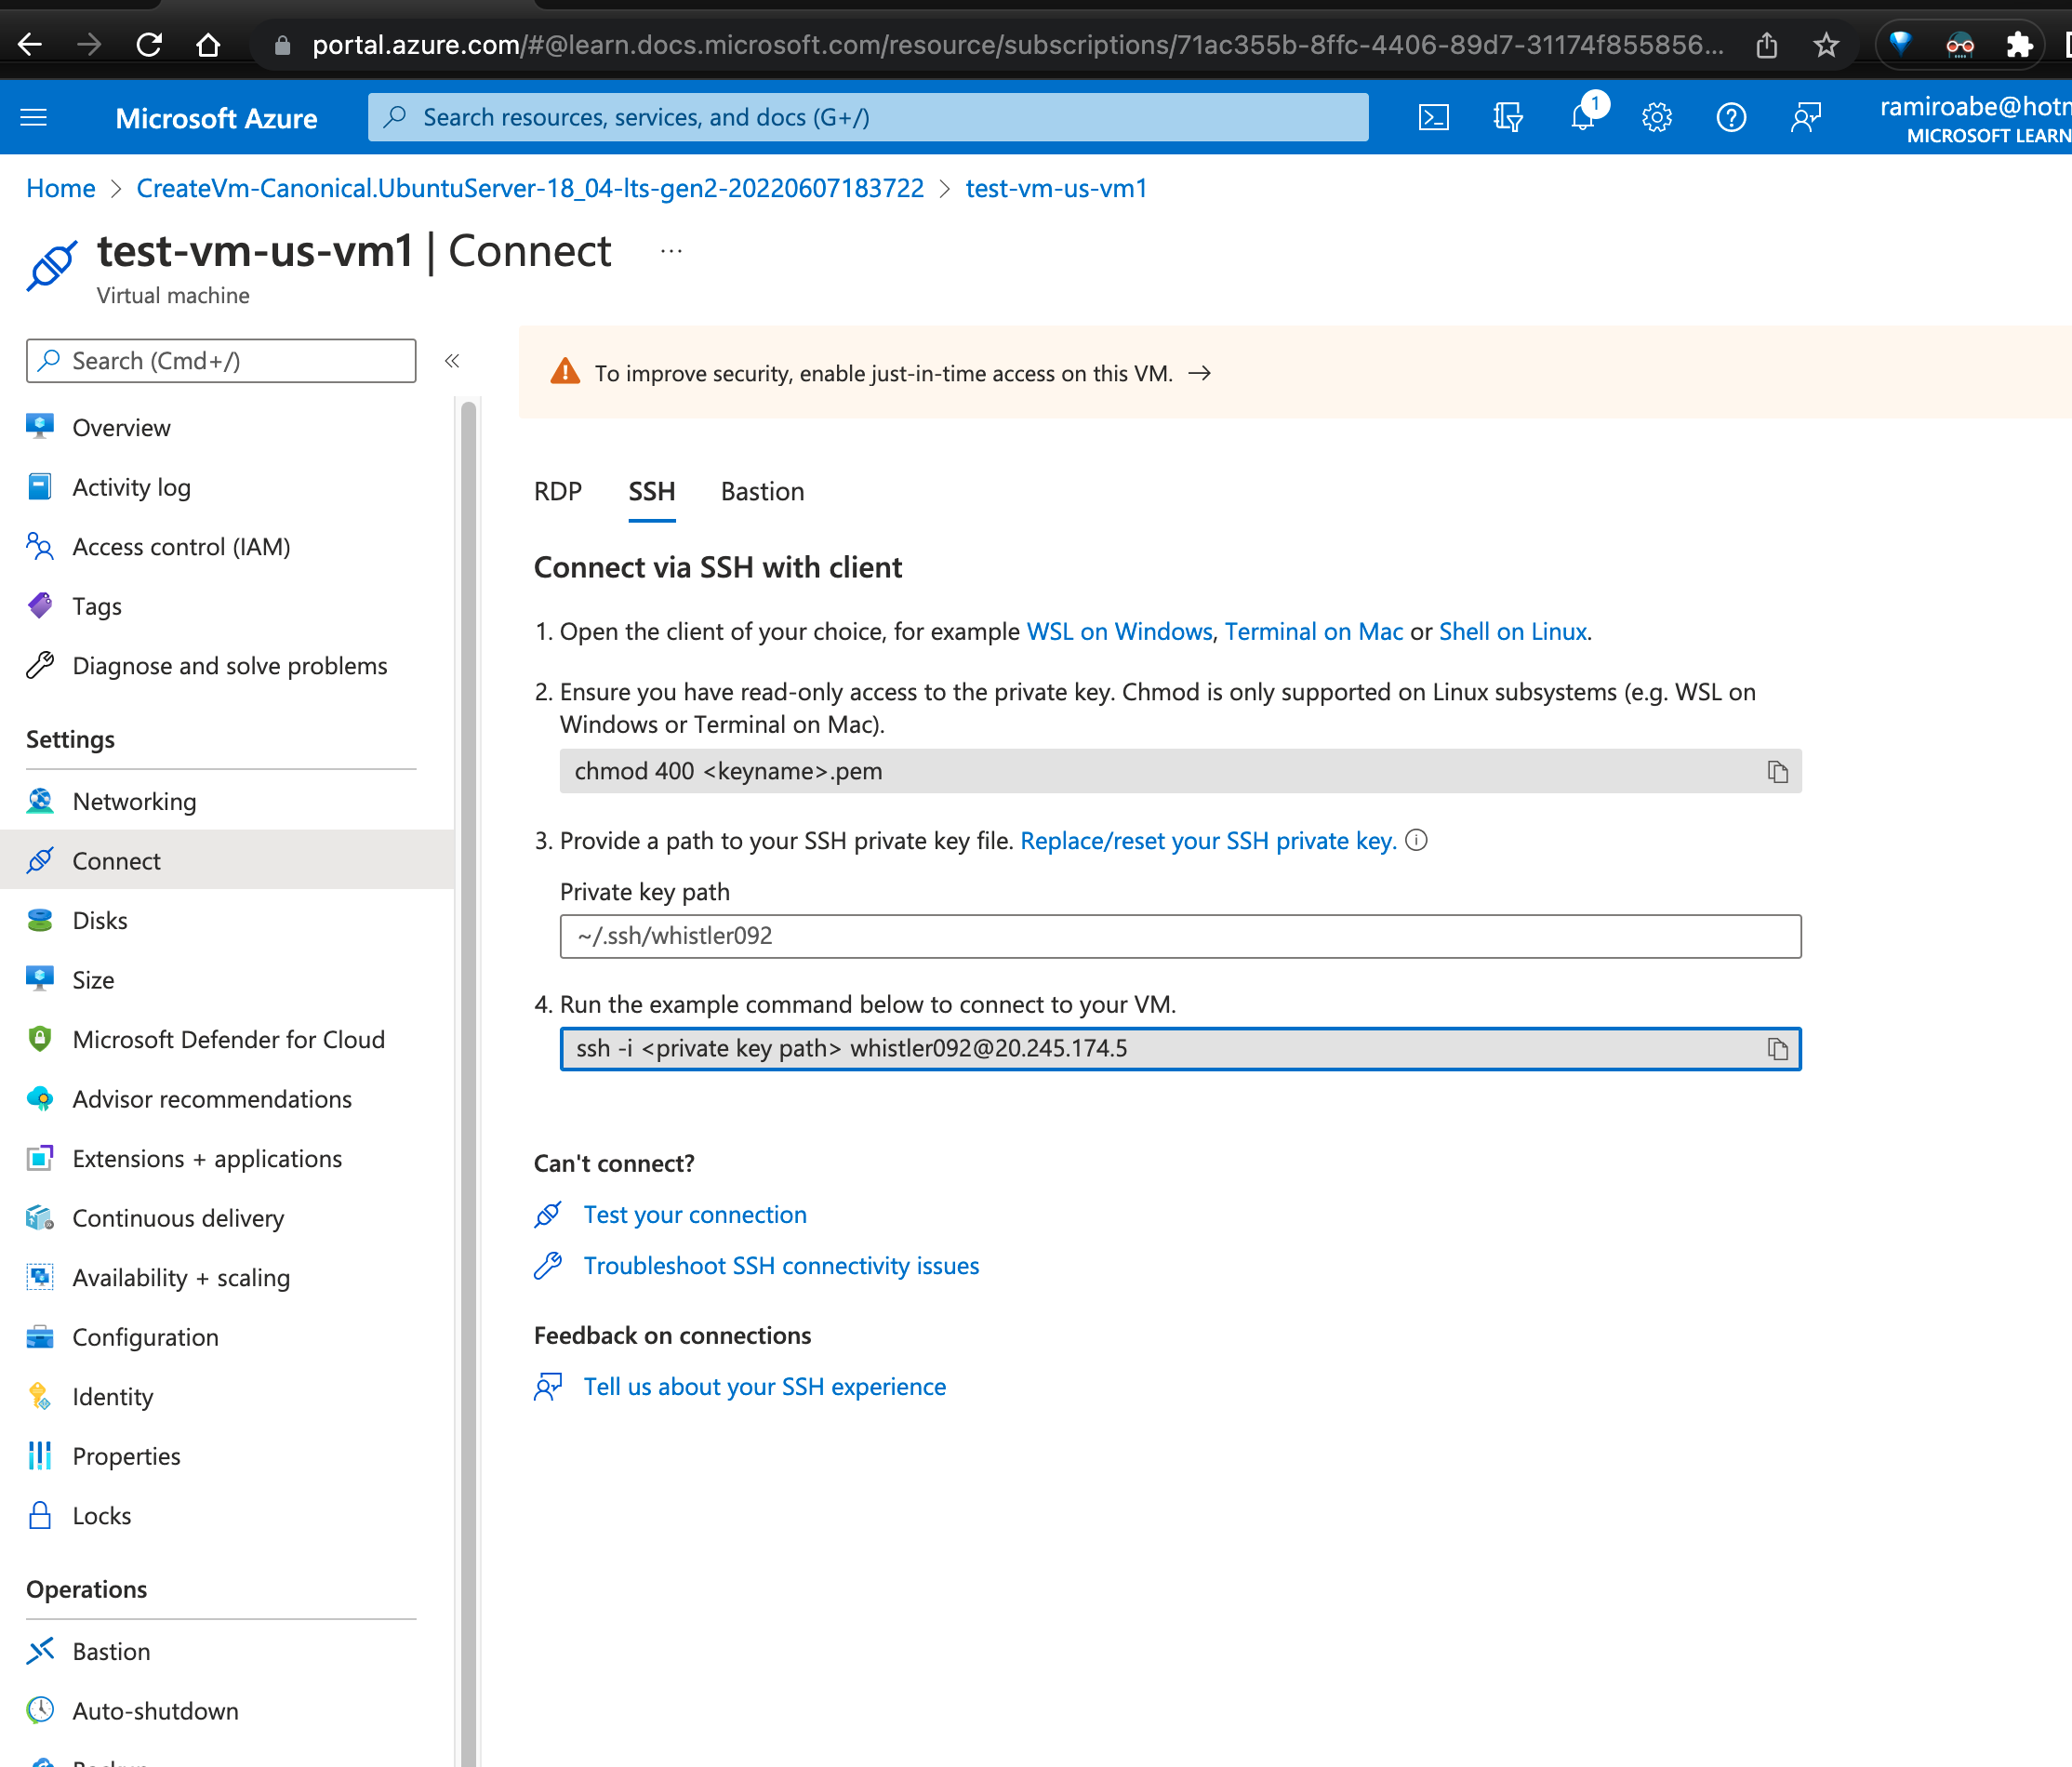
    1
    2
    3
    4
    5
    6
    7
    8
    9
    10
    11
    12
    13
    14
    15
    16
    17
    18
    19
    20
    21
    22
    23
    24
    25
    26
    27
    28
    29
    30
    31
    > chmod 400 ~/.ssh/id_ssh2.pem
    > ssh whistler092@20.245.174.5
    Enter passphrase for key '/Users/ramiroandres/.ssh/id_rsa':
    Welcome to Ubuntu 18.04.6 LTS (GNU/Linux 5.4.0-1080-azure x86_64)

    * Documentation: https://help.ubuntu.com
    * Management: https://landscape.canonical.com
    * Support: https://ubuntu.com/advantage

    System information as of Wed Jun 8 00:07:14 UTC 2022

    System load: 0.0 Processes: 111
    Usage of /: 4.8% of 28.90GB Users logged in: 0
    Memory usage: 2% IP address for eth0: 10.0.0.4
    Swap usage: 0%

    0 updates can be applied immediately.


    The programs included with the Ubuntu system are free software;
    the exact distribution terms for each program are described in the
    individual files in /usr/share/doc/*/copyright.

    Ubuntu comes with ABSOLUTELY NO WARRANTY, to the extent permitted by
    applicable law.

    To run a command as administrator (user "root"), use "sudo <command>".
    See "man sudo_root" for details.

    whistler092@test-vm-us-vm1:~$

    Initialize data disks

    Any additional drives you create from scratch need to be initialized and formatted. The process for initializing is identical to a physical disk.

    1
    2
    3
    4
    5
    6
    7
    8
    9
    10
    11
    12
    13
    14
    15
    16
    17
    18
    19
    20
    21
    22
    23
    24
    25
    26
    27
    28
    29
    30
    31
    32
    33
    34
    35
    36
    37
    38
    39
    40
    41
    42
    43
    44
    45
    46
    47
    48
    > dmesg | grep SCSI
    > dmesg | grep SCSI
    [ 1.009591] SCSI subsystem initialized
    [ 1.806995] Block layer SCSI generic (bsg) driver version 0.4 loaded (major 244)
    [ 2.442348] sd 0:0:0:0: [sda] Attached SCSI disk
    [ 2.460562] sd 0:0:0:1: [sdb] Attached SCSI disk
    [ 8.474305] Loading iSCSI transport class v2.0-870.
    [ 72.706316] sd 1:0:0:0: [sdc] Attached SCSI disk
    > (echo n; echo p; echo 1; echo ; echo ; echo w) | sudo fdisk /dev/sdc

    Welcome to fdisk (util-linux 2.31.1).
    Changes will remain in memory only, until you decide to write them.
    Be careful before using the write command.

    Device does not contain a recognized partition table.
    Created a new DOS disklabel with disk identifier 0x8c0906cc.

    Command (m for help): Partition type
    p primary (0 primary, 0 extended, 4 free)
    e extended (container for logical partitions)
    Select (default p): Partition number (1-4, default 1): First sector (2048-2147483647, default 2048): Last sector, +sectors or +size{K,M,G,T,P} (2048-2147483647, default 2147483647):
    Created a new partition 1 of type 'Linux' and of size 1024 GiB.

    Command (m for help): The partition table has been altered.
    Calling ioctl() to re-read partition table.
    Syncing disks.

    > sudo mkfs -t ext4 /dev/sdc1

    mke2fs 1.44.1 (24-Mar-2018)
    Discarding device blocks: done
    Creating filesystem with 268435200 4k blocks and 67108864 inodes
    Filesystem UUID: 37855943-7127-4f8a-9e7c-f8c35b65a871
    Superblock backups stored on blocks:
    32768, 98304, 163840, 229376, 294912, 819200, 884736, 1605632, 2654208,
    4096000, 7962624, 11239424, 20480000, 23887872, 71663616, 78675968,
    102400000, 214990848

    Allocating group tables: done
    Writing inode tables: done
    Creating journal (262144 blocks): done
    Writing superblocks and filesystem accounting information: done

    > sudo mkdir /data && sudo mount /dev/sdc1 /data
    > ls /
    bin boot data dev etc home lib lib64 lost+found media mnt opt proc root run sbin snap srv sys tmp usr var vmlinuz vmlinuz.old
    >

    Now you have attached the new disk to the VM. Let’s install a webserver:

    1
    2
    3
    > sudo apt-get update
    > sudo apt-get install apache2 -y
    > sudo systemctl status apache2 --no-pager

    The service is running, but by default, all ports are closed. Let’s open port 80 creating a network security group, and add an inbound rule allowing traffic on port 80.

    But, what is a network security group? Virtual networks (VNets) are the foundation of the Azure networking model, and provide isolation and protection. Network security groups (NSGs) are the primary tool you use to enforce and control network traffic rules at the networking level. NSGs are an optional security layer that provides a software firewall by filtering inbound and outbound traffic on the VNet.

    Security groups can be associated to a network interface (for per host rules), a subnet in the virtual network (to apply to multiple resources), or both levels.

    When we created the VM, we selected the inbound port SSH so we could connect to the VM. This created an NSG that’s attached to the network interface of the VM. That NSG is blocking HTTP traffic. Let’s update this NSG to allow inbound HTTP traffic on port 80.

    Let’s go to the VM and go to Settings -> Networking, and you should see your NSG associated. Click Add inbound port rule and select the service HTTP, and it should select port 80.

    Let’s create a new Application

    1
    2
    3
    4
    5
    6
    7
    8
    9
    10
    11
    12
    13
    14
    15
    16
    17
    18
    19
    20
    21
    22
    23
    24
    25
    26
    27
    28
    29
    30
    31
    32
    33
    34
    35
    36
    37
    38
    39
    40
    41
    42
    43
    44
    45
    46
    47
    48
    49
    50
    51
    52
    53
    54
    55
    56
    57
    58
    59
    60
    61
    62
    63
    64
    65
    66
    67
    68
    69
    70
    71
    72
    73
    74
    75
    76
    77
    78
    79
    80
    81
    82
    83
    84
    85
    86
    87
    88
    89
    90
    91
    92
    93
    94
    95
    96
    97
    98
    99
    100
    101
    102
    103
    104
    105
    106
    107
    108
    109
    110
    111
    112
    > az group create \
    --name <resource-group-name> \
    --location <resource-group-location>
    > az vm create \
    --resource-group learn-6860e051-fc17-4d2b-9677-75a49842dd05 \
    --name MeanStack \
    --image Canonical:0001-com-ubuntu-server-focal:20_04-lts:latest \
    --admin-username azureuser \
    --generate-ssh-keys

    SSH key files '/home/ramiroabe/.ssh/id_rsa' and '/home/ramiroabe/.ssh/id_rsa.pub' have been generated under ~/.ssh to allow SSH access to the VM. If using machines without permanent storage, back up your keys to a safe location.
    It is recommended to use parameter "--public-ip-sku Standard" to create new VM with Standard public IP. Please note that the default public IP used for VM creation will be changed from Basic to Standard in the future.
    {
    "fqdns": "",
    "id": "/subscriptions/f26515d9-3bc6-4a50-8192-cb816a833f54/resourceGroups/learn-6860e051-fc17-4d2b-9677-75a49842dd05/providers/Microsoft.Compute/virtualMachines/MeanStack",
    "location": "westus",
    "macAddress": "00-22-48-0B-44-41",
    "powerState": "VM running",
    "privateIpAddress": "10.0.0.4",
    "publicIpAddress": "20.237.176.122",
    "resourceGroup": "learn-6860e051-fc17-4d2b-9677-75a49842dd05",
    "zones": ""
    }

    > az vm open-port \
    --port 80 \
    --resource-group learn-6860e051-fc17-4d2b-9677-75a49842dd05 \
    --name MeanStack
    {
    "id": "/subscriptions/f26515d9-3bc6-4a50-8192-cb816a833f54/resourceGroups/learn-6860e051-fc17-4d2b-9677-75a49842dd05/providers/Microsoft.Network/networkSecurityGroups/MeanStackNSG",
    "location": "westus",
    "name": "MeanStackNSG",
    }

    > ipaddress=$(az vm show \
    --name MeanStack \
    --resource-group learn-6860e051-fc17-4d2b-9677-75a49842dd05 \
    --show-details \
    --query [publicIps] \
    --output tsv)

    > ssh azureuser@$ipaddress
    The authenticity of host '20.237.176.122 (20.237.176.122)' can not be established.
    ECDSA key fingerprint is SHA256:4eOdogKzLkVumOiXVT9szsOLKu2NDKXrqfuFvcA5Sv0.
    Are you sure you want to continue connecting (yes/no)? yes
    Warning: Permanently added '20.237.176.122' (ECDSA) to the list of known hosts.
    Welcome to Ubuntu 20.04.4 LTS (GNU/Linux 5.13.0-1025-azure x86_64)

    * Documentation: https://help.ubuntu.com
    * Management: https://landscape.canonical.com
    * Support: https://ubuntu.com/advantage

    System information as of Wed Jun 8 02:13:09 UTC 2022

    System load: 0.01 Processes: 117
    Usage of /: 4.9% of 28.90GB Users logged in: 0
    Memory usage: 7% IPv4 address for eth0: 10.0.0.4
    Swap usage: 0%


    1 update can be applied immediately.
    To see these additional updates run: apt list --upgradable


    The programs included with the Ubuntu system are free software;
    the exact distribution terms for each program are described in the
    individual files in /usr/share/doc/*/copyright.

    Ubuntu comes with ABSOLUTELY NO WARRANTY, to the extent permitted by
    applicable law.

    To run a command as administrator (user "root"), use "sudo <command>".
    See "man sudo_root" for details.

    > sudo apt update && sudo apt upgrade -y
    > sudo apt-get install -y mongodb
    > sudo systemctl status mongodb

    ● mongodb.service - An object/document-oriented database
    Loaded: loaded (/lib/systemd/system/mongodb.service; enabled; vendor preset: enabled)
    Active: active (running) since Thu 2019-08-22 16:46:30 UTC; 9s ago
    Docs: man:mongod(1)
    Main PID: 18360 (mongod)
    CGroup: /system.slice/mongodb.service
    └─18360 /usr/bin/mongod --config /etc/mongodb.conf

    Aug 22 16:46:30 MeanStack systemd[1]: Started An object/document-oriented database.

    > mongod --version
    db version v3.6.8
    git version: 8e540c0b6db93ce994cc548f000900bdc740f80a
    OpenSSL version: OpenSSL 1.1.1f 31 Mar 2020
    allocator: tcmalloc
    modules: none
    build environment:
    distarch: x86_64
    target_arch: x86_64

    > curl -sL https://deb.nodesource.com/setup_16.x | sudo -E bash -
    > sudo apt install nodejs
    > nodejs -v

    > ipaddress=$(az vm show \
    --name MeanStack \
    --resource-group learn-6860e051-fc17-4d2b-9677-75a49842dd05 \
    --show-details \
    --query [publicIps] \
    --output tsv)
    > echo $ipaddress

    > scp -r ~/Books azureuser@$ipaddress:~/Books

    Source Code

    Align requirements with cloud types and service models in Azure

    Azure solutions for public, private, and hybrid cloud

    Cloud computing resources are delivered using three different service models.

    Control Azure services with the CLI

    The UI works fine, but for tasks that need to be repeated daily or even hourly, using the command line and a set of tested commands or scripts can help get your work done more quickly and avoid errors.

    Let’s check some useful commands.

    1
    2
    3
    4
    > brew update
    > brew install azure-cli
    > az --version

    Find commands

    1
    2
    3
    4
    > az find blob
    > az find "az vm"
    > az find "az vm create"
    > az storage blob --help

    Login

    1
    > az login

    Create a Resource Group

    1
    2
    3
    4
    5
    6
    7
    8
    9
    > az group create --name <name> \
    --location <location>

    > az group list
    > az group list --output table

    Name Location Status
    ------------------------------------------ ---------- ---------
    learn-6860e051-fc17-4d2b-9677-75a49842dd05 westus Succeeded

    Exercise - Create an Azure website using the CLI

    1
    2
    3
    4
    5
    6
    7
    8
    9
    10
    11
    12
    13
    14
    15
    16
    17
    18
    19
    20
    21
    22
    23
    24
    25
    26
    27
    28
    29
    30
    31
    32
    33
    34
    35
    36
    37
    38
    39
    40
    41
    42
    43
    44
    45
    46
    47
    48
    49
    50
    > export RESOURCE_GROUP=learn-c35d9ea4-f957-42d7-835b-4ba0dd378a50
    > export AZURE_REGION=centralus
    > export AZURE_APP_PLAN=popupappplan-$RANDOM
    > export AZURE_WEB_APP=popupwebapp-$RANDOM

    > az group list --query "[?name == '$RESOURCE_GROUP']"

    [
    {
    "id": "/subscriptions/994e915d-57d8-4585-870e-22a3f57935e8/resourceGroups/learn-c35d9ea4-f957-42d7-835b-4ba0dd378a50",
    "location": "westus",
    "name": "learn-c35d9ea4-f957-42d7-835b-4ba0dd378a50",
    }
    ]

    > az appservice plan create --name $AZURE_APP_PLAN \
    --resource-group $RESOURCE_GROUP \
    --location $AZURE_REGION \
    --sku FREE

    {
    "id": "/subscriptions/994e915d-57d8-4585-870e-22a3f57935e8/resourceGroups/learn-c35d9ea4-f957-42d7-835b-4ba0dd378a50/providers/Microsoft.Web/serverfarms/popupappplan-28651",
    "location": "centralus",
    "resourceGroup": "learn-c35d9ea4-f957-42d7-835b-4ba0dd378a50",
    }

    > az appservice plan list --output table
    > az webapp create --name $AZURE_WEB_APP \
    --resource-group $RESOURCE_GROUP \
    --plan $AZURE_APP_PLAN
    > az webapp list --output table
    > curl $AZURE_WEB_APP.azurewebsites.net

    > az webapp deployment source config \
    --name $AZURE_WEB_APP \
    --resource-group $RESOURCE_GROUP \
    --repo-url "https://github.com/Azure-Samples/php-docs-hello-world" --branch master \
    --manual-integration

    {
    "branch": "master",
    "id": "/subscriptions/994e915d-57d8-4585-870e-22a3f57935e8/resourceGroups/learn-c35d9ea4-f957-42d7-835b-4ba0dd378a50/providers/Microsoft.Web/sites/popupwebapp-21359/sourcecontrols/web",
    "isManualIntegration": true,
    "location": "Central US",
    "name": "popupwebapp-21359",
    "repoUrl": "https://github.com/Azure-Samples/php-docs-hello-world",
    "resourceGroup": "learn-c35d9ea4-f957-42d7-835b-4ba0dd378a50",
    }
    > curl $AZURE_WEB_APP.azurewebsites.net
    Hello World!

    Automate Azure tasks using scripts with PowerShell

    Source

    Creating administration scripts is a powerful way to optimize your work flow. You can automate common, repetitive tasks. Once a script has been verified, it will run consistently, likely reducing errors.

    TODO:

    Tutorial: Deploy an ASP.NET Core and Azure SQL Database app to Azure App Service