Azure, Azure, and more Azure - Containers | Basic Workflow and Links
Containers
Self-study links
- Introduction to Docker containers (~32 min)
- Build and store container images with Azure Container Registry (~49 min)
- Deploy and run a containerized web app with Azure App Service (~46 min)
.
- Administer containers in Azure (~5 hr 10 min)
- Tutorial: Deploy a multi-container group using Docker Compose (~7 min)
- Other container deployment options (~2 min)
- Extending an existing ASP.NET Core web application (~2 min)
- Create a multi-container (preview) app in Web App for Containers (~11 min)
- eShopOnWeb wiki
Notes:
A container is a loosely isolated environment that allows us to build and run software packages. These software packages include the code and all dependencies to run applications quickly and reliably on any computing environment. We call these packages container images.
What is a Dockerfile?
A Dockerfile is a text file that contains the instructions we use to build and run a Docker image. The following aspects of the image are defined:
- The base or parent image we use to create the new image
- Commands to update the base OS and install additional software
- Build artifacts to include, such as a developed application
- Services to expose, such as storage and network configuration
- Command to run when the container is launched
Example of a Dockerfile
# Step 1: Specify the parent image for the new image
FROM ubuntu:18.04

# Step 2: Update OS packages and install additional software
RUN apt -y update &&  apt install -y wget nginx software-properties-common apt-transport-https \
    && wget -q https://packages.microsoft.com/config/ubuntu/18.04/packages-microsoft-prod.deb -O packages-microsoft-prod.deb \
    && dpkg -i packages-microsoft-prod.deb \
    && add-apt-repository universe \
    && apt -y update \
    && apt install -y dotnet-sdk-3.0

# Step 3: Configure Nginx environment
CMD service nginx start

# Step 4: Configure Nginx environment
COPY ./default /etc/nginx/sites-available/default

# STEP 5: Configure work directory
WORKDIR /app

# STEP 6: Copy website code to container
COPY ./website/. .

# STEP 7: Configure network requirements
EXPOSE 80:8080

# STEP 8: Define the entry point of the process that runs in the container
ENTRYPOINT ["dotnet", "website.dll"]
Useful commands
Build the images
> docker build -t temp-ubuntu .
List the images
> docker images
Remove an image
> docker rmi temp-ubuntu:version-1.0
Available containers
> docker ps -a
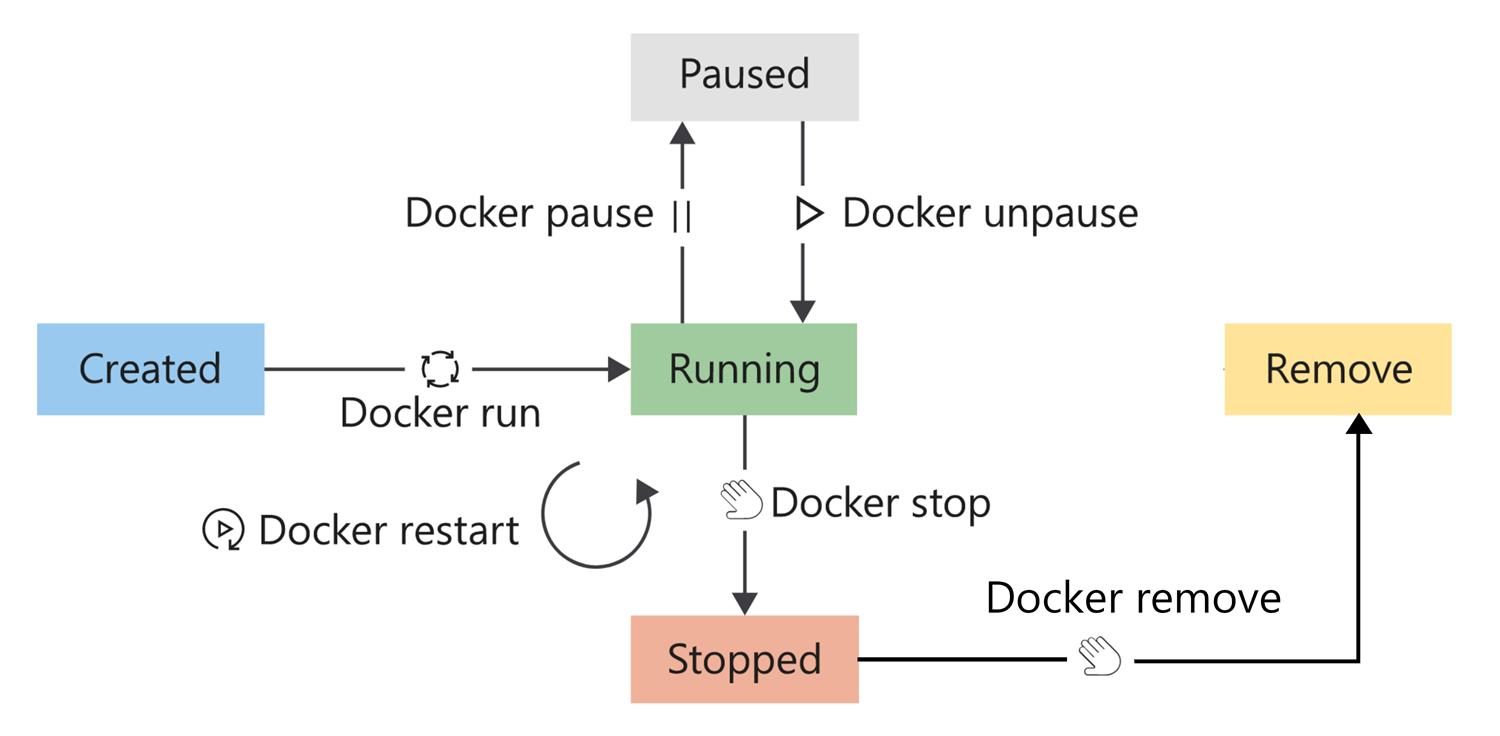
Run a container, pause, restart, stop and remove a container
> docker run -d tmp-ubuntu
> docker pause happy_wilbur
> docker stop happy_wilbur
> docker rm happy_wilbur
Docker lifecycle
Docker container Storage
Since container storage is temporal, containers can make use of two options to persist data. The first option is to make use of volumes, and the second is to bind mounts.
Volumes: Volumes are managed by Docker and are completely managed by the Docker engine. Volumes are stored in a part of the host filesystem that is managed by Docker. Volumes are the best option when you want to store data that is specific to a single container. Use the command
docker volume createto create a volume. Use the commanddocker volume lsto list the volumes. Use the commanddocker volume inspectto inspect a volume. Use the commanddocker volume rmto remove a volume.Bind mounts: Bind mounts are stored anywhere on the host filesystem. Bind mounts are useful when you want to store data that is specific to a single host.
Docker container networking
The default Docker network configuration allows for isolating containers on the Docker host. This feature enables you to build and configure apps that can communicate securely with each other.
The bridge network is the default configuration applied to containers when launched without specifying a network. By default, Docker doesn’t publish any container ports. You can use the command --publish 8080:80 or -p 8080:80 to enable the mapping port between the container ports and the docker host ports.
Azure Container Registry
Azure Container Registry is a managed Docker registry service based on the open-source Docker Registry 2.0. Container Registry is private, hosted in Azure, and allows you to build, store, and manage images for all types of container deployments.
Workflow
The idea is to continue using the https://github.com/dotnet-architecture/eShopOnWeb base application to build the web and publicApi projects locally using docker-compose. Then, we will create an Azure Container Registry and push the images to it. Finally, we will create an Azure Web App and deploy the images from the Azure Container Registry.
Finally, Enable continuous deployment from Azure Container Registry when a new image gets pushed to the registry.
> git clone https://github.com/dotnet-architecture/eShopOnWeb.git
Build the images locally
This project already has configured the docker-compose.yml file to build the images locally. This file is configured to build the web and publicApi projects and connect them with the SQL Server database. You can run it using the following command.
I have added the --build option to force the build of the images. If you want to run it without building the images, you can remove this option. And -d option to run it in detached mode.
> cd eShopOnWeb
> docker compose up --build -d

As you can see, the project already has configured appsettings.docker.json. This file is used to configure the connection string to the database. This file is created in the web and publicApi projects.
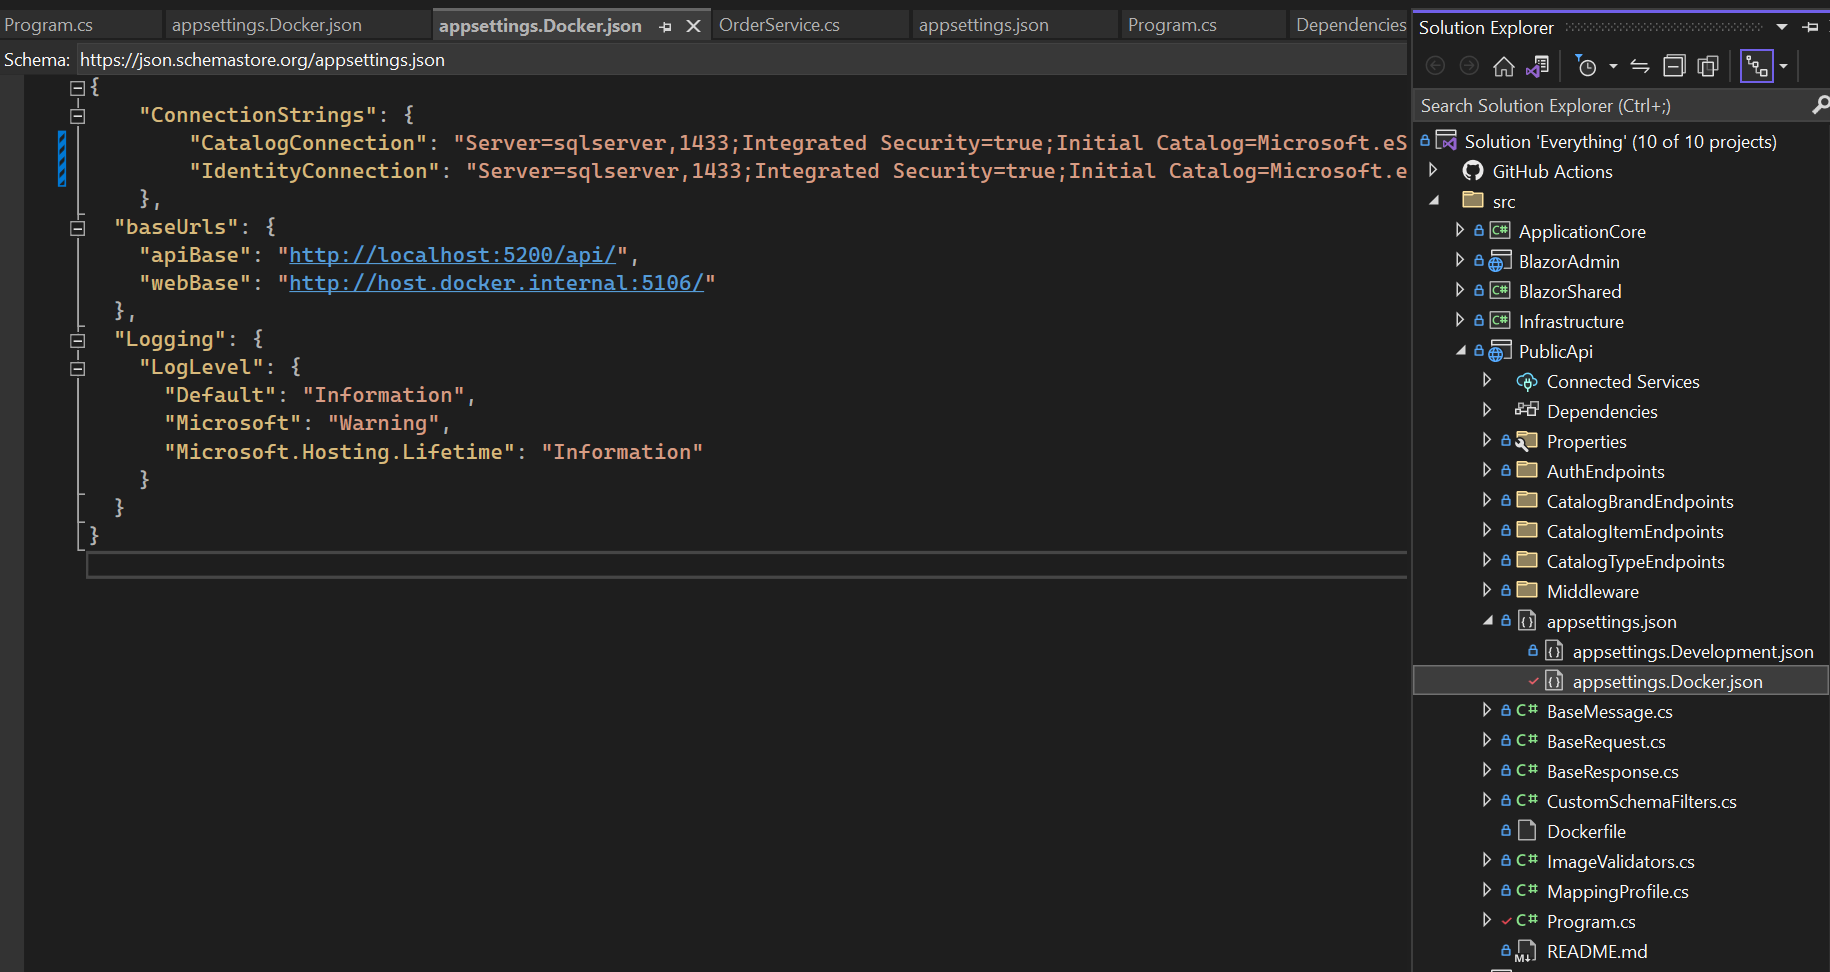
Now let’s go to Azure and create the Azure Container Registry. Note, that name requires alphanumeric characters only and must be between 5 and 50 characters.
> az group create --name eshop-containers-rg --location eastus
> az acr create --resource-group eshop-containers-rg --name eshopramirobedoyaarc --sku Basic
Now we have our new Azure container registry eshopramirobedoyaarc.azurecr.io created.
Let’s run the following command to build the image with the Azure container registry name. What this command does is build the image and push it to the Azure container registry. That’s why you are going to see the message Packing source code into tar to upload... after entering the command.
> az acr build --registry eshopramirobedoyaarc --image eshopweb:v1.0 --file ./src/Web/Dockerfile .
Notes:
Don’t forget the period . at the end of the preceding command. It represents the source directory containing the docker file, which in our case is the current directory. Because we didn’t specify the name of a file with the –file parameter, the command looks for a file called Dockerfile in our current directory.
If your build failed because of the following error. When using COPY with more than one source file, the destination must be a directory and end with a /

Go to the Dockerfile of src/web/Dockerfile and change the following line adding the forward slash at the end.
COPY *.sln ./
Run it one more time and it should work. As you can see in the following image. The container image was successfully built and pushed to the Azure container registry.
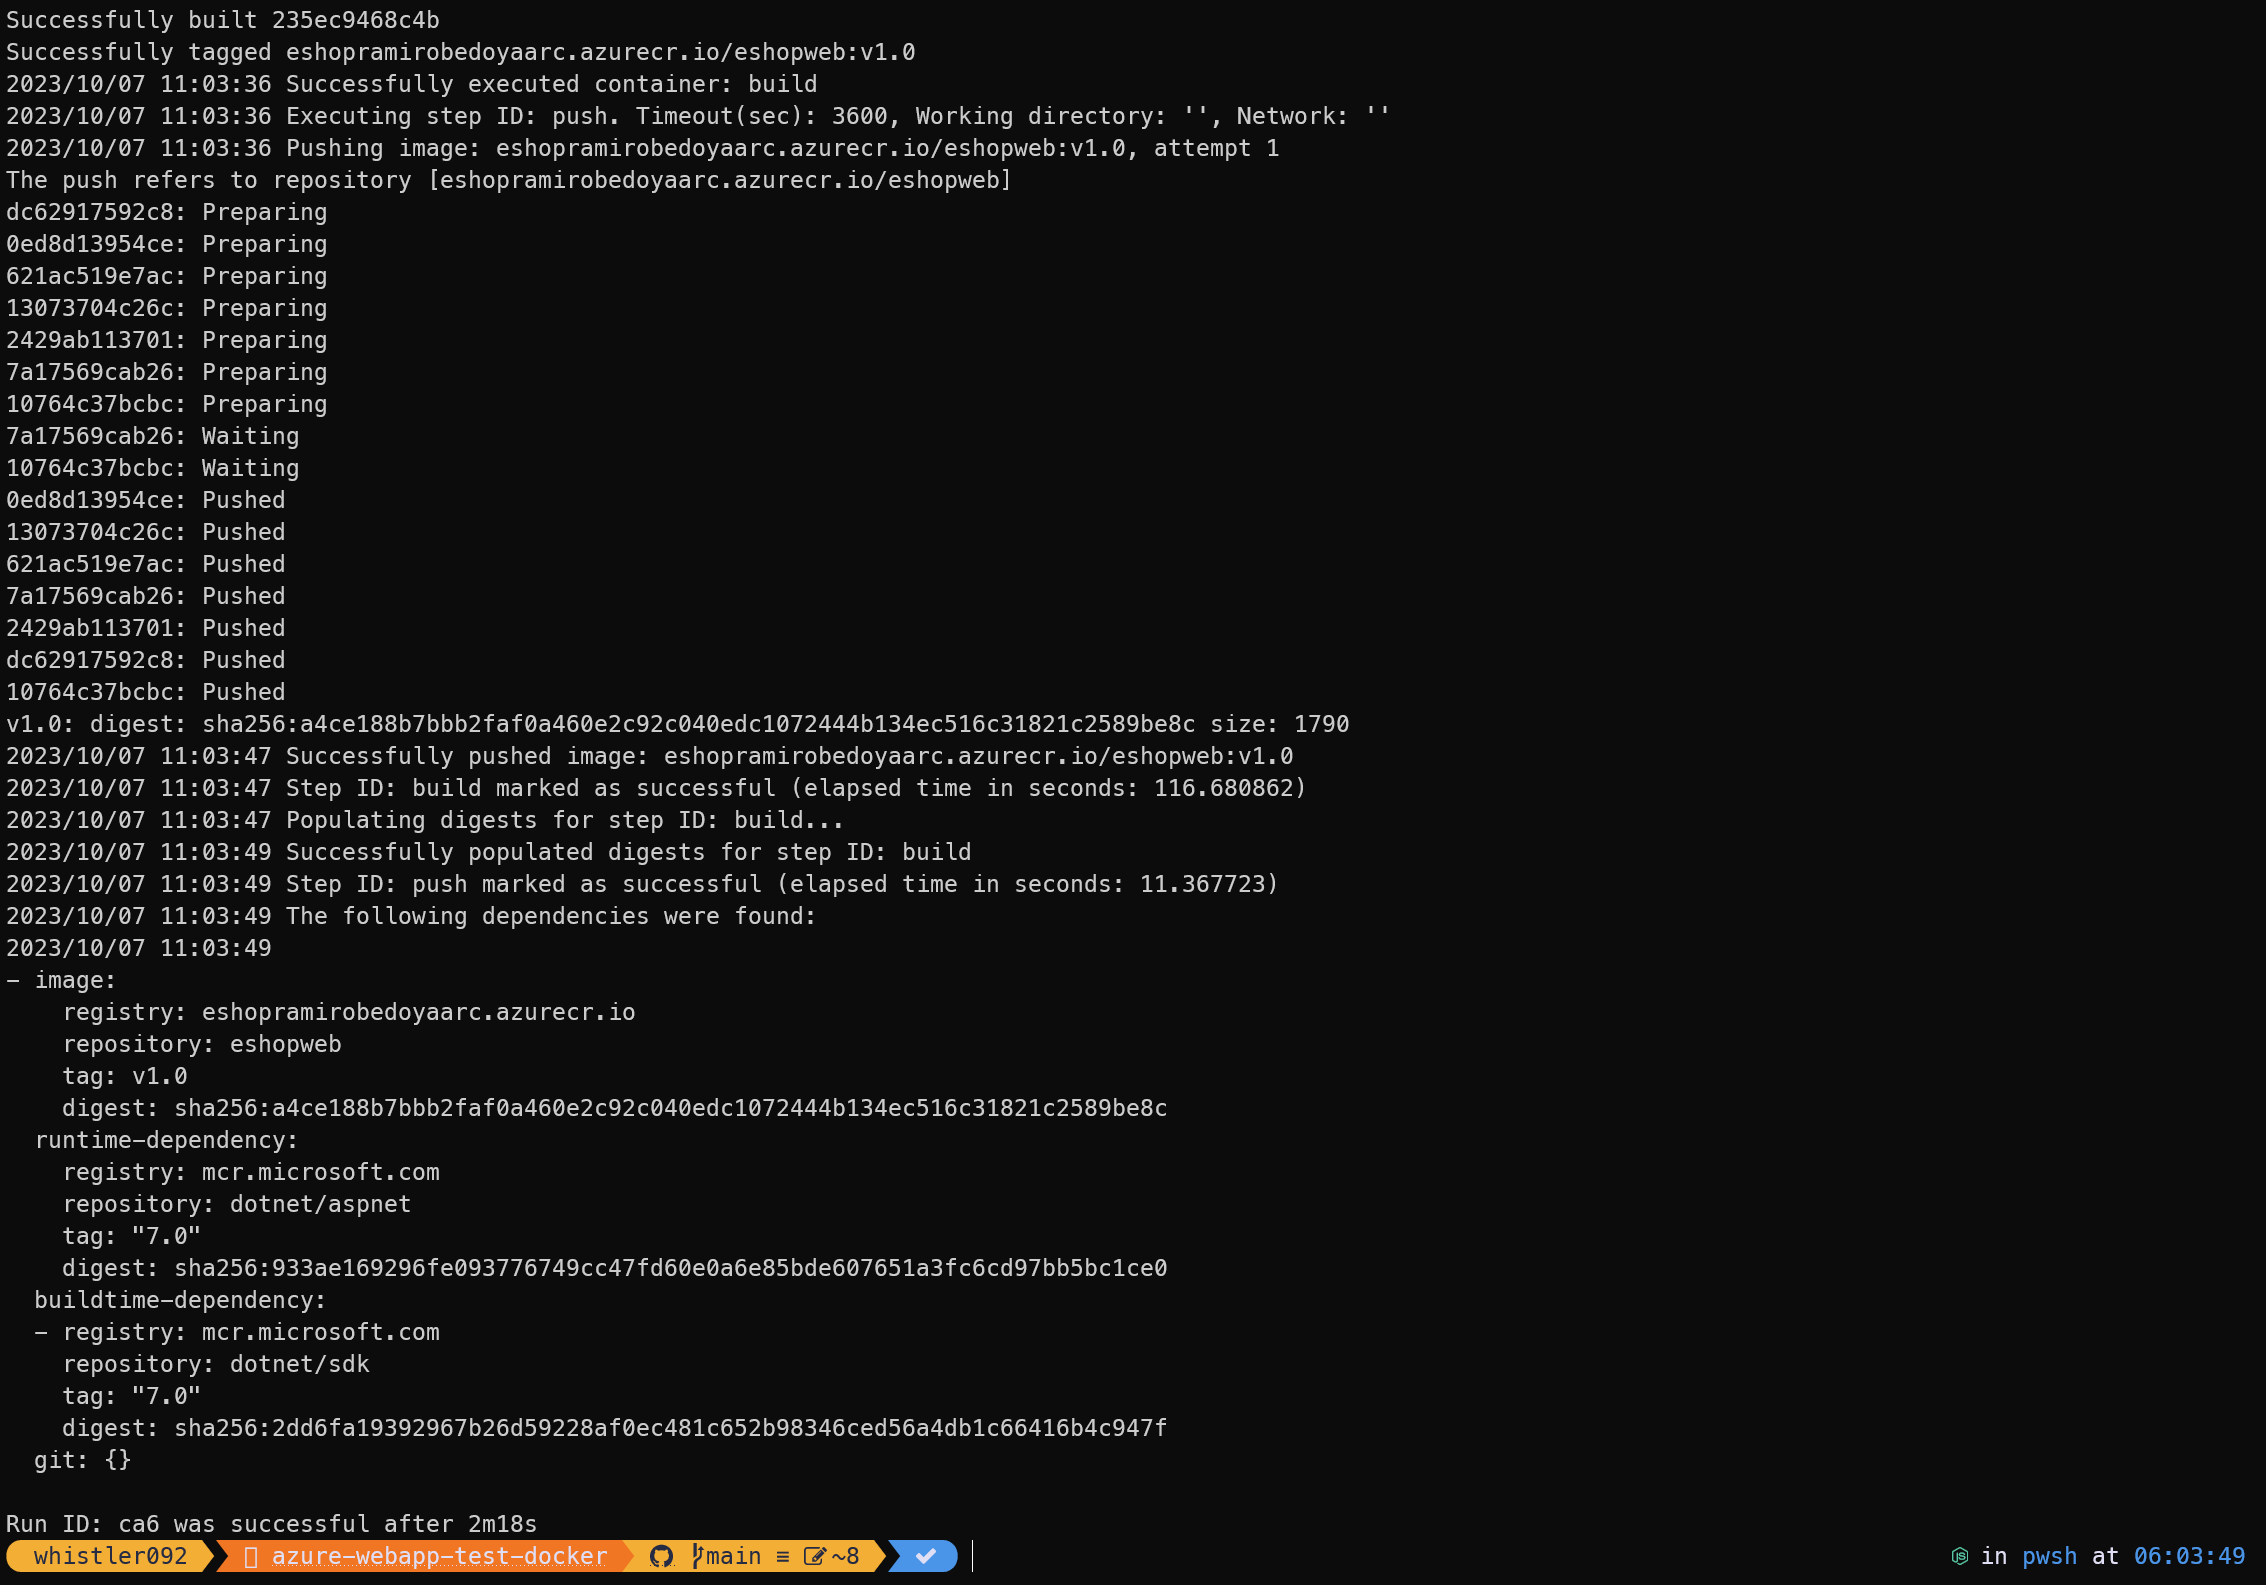
if we run the command az acr repository list --name eshopramirobedoyaarc --output table you should see your image in the list. If you are getting the error Unable to get admin user credentials with message: Admin user is disabled., go to the Azure portal and enable the admin user located in the Access keys section of the Azure Container registry resource. Or execute az acr update -n eshopramirobedoyaarc --admin-enabled true and az acr credential show --name eshopramirobedoyaarc to show the username and password. Another alternative is when you execute the az acr create and add the --admin-enabled true flag.
Now let’s deploy the image from the Azure Container Registry.
> az container create \
    --resource-group eshop-containers-rg \
    --name eshop-webapp \
    --image eshopramirobedoyaarc.azurecr.io/eshopweb:v1.0 \
    --registry-login-server eshopramirobedoyaarc.azurecr.io \
    --ip-address Public \
    --location eastus \
    --registry-username [username] \
    --registry-password [password]
If all works, let’s get the IP address of the container.
> az container show --resource-group learn-deploy-acr-rg --name acr-tasks --query ipAddress.ip --output table

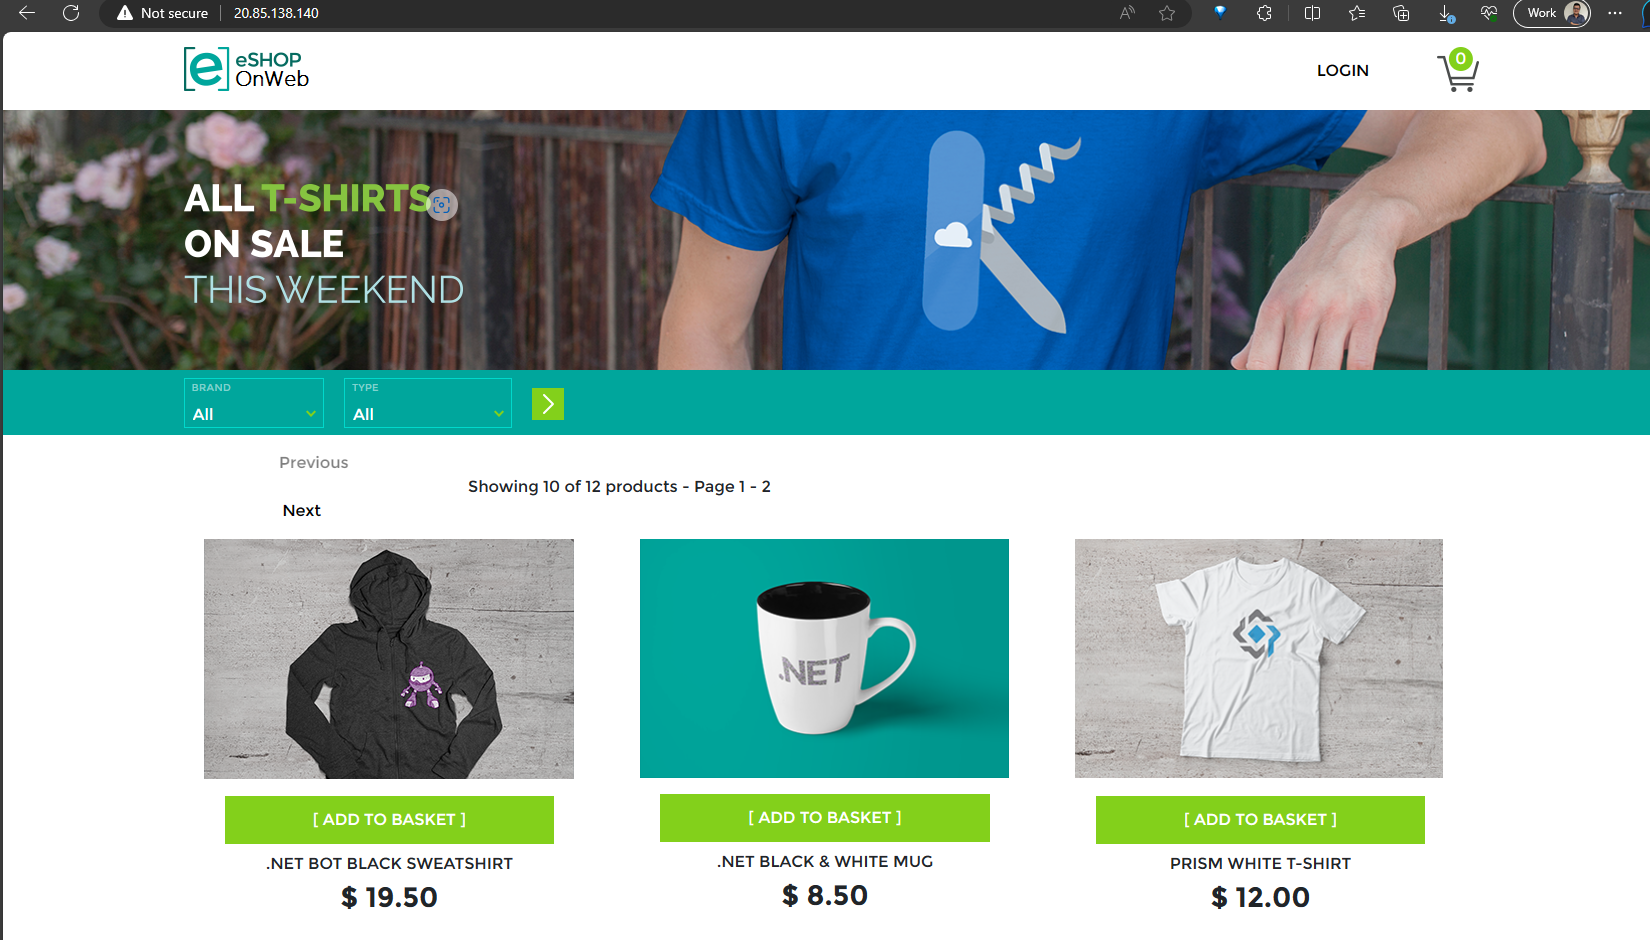
Now, let’s connect to the container using the IP address and port 80.
Issues I had:
If you go to the Azure Container Registry at Azure Portal and click repositories, you might see the following error. Status: 401 Unauthorized. You can fix it by following the instructions:
Enter the access control (IAM)
- Press add
- add role assignment
- role: reader
- members: add your account
- then, review and create
it should work
Then, you should see it.

I had a few errors regarding the string connection to the database. So, I had to change the connection string in the appsettings.json file with my Azure Database. Then, I rebuild the image with a new tag and push it to the Azure Container Registry.
Please make sure to change the tag version to the new one. From eshopweb:v1.1 to eshopweb:v1.2
>  az acr build --registry eshopramirobedoyaarc \
    --image eshopweb:v1.2 \
    -f src/Web/Dockerfile .

>  az container create \
     --resource-group eshop-containers-rg \
    --name eshop-webapp \
    --image eshopramirobedoyaarc.azurecr.io/eshopweb:v1.2 \
    --registry-login-server eshopramirobedoyaarc.azurecr.io \
    --ip-address Public \
    --location eastus \
    --registry-username eshopramirobedoyaarc \
    --registry-password ""
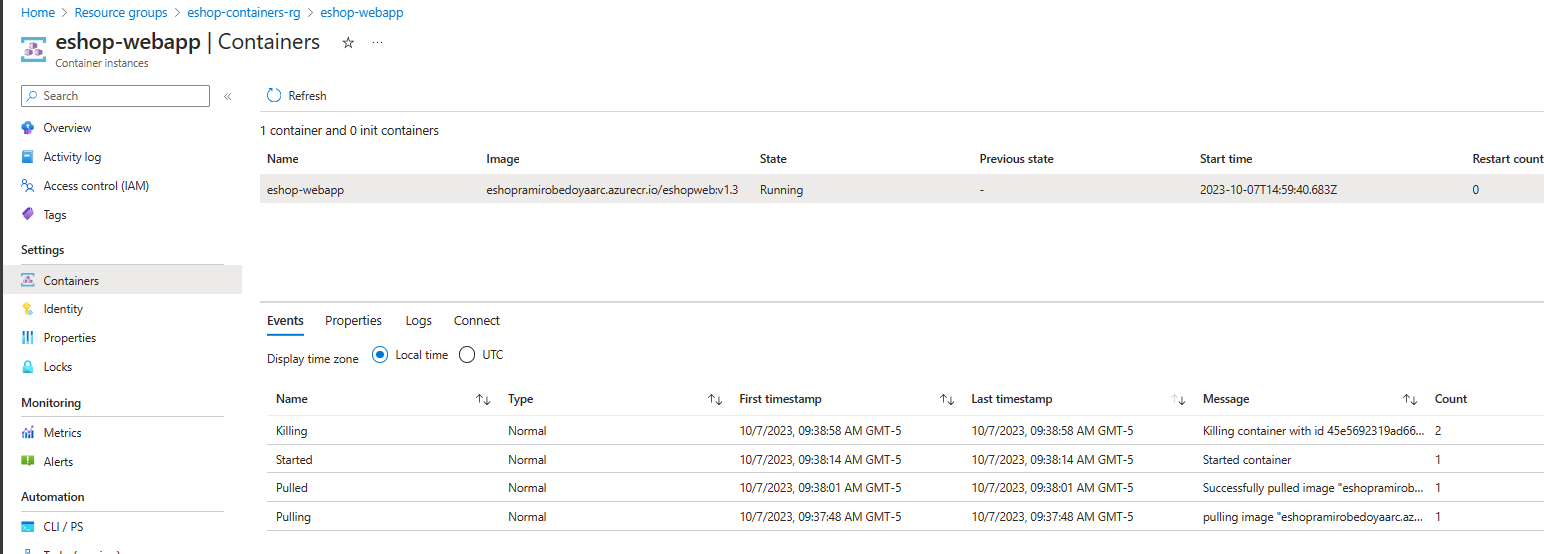
Use Azure Web App instead of Azure Container Instances
Remember, you can also create an Azure Web App with a container image from the Azure Container Registry. Azure Web App already contains SSL certificates and extra features like auto-scaling, etc.
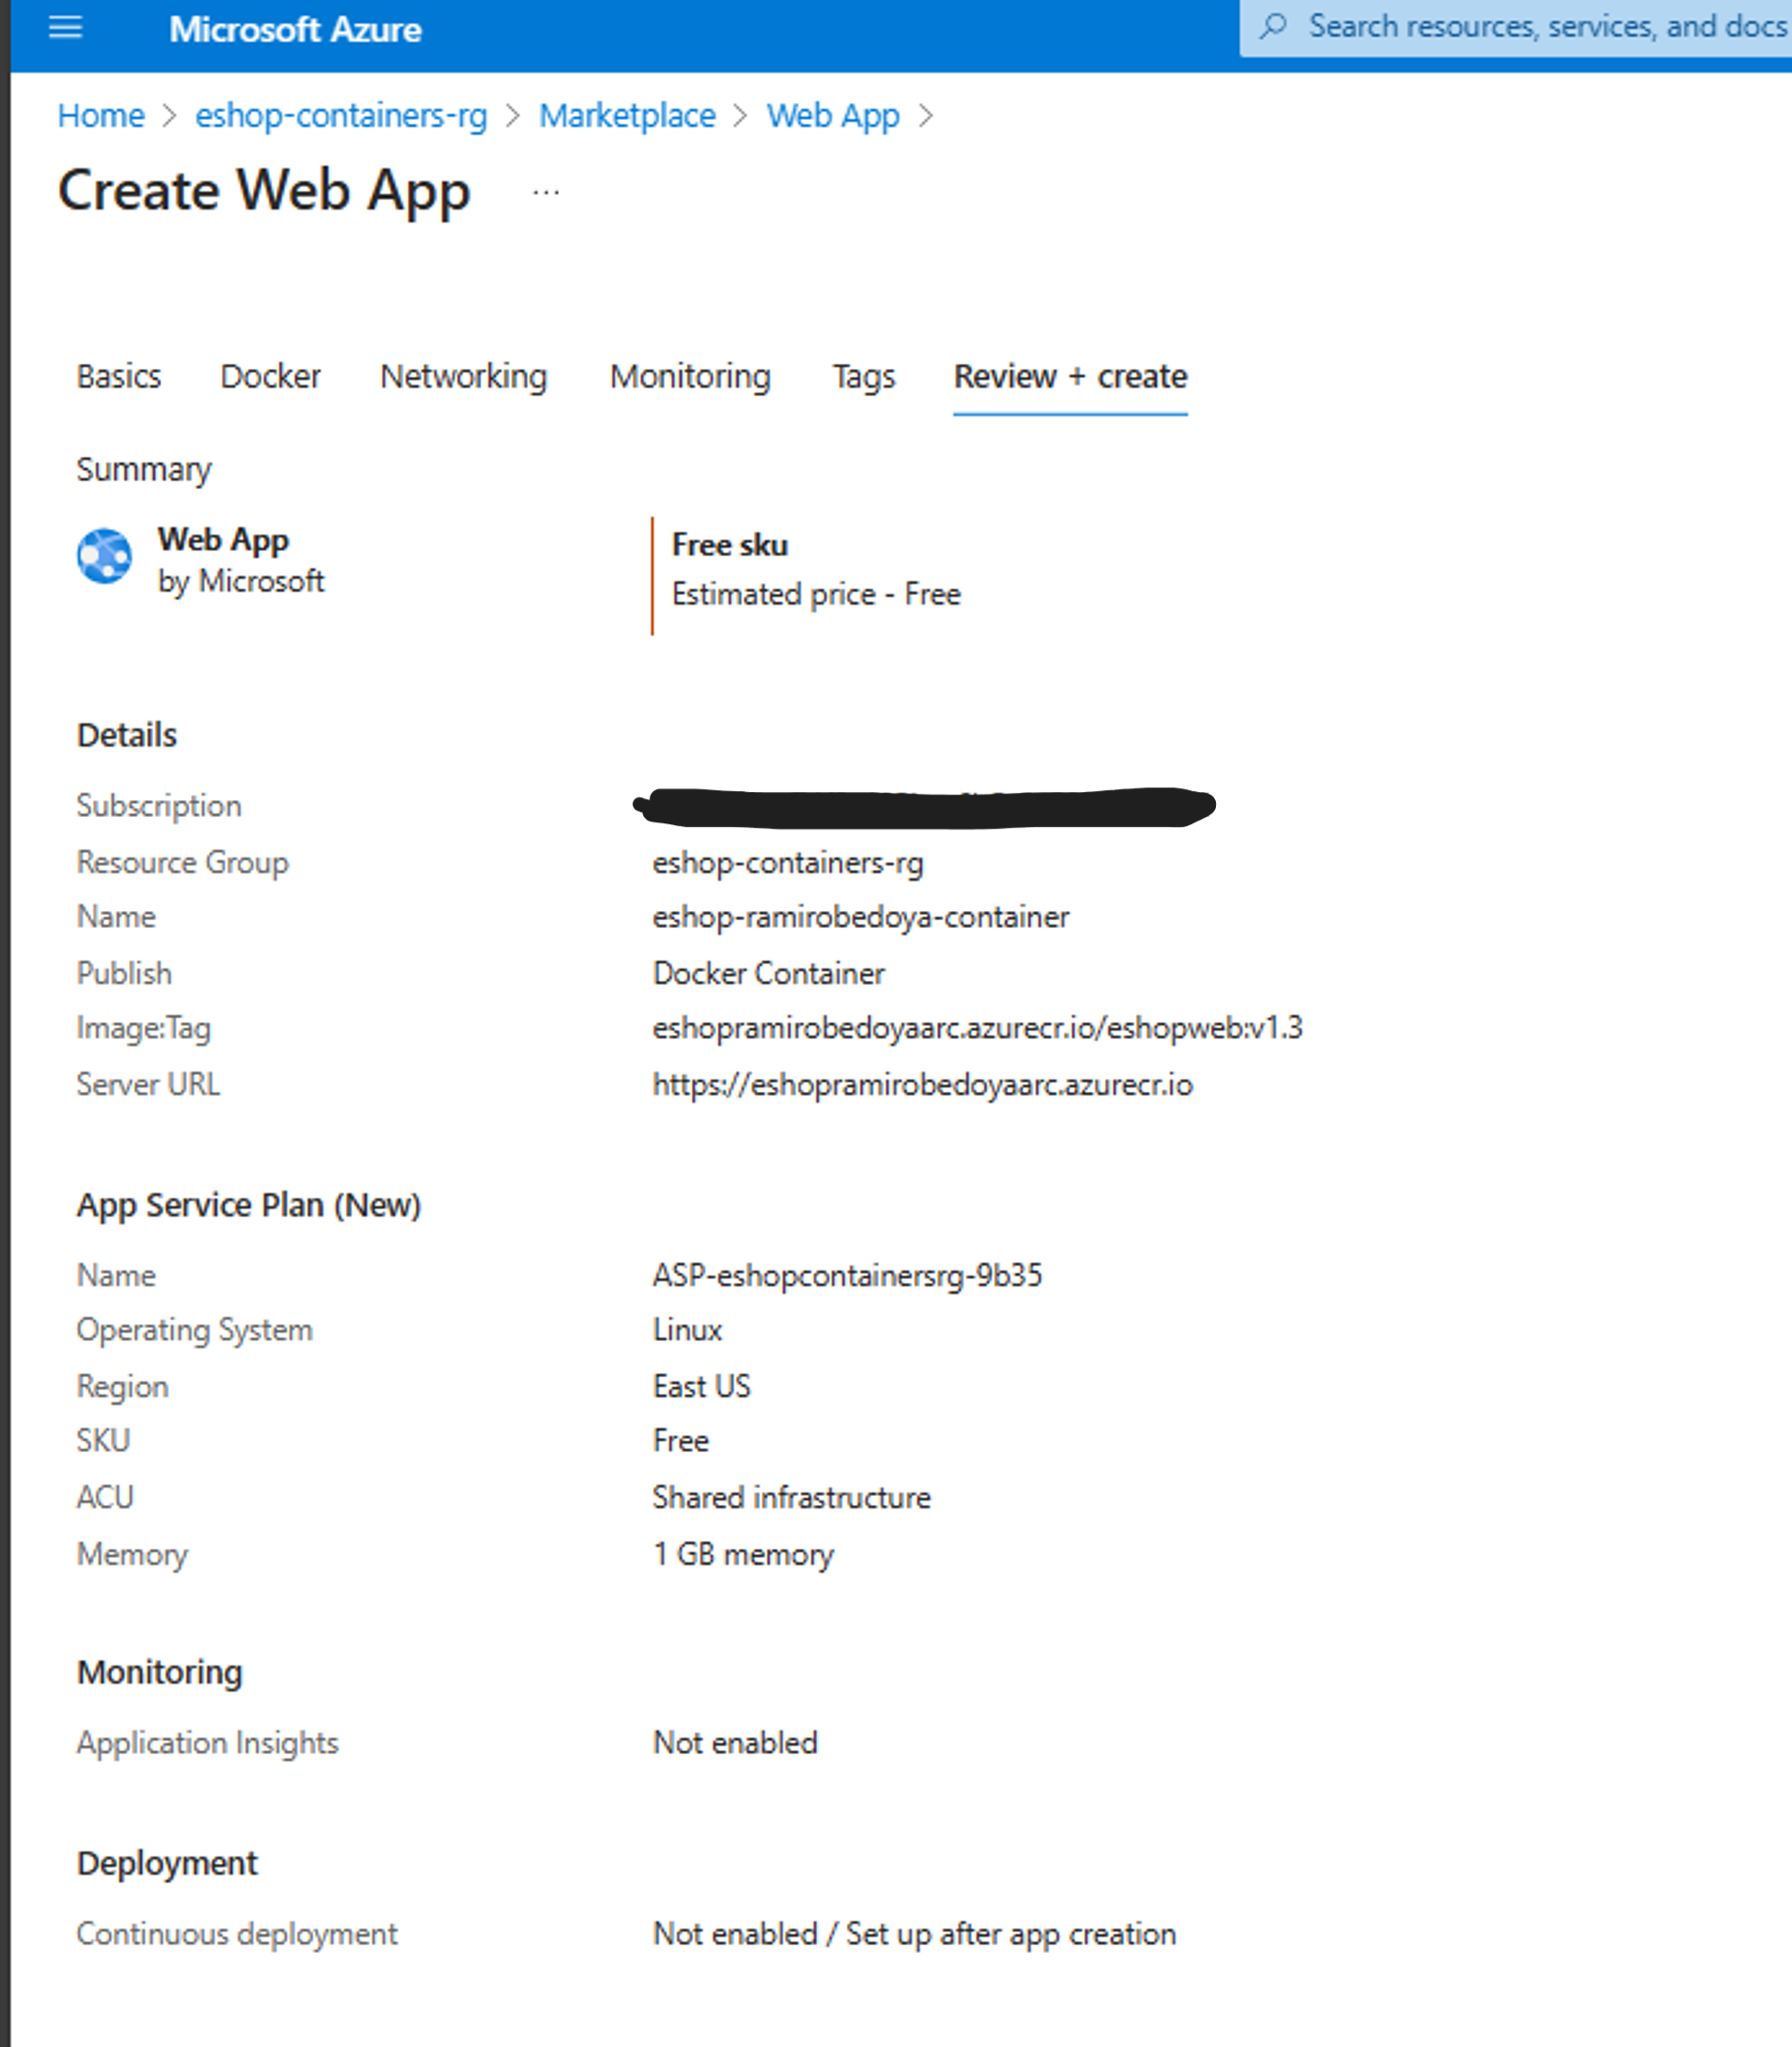
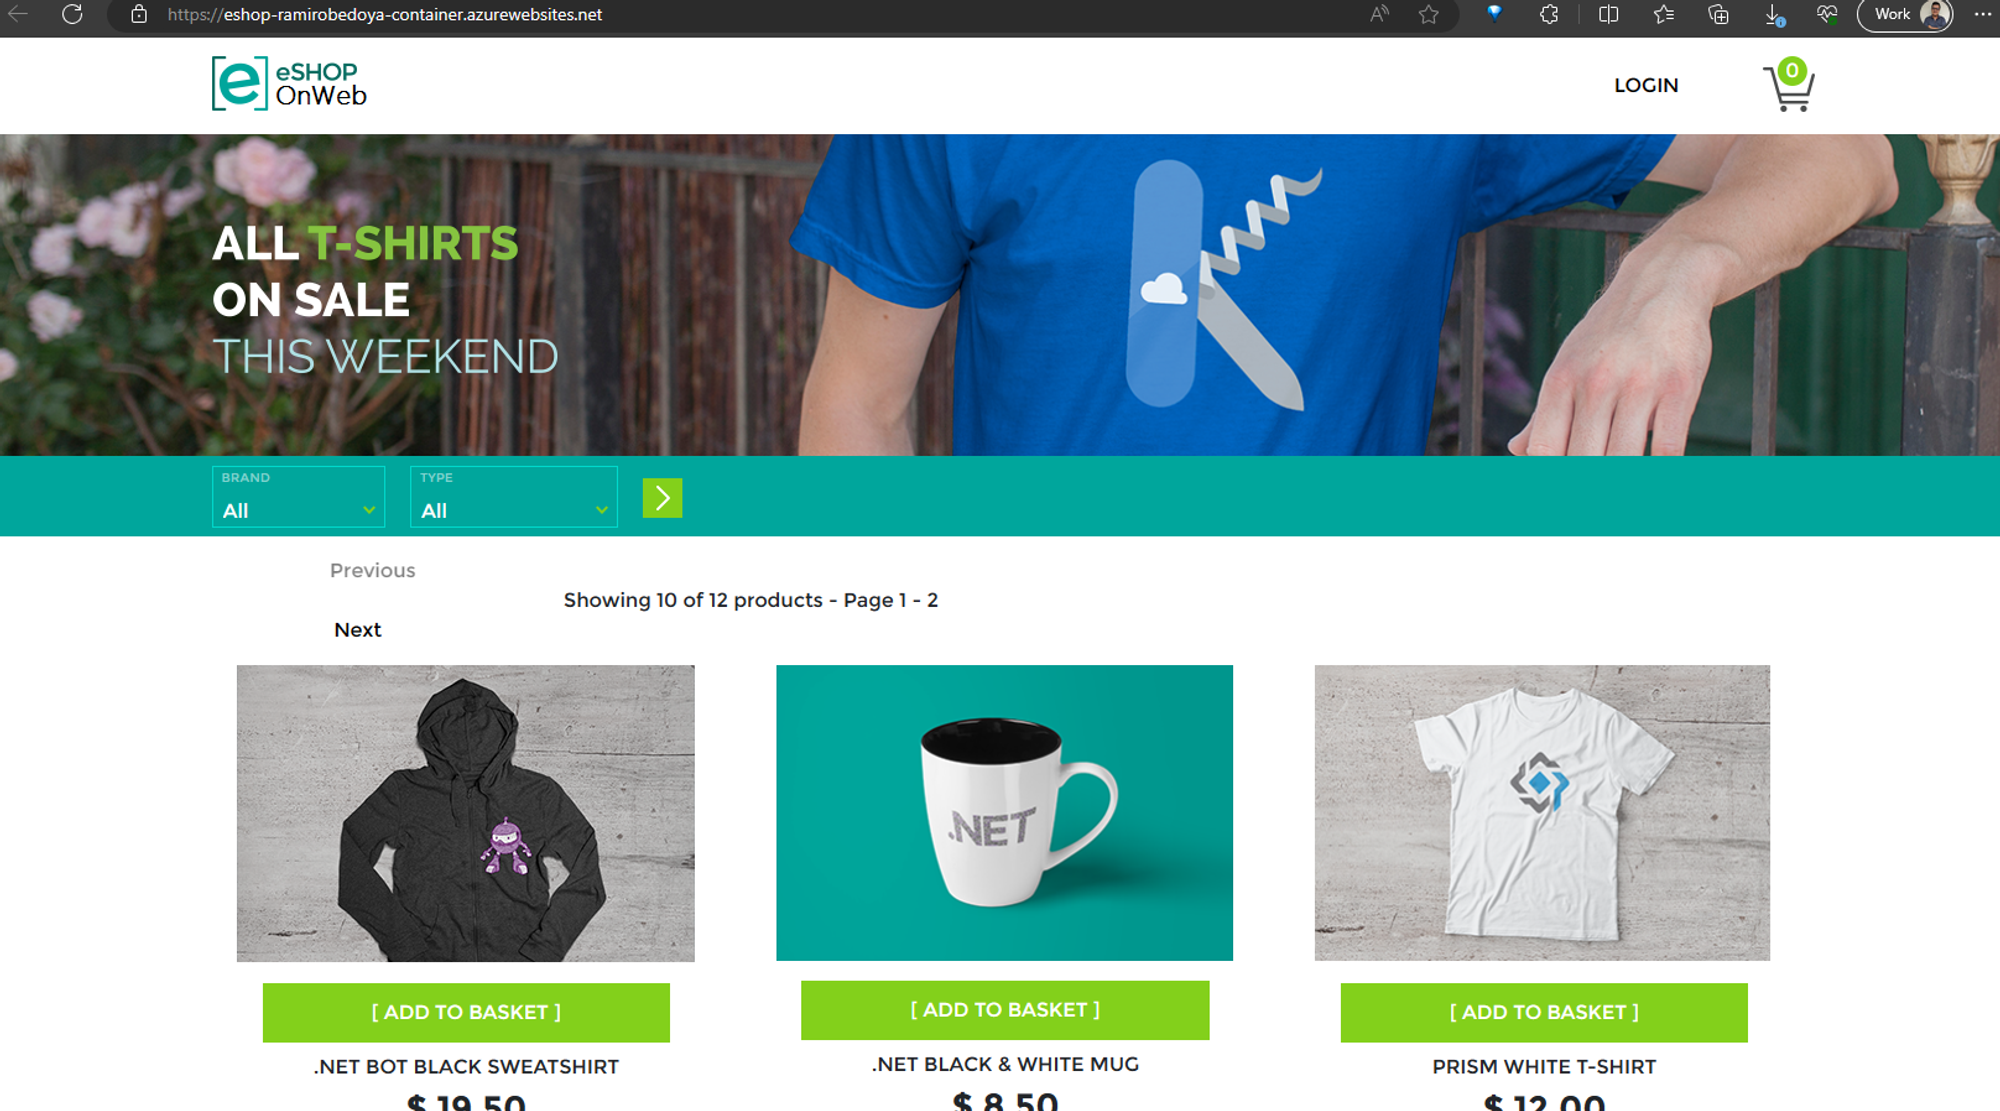
After you create it, simply click on the URL and you should see the eShopOnWeb application.
Continuous Deployment
Azure App Service supports continuous deployment using webhooks. A webhook is a service offered by the Container Registry. Services and applications can subscribe to the webhook to receive notifications about updates to images in the registry. A web app that uses App Service can subscribe to a Container Registry webhook to receive notifications about updates to the image that contains the web app. When the image is updated and App Service receives a notification, your app automatically restarts the site and pulls the latest version of the image.
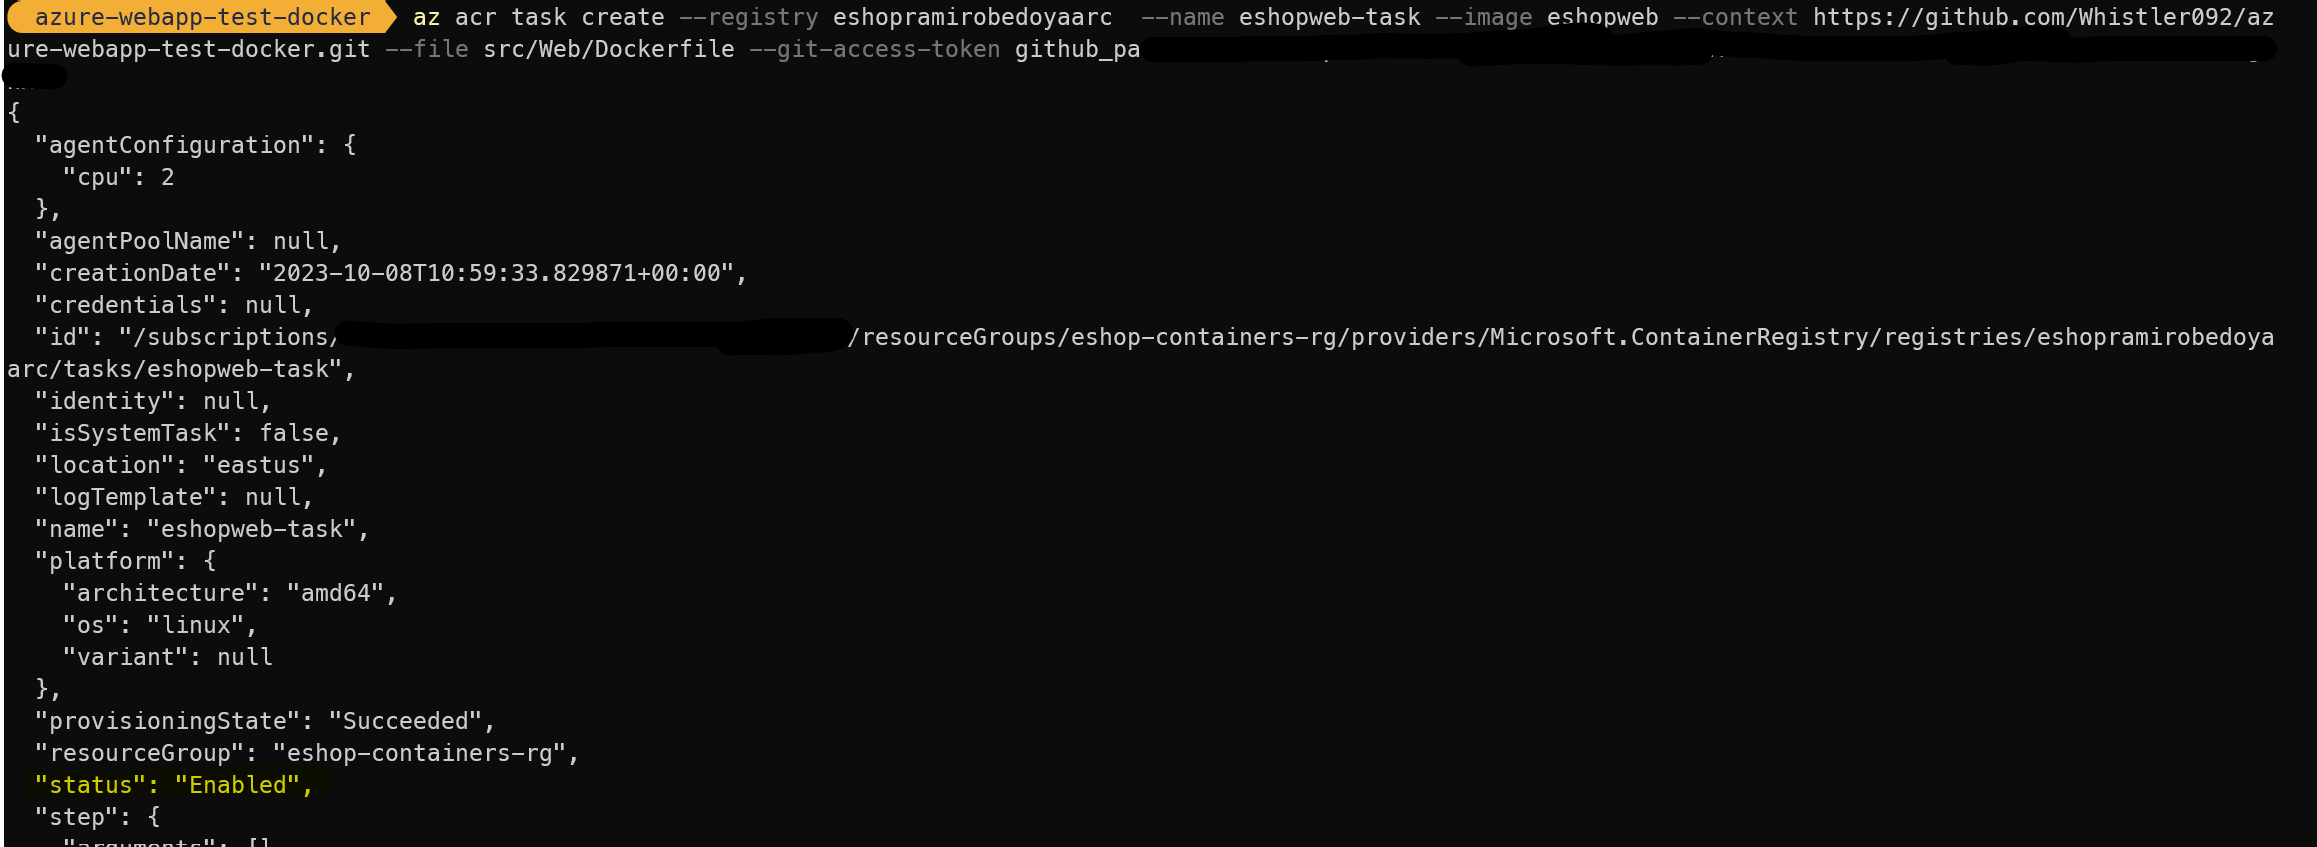
So, the Azure container Registry has a feature called tasks, which is going to rebuild your image whenever its source code changes automatically. You can configure it to monitor your GitHub repository that contains your source code and trigger a build each time it changes. Let’s check it out.
The following task is going to monitor the GitHub repository. So, I uploaded the eShopOnWeb into my private repository to be able to push whenever I want. So, each time a change is committed, the task builds the eshopweb docker image and pushes it to the Azure Container Registry.
Remember, you need to create a GitHub personal access token with permission to create a webhook in your repository. For private repositories, the token will also need full repository read permissions. To generate the token, you need to go here. Make sure to generate a token only for that repository. Then, copy the token and use it in the following command.
> az acr task create \
    --registry eshopramirobedoyaarc \
    --name eshopweb \
    --image eshopweb \
    --context https://github.com/Whistler092/azure-webapp-test-docker.git \
    --file src/Web/Dockerfile  \
    --git-access-token <access_token>
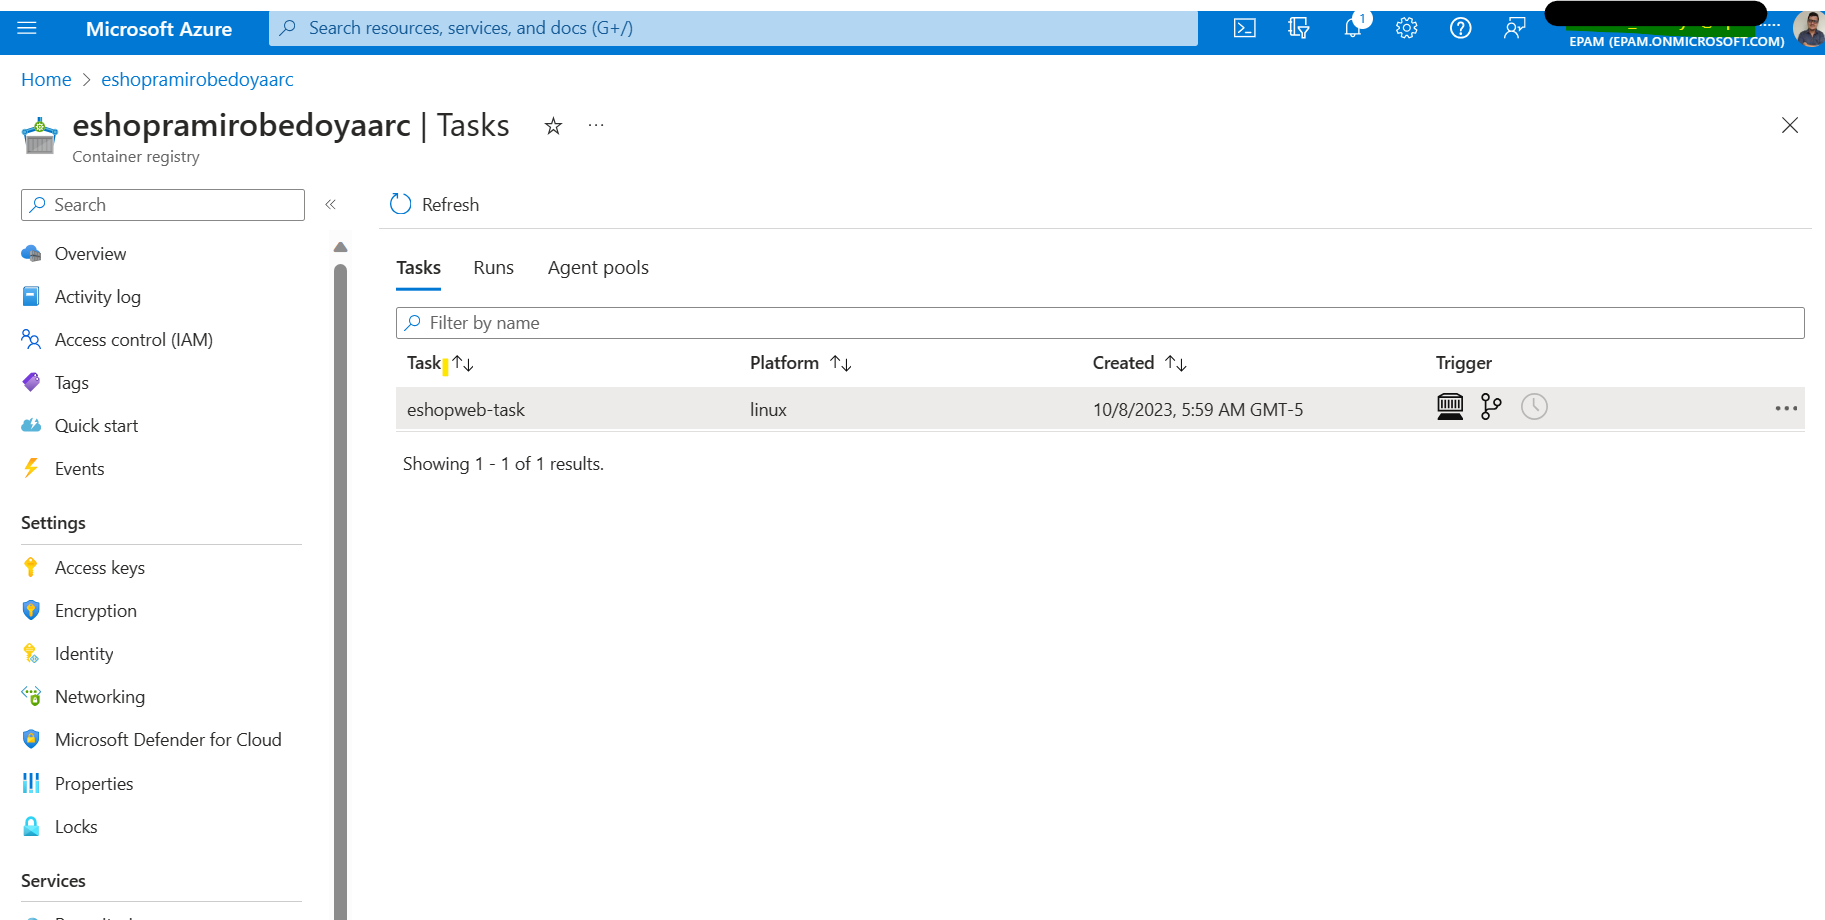
Now, let’s go to the Azure portal and set Continuous Deployment on the Azure Web App.
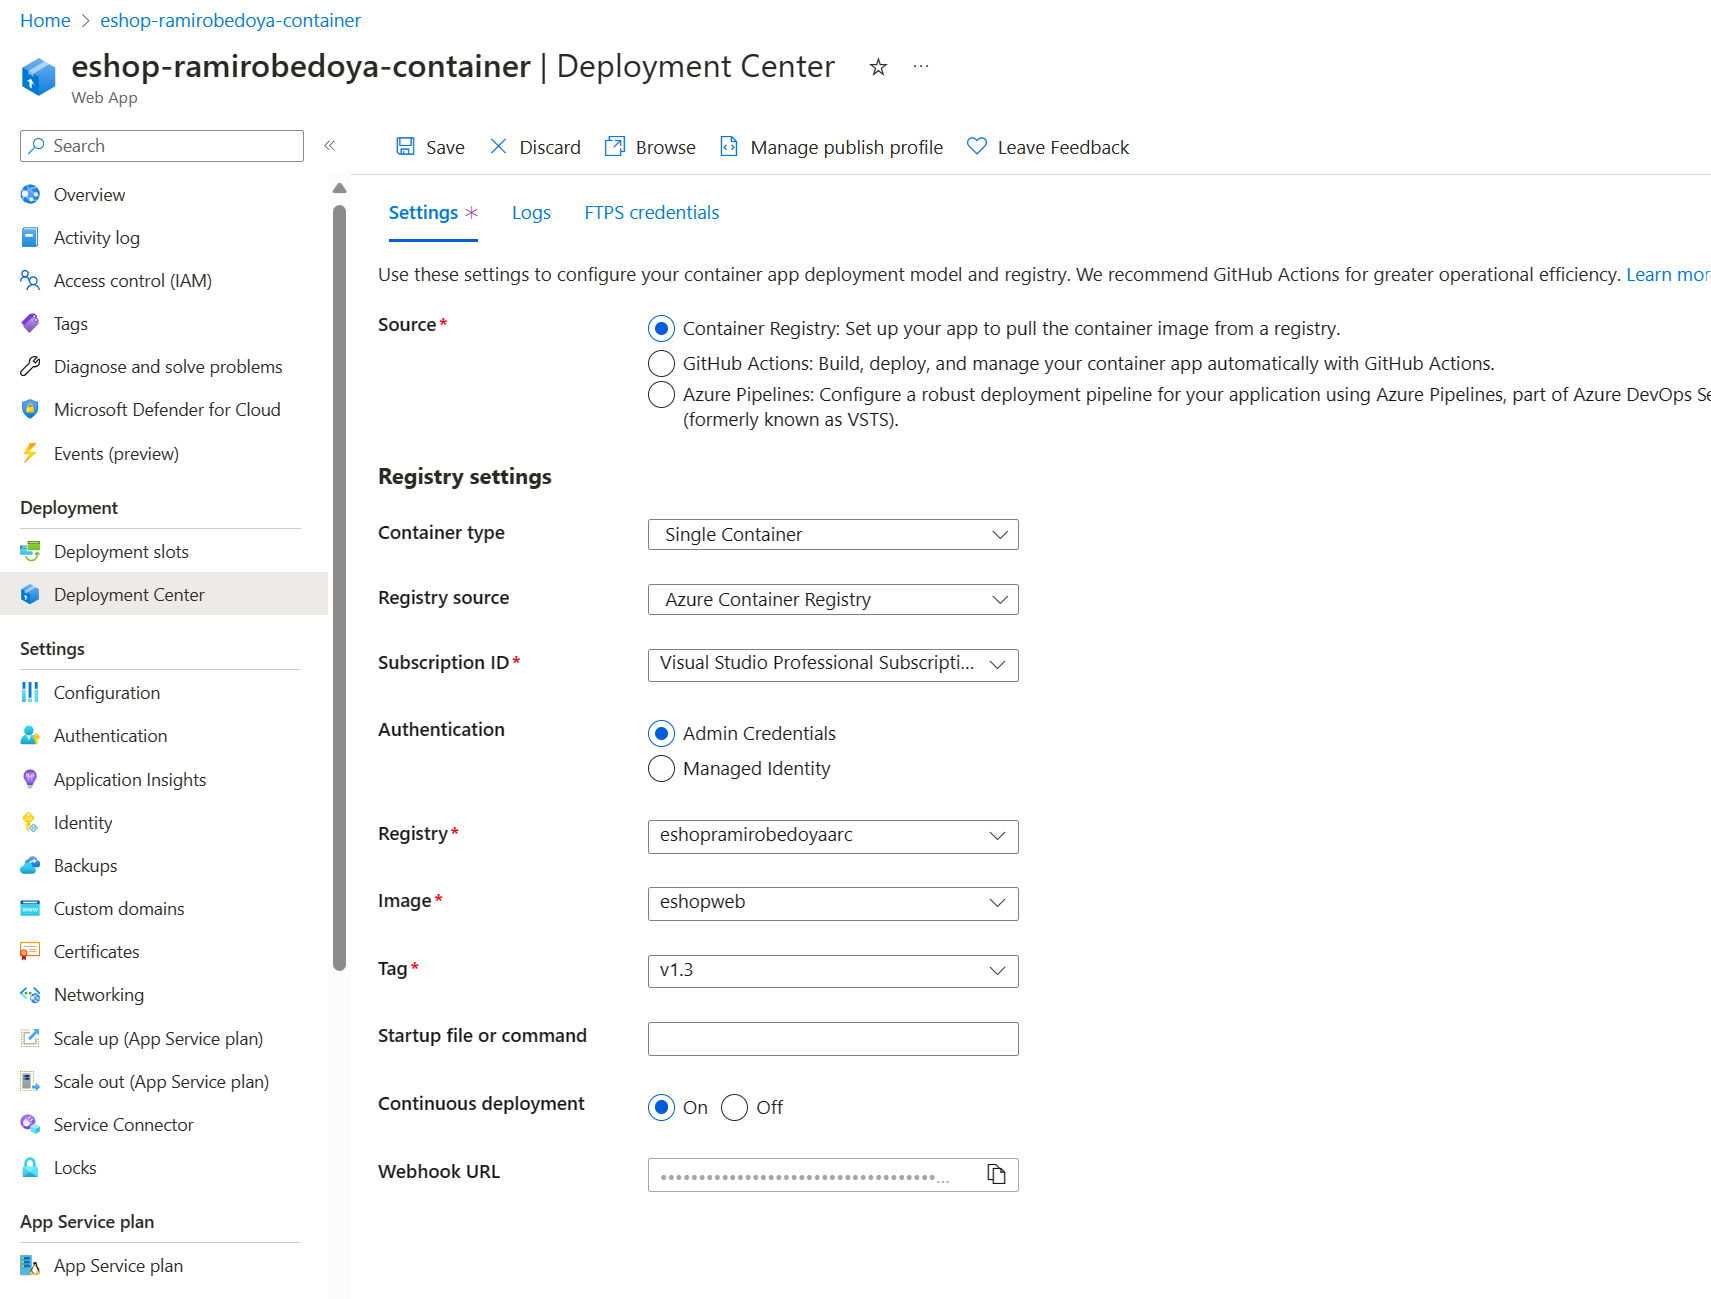
Let’s test!
Add a new commit.
And well, It did not work for me. I had to do a few things to make it work.

First, I had to delete the old task and then, I had to create a new task changing the tag of the image to latest. Then, the --context parameter was changed to the repository URL with the branch name. Additionally, the --file parameter was changed with the Dockerfile path starting with the ./src.... I don’t know why, but it worked. Finally, I had to recreate the --git-access-token in the classic way and since my repo was private, I had to select the scope for full repo control.
This documentation page help me a lot
> az acr task delete \
    --registry eshopramirobedoyaarc \
    --name eshopweb-task
> az acr task create \
    --registry eshopramirobedoyaarc  \
    --name eshopweb-task \
    --image eshopweb:latest \
    --context https://github.com/Whistler092/azure-webapp-test-docker.git#main --file ./src/Web/Dockerfile --git-access-token ghp_...
> az acr task run \
    --registry eshopramirobedoyaarc   \
    --name eshopweb-task
After recreating the task, I noticed the Azure Web App still points to the old v1.3 tag. So, I had to change it to the latest building image one more time to the Azure Container Registry.
> az acr build --registry eshopramirobedoyaarc \
    --image eshopweb:v1.2 \
    -f src/Web/Dockerfile .
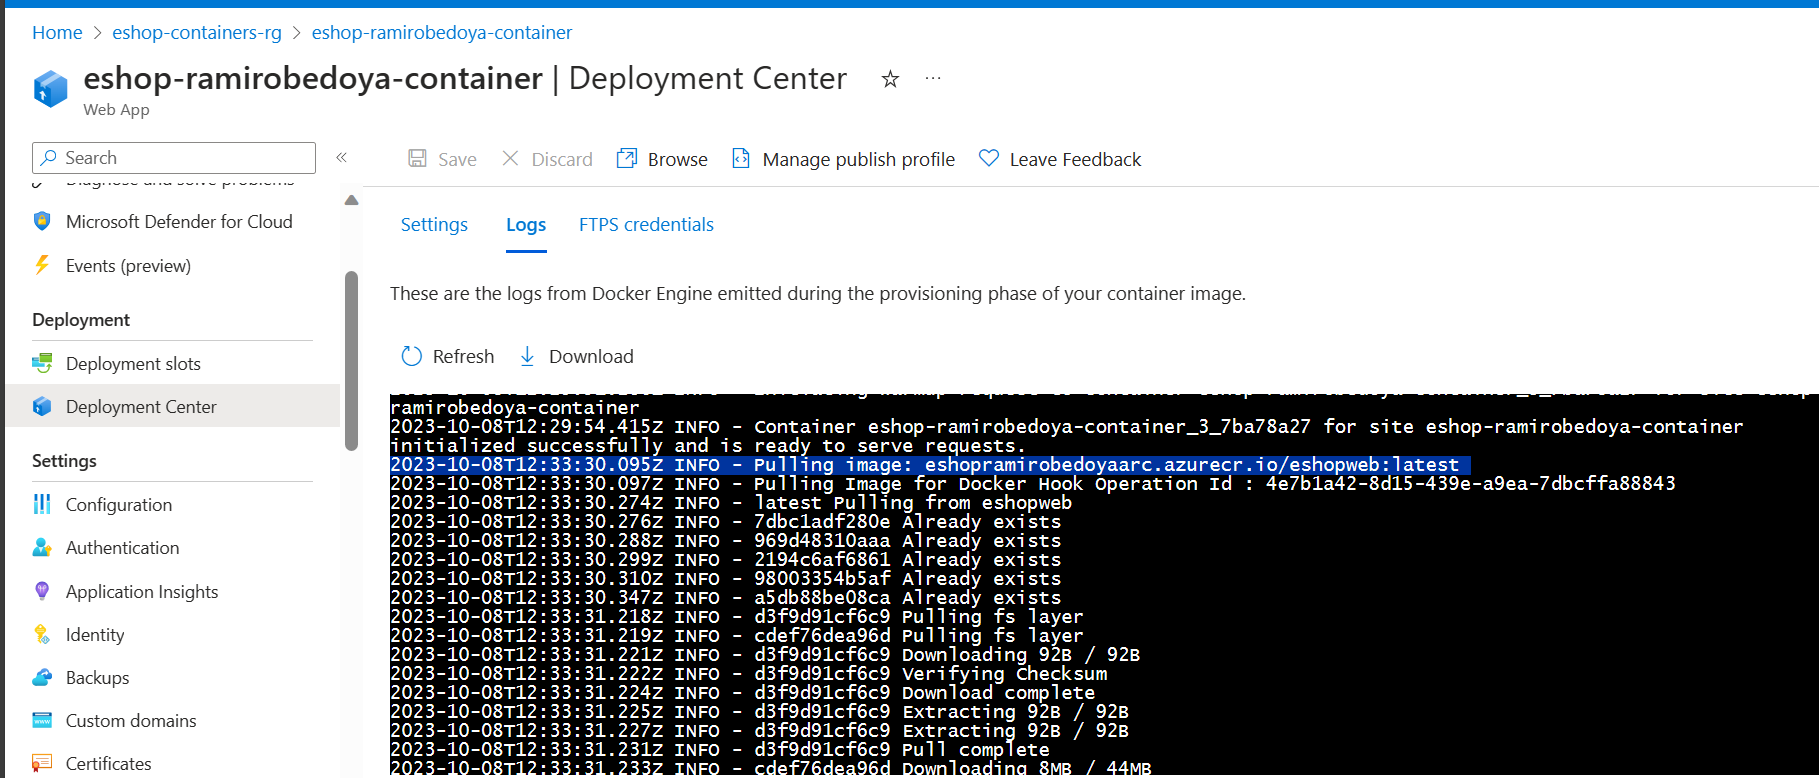
Finally, I navigate to the Azure App Service page, click on the Deployment Center, and change the tag to latest.
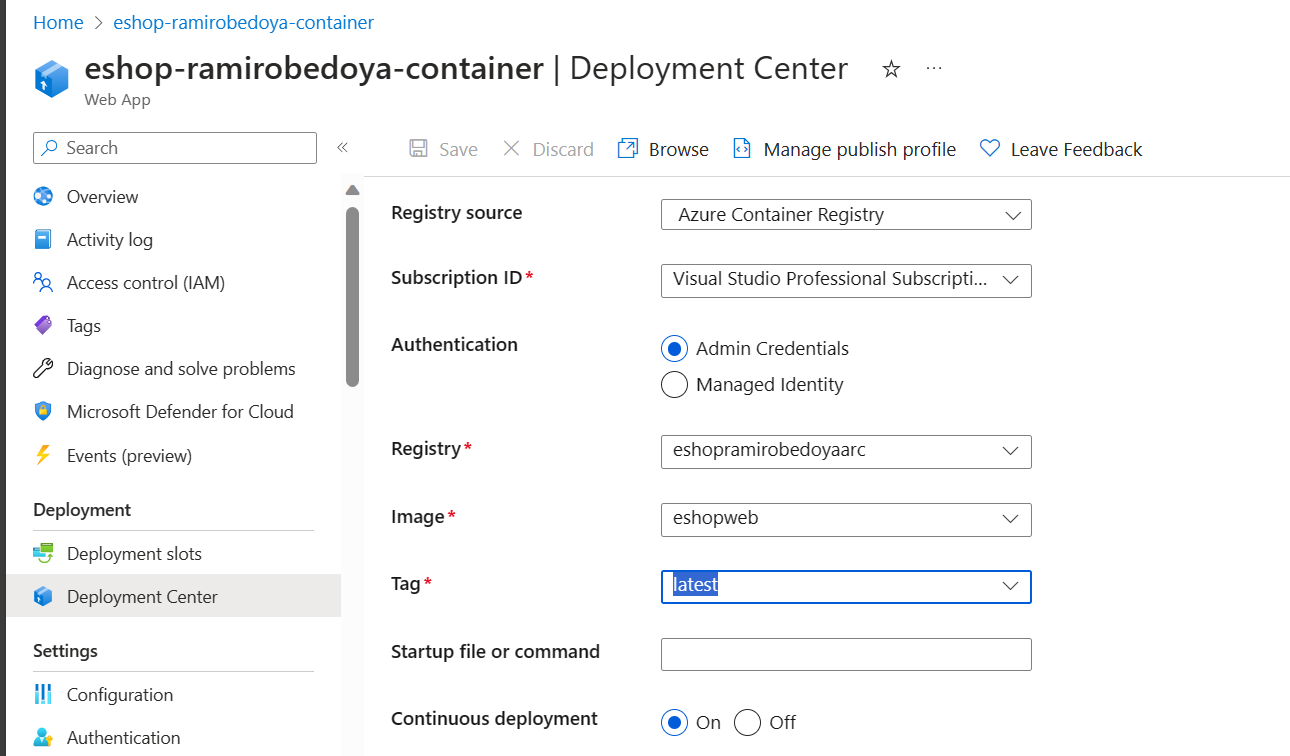
And now, it works!
I added a new commit and Github triggered the webhook configured by the Azure Container Registry task.
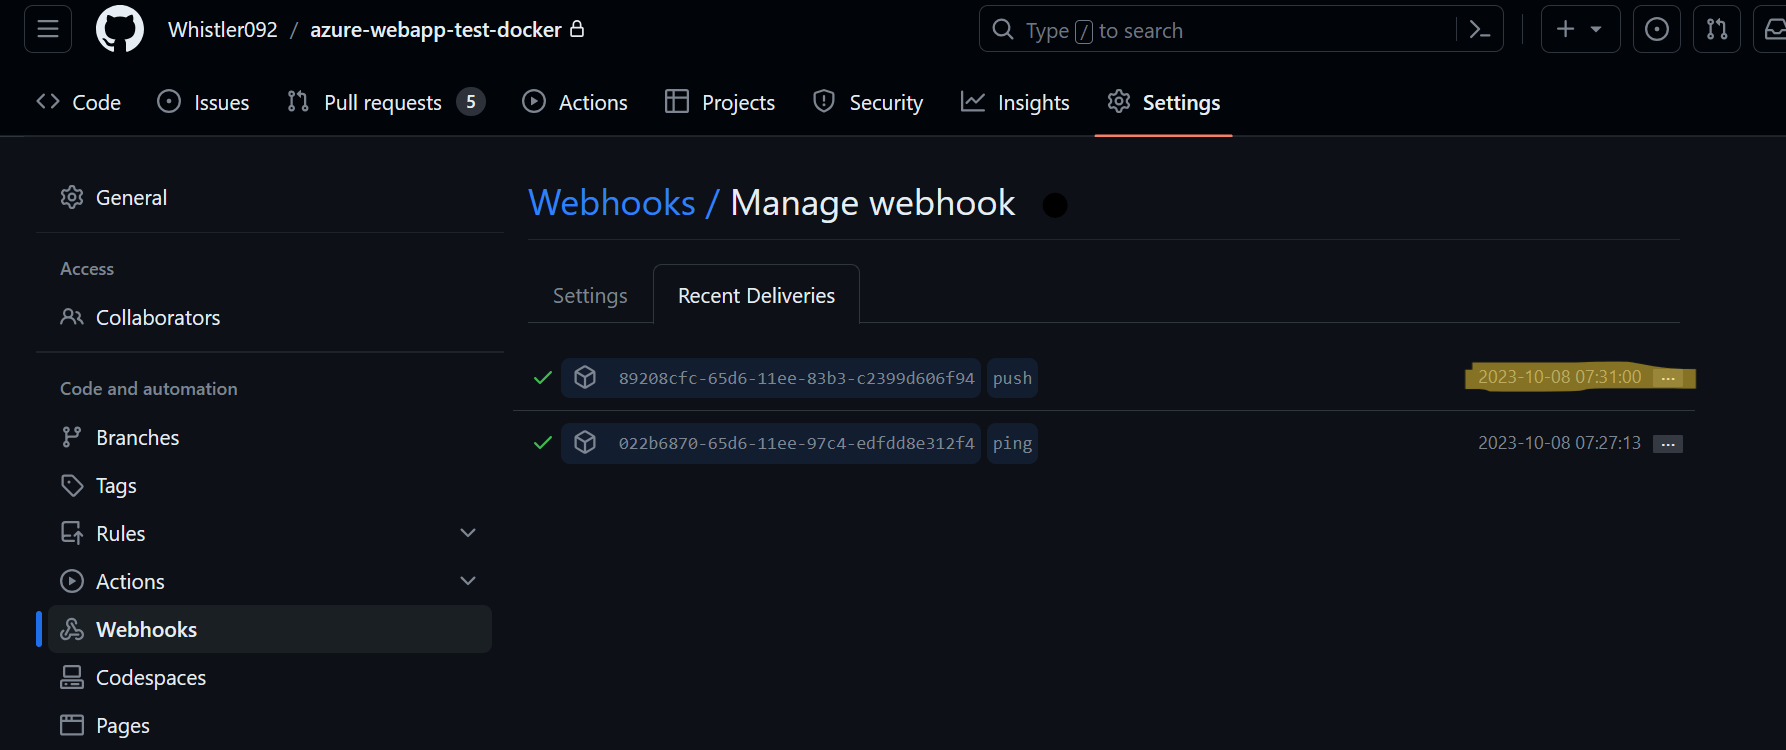
If we go to the Azure Container Registry, One minute later, we will see the latest pushed image.

And then, the Azure App service will update the image and restart the container.
Thanks for reading. I hope you find it useful.
❤️